Vortex Modifier
Summary
This modifier enables you to move particles to form a whirling vortex, making the creation of tornadoes, etc. very simple.
Please read the section 'How to use the Vortex modifier' before using it for the first time.
Interface
This modifier includes the following sections:
For the 'Groups Affected', 'Mapping', and 'Falloff' tabs, and for the buttons at the bottom of the interface, please see the 'Common interface elements' page.
Parameters
General quicktab
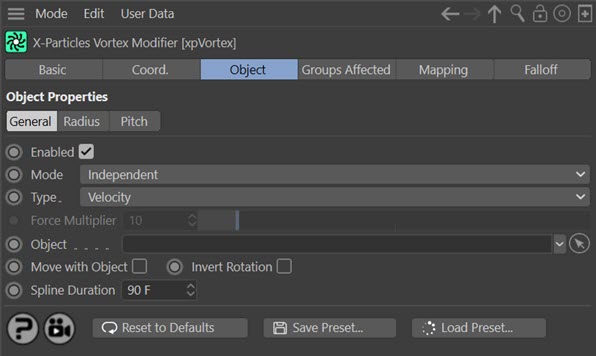
Enabled
Uncheck this switch to disable the modifier.
Mode
Independent [default setting]
In this mode, particles will be affected if they come into the field of effect of the modifier. X-Particle Actions have no effect on the modifier in this mode.
Action-Controlled
In this mode, the modifier will only act on a particle when told to do so by an Action. Until that point, the particle will not be affected, but once activated for a particular particle, the modifier will continue to influence it as long as it is in the field of effect of the modifier. The modifier's effect on a particle can be halted by means of another Action, if desired.
Type
This modifier has two modes of operation, which are controlled here. The options are:
Velocity
This is the default mode. Here, the modifier takes complete control of the particle movement and if you add another modifier which also influences particle speed and direction (e.g. Turbulence) you will find that it has little or no effect on the particle. This is the only mode that was available in X-Particles 3.5.
Force
In this mode the change in velocity caused by this modifier contributes to, but does not control, the final particle velocity. Adding a modifier such as Wind or Turbulence will also contribute to the final result. This is the mode to use if you want to add some other kind of movement to the particle as well as rotation.
Helix
This mode causes the particle to move in a perfect helix. You can control the radius and amplitude of the helix from the controls which appear when this mode is selected - see below.
Force Multiplier
If 'Type' is set to 'Force', this control becomes available. It enables you to change the strength of the 'Force' effect.
Object
If this field is clear, and you are emitting directly from an emitter rather than an object, the vortex axis is along the Z-axis of the emitter. If you drop an object into this field, the vortex axis will be along the Z-axis of the object in the field. If the object is not at the same location as the emitter, or has a different rotation, the particles will move in a (possibly large) circle around the linked object. This can be a useful effect if required.
If you are emitting from an object, it is recommended that you drop the emission object into this field. If you don't, the axis of the vortex will be along the Z-axis of the emitter. If the emitter is not at the same location as the emitting object, or has a different rotation, the particles will move in a (possibly large) circle around the emitter.
Move With Object
If you are emitting from an emitter (not an object) and you move the emitter, what happens? New particles are generated from the emitter position but existing ones stay where they are. This isn't very good if you want a tornado to move over the ground, so check this switch to make the existing vortex move with the emitter. In this case, make sure the 'Object' field is clear.
If you are emitting from an object, you can get the same effect with this switch but ensure that the 'Object' field contains the object you are emitting from.
Invert Rotation
If you are looking along the vortex axis from the emitter (or emitting object) the particles travel in a counter-clockwise rotation. To make it clockwise instead, check this switch.
Spline Duration
This is the length of time over which the radius and pitch splines extend. The longer the time, the more gradual the change in radius and/or pitch.
Helix Controls
When 'Type' is set to 'Helix', the interface changes to this:
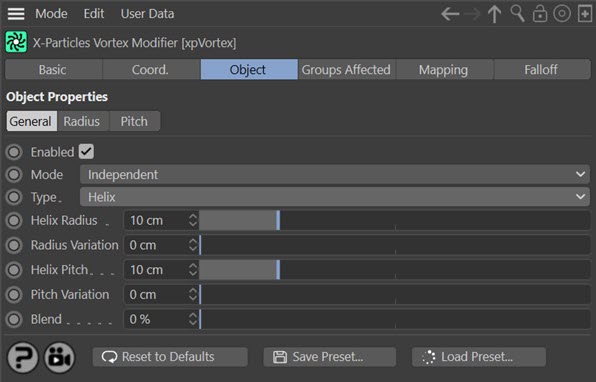
With this mode, the particles move in their own individual helix pattern.
Helix Radius
This parameter sets the radius (i.e. the amplitude) of the helix.
Radius Variation
With this setting you can add variation to the radius for different particles.
Helix Pitch
This sets the pitch (i.e. the wavelength) of the helix.
Pitch Variation
With this setting you can add variation to the pitch for different particles.
Blend
This setting lets you blend the particle's current direction of movement with that calculated for movement in a helix. You can use this to blend the helix effect with movement generated by other modifiers. To do that, make sure that the helix is the lowest of all the modifiers in the object manager. Modifiers are carried out for each particle in the order found in the object manager, so this will let other modifiers (such as Wind or Turbulence) alter the particle movement, then apply a helical component to the result.
If you blend modifiers like this, note that:
- the 'strength' setting, if there is one, of the other modifiers may need to be increased
- the 'Blend' setting in this modifier may need to be turned up to a high value - perhaps 80% or higher
- blending is unlikely to work with modifiers which force the particle to follow a certain direction, such as the Follow Spline modifier
If the value is set at 0%, there is no blending and the helix takes over completely. At 100% there is no helical effect at all and the existing direction is followed without change.
Radius quicktab
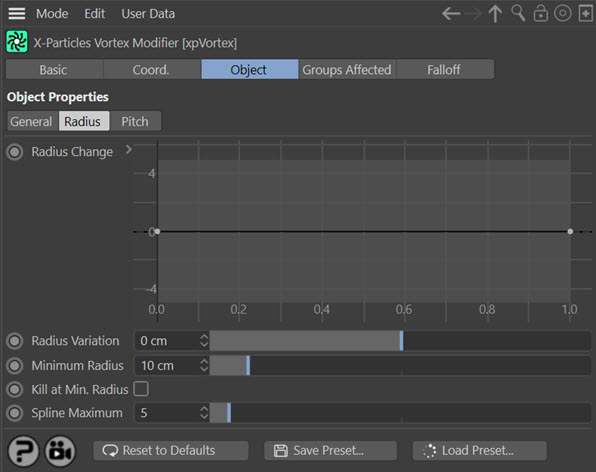
Radius Change
This spline governs the rate of change of the vortex radius. It is not an absolute setting for the radius - see 'How to use the Vortex modifier' below.
Radius Variation
Adding variation to the change in radius will add some 'thickness' to the vortex and make it more realistic.
Minimum Radius
If you reduce the radius using the spline, you can set this value, which is the minimum radius the vortex can have. Note that if set to zero, the particles will never start to expand outwards after being generated.
Kill at Min. Radius
If checked, this switch will cause the modifier to kill any particles which reach the minimum vortex radius.
Spline Maximum
This is the maximum value allowed by the spline. You can change it to allow larger values if required.
Pitch quicktab
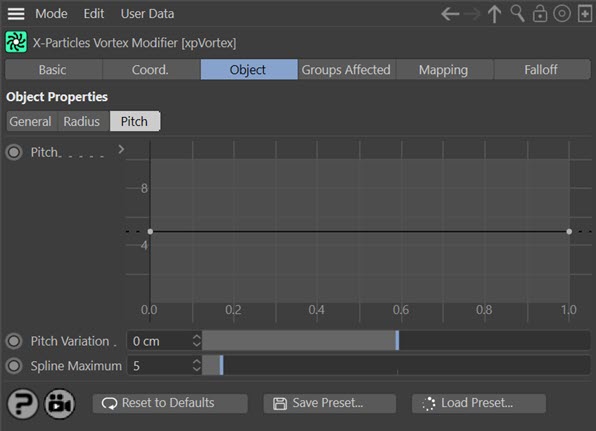
Pitch
This spline governs the pitch of the vortex - how fast the particles move along the axis of the vortex. Unlike the radius spline, this is an absolute setting.
Pitch Variation
This setting enables some variation to be added to the pitch for each particle.
Spline Maximum
This is the maximum value allowed by the spline. You can change it to allow larger values if required.
How to use the Vortex modifier
The emitter
How you emit particles will have a major effect on the result. For a nice vortex, try emitting from an emitter with a Circle shape, and turn on 'Ring Only' in the emitter so that particles only emit from the edge of the circle. You could also try emitting from a Disc primitive with a wide Inner Radius to give a thin ring of polygons; that will give some 'thickness' to the vortex.
Very important: the axis of the vortex is along the Z-axis of the emitter! If you are emitting from an object, it will still be along the Z-axis of the emitter unless you drag the object into the 'Object' field of the modifier. Then the object's Z-axis is used for the axis of rotation.
Therefore, if you are emitting from an object, we recommend that you do the following:
- make sure the Z-axis of the object is pointing in the correct direction - that is, the direction of the particle stream
- drag the object into the 'Object' field of the modifier - then the orientation and position of the emitter do not matter
If you find that the particles are rotating around the wrong axis, make sure that the axis of rotation (i.e. the object's axis) is aligned correctly and that the modifier is linked to it. The object's Z-axis should point along the initial direction of travel of the particle stream.
Movement of particles
The default behaviour of the modifier is to move the particles in a circle. That's not very exciting because for a tornado you want the particles to travel in a spiral shape. To get the shape you want, the modifier has two controls, Radius and Pitch.
Effect of Radius
The Radius control determines how fast the radius of the circle the particle is travelling around increases over time. The Radius Change spline control is used for this. The default setting is to return a constant value of zero. This does NOT mean that the radius of the circle is zero, it means that there is zero change in the radius over time. Left like this, the particles will always travel in a circle.
To make the particles expand their radius to produce a typical vortex cone shape, set the spline to return a positive value. If set to always return 1, for example, the radius will increase by 1 scene unit per frame. This is a very gentle change but a value of 5 will increase the radius dramatically. You can have different rates of change at different times by adding more spline points and/or changing the spline point tangents. For example you might set the value at the start to be 5, then later on change to zero. Remember, this won't give a radius of zero, it will stop the from radius increasing. You can have negative values in the spline to shrink the radius over time; if you do that, you can use the 'Minimum Radius' setting to prevent the vortex radius from shrinking right down to zero, if you need to.
Effect of Pitch
The Pitch is how fast the particles move along the axis of the vortex. A value of zero will result in the particles moving only in a circle (the radius of which is set, or changed by, the Radius controls).
Higher values make the particles move faster. Again, you can use the Pitch spline control to adjust the speed, so you can have fast movement at the start and slow at the end.
Getting the exact shape you want will probably take some trial and error. When you do, you might want to save it as a preset so you can easily recreate it.