Cover/Target Modifier
Summary
In Cover/Fill mode, this modifier causes the particles to either coat the surface, or fill the volume, of another object. Once the object is coated/filled, the particles will stick to it and will move with the object if the object is moved during an animation. In Target mode, the particles will head for the Target object (if 'Attract' is selected) or be repelled from it. They will never stick to the object in this mode.
Interface
This modifier has the following sections:
For the 'Groups Affected', 'Mapping', and 'Falloff' tabs, and for the buttons at the bottom of the interface, please see the 'Common interface elements' page.
Parameters
General quicktab
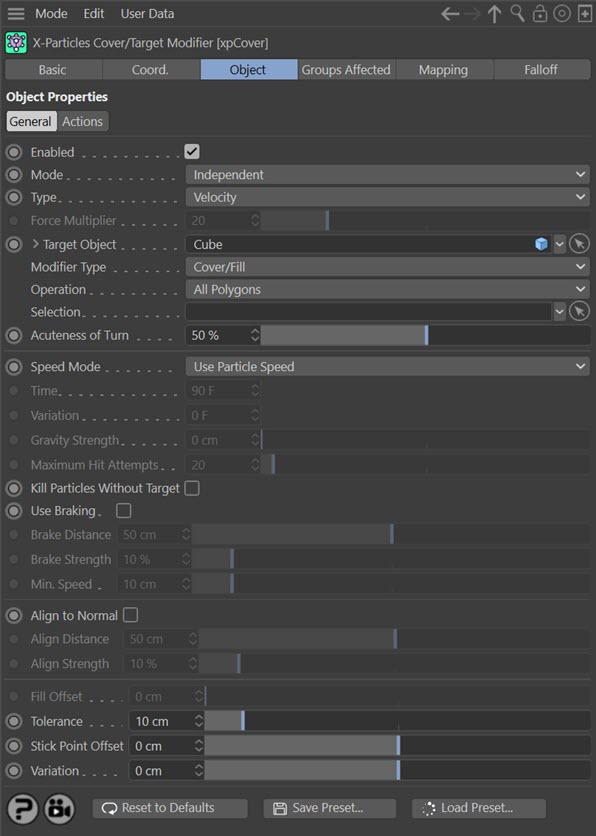
Enabled
If this button is unchecked, the modifier will be disabled (inactive).
Mode
Independent [default setting]
In this mode, particles will be affected if they come into the field of effect of the modifier. X-Particle Actions have no effect on the modifier in this mode.
Action-Controlled
In this mode, the modifier will only act on a particle when told to do so by an Action. Until that point, the particle will not be affected, but once activated for a particular particle, the modifier will continue to influence it as long as it is in the field of effect of the modifier. The modifier's effect on a particle can be halted by means of another Action, if desired.
Type
This modifier has two modes of operation, which are controlled here. The options are:
Velocity
This is the default mode. Here, the modifier takes complete control of the particle movement and if you add another modifier which also influences particle speed and direction (e.g. Turbulence) you will find that it has little or no effect on the particle. This is the only mode that was available in X-Particles 3.5.
Force
In this mode the change in velocity caused by this modifier contributes to, but does not control, the final particle velocity. Adding a modifier such as Wind or Turbulence will also contribute to the final result. This is the mode to use if you want to add some other kind of movement to the particle as well as rotation.
Force Multiplier
If 'Type' is set to 'Force', this control becomes available. It enables you to change the strength of the 'Force' effect.
Target Object
To use this modifier, first drag an object into the link field ‘Target object’. There are some restrictions on what you can put here:
- the object must either be a polygon object, or a spline, or a Cinema 4D primitive object or spline
- it must be alone and not in an object hierarchy (e.g. placing the object inside another object will give incorrect results)
- you can use an Extrude, Lathe, or Sweep object as the object to be covered/filled
- it cannot be in a generator such as a Subdivision Surfaces object or a Mograph cloner or an Array object
- you CAN add a deformer to the object to be covered/filled, even ones such as the Explosion deformer!
- if you use any of the the ‘Object Vertices’ modes (see below) you can even animate a deformer attached to the object and the particles will move to follow the deformed object
Once you have selected your object, you can in some circumstances also drag a selection tag into the ‘Selection’ link field. This is only used in the ‘All Polygons’ or ‘Object Vertices (Random)’ modes described below.
Modifier Type
This can be either Cover/Fill or Target. In Cover/Fill mode, the modifier causes the particles to either coat the surface, or fill the volume, of another object. Once the object is coated/filled, the particles will stick to it and will move with the object if the object is moved during an animation. In Target mode, the particles will head for the Target object (if 'Attract' is selected) or be repelled from it. They will never stick to the target object in this mode.
Operation
This drop-down menu determines how the modifier works. There are several options:
All Polygons
In this mode, all the polygons of the target object will be used as possible targets for a particle to stick to their surface. A polygon selection tag may be used to define which polygons will be used. Point selection tags can also be used but the selection will first be converted to a polygon selection.
Visible Polygons (Using Normals)
Only those polygons which are “visible” to the particle will be targets for particles. Whether a polygon is visible is defined by the surface normal of the particle. If the normal points away from the particle at an angle of less than 90 degrees, it is said to be visible; if not, it is not visible and that polygon will be ignored. This method may, depending on the object, result in some polygons being coated when they are not truly visible from the position of the particle. However, this mode is much faster than the alternative mode described next. Polygon and point selection tags cannot be used in this mode.
Visible Polygons (Using Rays)
This is the same as the previous option but fires an invisible ray from the particle to try to hit a polygon in the object. This method is more accurate but slower than ‘Visible Polygons (Using Normals)’.
Nearest Surface Point
The particle will find the nearest point on the object's surface and use that as the target. If you select this option, the interface is updated to show these parameters:

'Selection' is explained below.
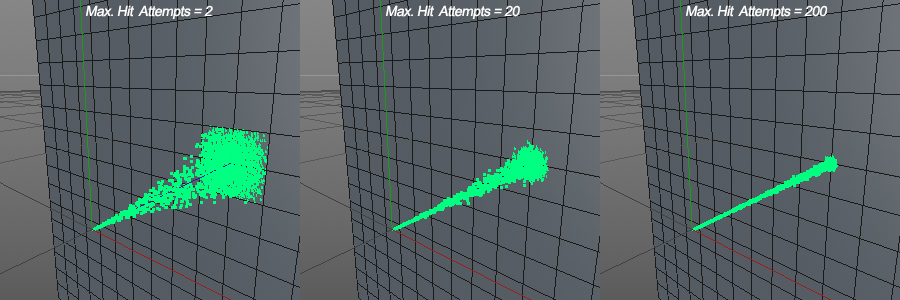
The way this mode works is that the modifier first finds the closest polygon to the particle, then samples that polygon repeatedly to find the closest point. The problem with this is that any polygon has an infinite number of surface coordinates to test in order to find the closest one. Testing them all would take an infinitely long time, so the modifier has a limit on the number of samples it can take. Once that is done, the closest one found is used.
This limit can be changed and is found in the 'Maximum Hit Attempts' setting. The higher this value, the more accurate the modifier is to finding the closest point, but the longer it takes to test that many points. As usual, it is a trade-off between speed and accuracy. Note also that the more polygons you have in the mesh the more accurate the result for any given number of attempts, since the individual polygons are smaller.
These screenshots show the effect of increasing the hit attempts on particle scattering:
Threshold
To explain this setting, imagine a particle which has the same distance from multiple polygons. Which polygon should be tested to find the closest point? if only the first one of these 'closest polygons' is tested, the same polygon will always receive the particle. If this value is greater than zero, the modifier will randomly choose all polygons whose distance from the particle is within this limit from the first closest polygon found. In this first animation, the threshold is at its default value:
This is technically correct - the nearest point lies between the two polygons shown. But the hard cut-off between the two adjacent polygons may be undesirable. Increasing the threshold to 2% gives this:
This is a much better effect. Often, the threshold value can be kept very small, and if it is too large in relation to the polygon size, you may see other polygons being included which should not be.
Repeat Sample
If this switch is unchecked, the closest point is only determined once, when the particle first enters the modifier's field of effect. But if the target object is moving or rotating, after a while another polygon may be closer to the particle. Checking this switch will find the closest surface point every frame, in case it has changed. This will, of course, slow down the animation.
Object Vertices (Random)
Instead of polygons, the object’s vertices are used as targets for the particles. A point selection tag may be used to define which vertices are used. Polygon selection tags are first converted to a point selection, where possible. In this mode you can animate deformers attached to the target object and the particles will move with the vertices of the deformed object. In the current version this will work for most deformers but not the Cinema 4D Displace deformer or the X-Particles Particle deformer.
Object Vertices (Ordered)
This mode also uses the object's vertices as targets. However, in 'Object Vertices (Random)' the vertices are selected randomly, as the name implies. For objects with a lot of points, this could mean that not all points receive a particle, while some points receive multiple particles. 'Object Vertices (Ordered)' guarantees that each vertex will will receive a particle, provided you emit enough particles of course. It works by assigning the first particle emitted to the first point in the object, the second particle to the second point, and so on.
In this mode you can animate deformers attached to the target object and the particles will move with the vertices of the deformed object. In the current version this will work for most deformers but not the Cinema 4D Displace deformer or the X-Particles Particle deformer.
You can use this mode to assign one, and only one, particle to each vertex. You would first work out the number of points in the object, then limit the number of emitted particles in the emitter (e.g. by limiting the maximum number of particles, or by using shot emission or pulse emission with an interval longer than the scene length) then use this modifier to allocate one particle per vertex. You can use the 'Get Count From Object' feature of the emitter to limit the number of particles to the number of vertices in an object automatically.
Object Vertices (Ordered, Random)
This is the same as 'Object Vertices (Ordered)' except that instead of each vertex in the object being covered by a particle in vertex order (i.e. point 1 gets the first particle, point 2 the second particle, and so on) the vertices are covered in random order. But each point will still receive one particle until all the points are covered.
Nearest Vertex
This works in the same way as 'Nearest Surface Point' option but the target is the nearest vertex to the particle. Note that the 'Threshold' setting is not necessary and therefore not available, but you can still use the 'Repeat Sample' switch.
Object Volume
All the previous options stick particles to the surface of an object. This option causes the object to be filled with particles. Selection tags cannot be used in this mode.
Texture
In this mode, you can use a texture to control the covering of an object by particles. If you select this option, the following section of the interface appears:
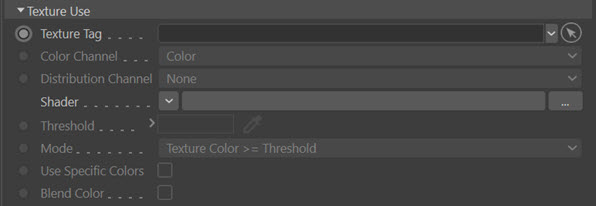
Texture Tag
You can drag a texture tag into this field and the modifier will use the material referenced by that tag. Any of the texture tags assigned to the object may be used, but they must have UVW mapping. No other form of mapping will work correctly.
Using a tag is convenient if you have already set up a material and don't want to have to duplicate it in another shader. Once you add the tag to this field, you can select the channel to sample in the 'Channel' drop-down menu, but you can no longer use the 'Shader' field - that is, you can't use a texture tag and a shader simultaneously.
Color Channel
Note: previously named 'Channel' in earlier versions of X-Particles.
This is the material channel which governs the sticking of particles to the target object.
If you have dragged a texture tag into the 'Texture Tag' field, you can choose the channel to use from the material. By default this is the Color channel, but you can choose from several others. One thing you can do is use a channel which is not being used in the material. For example, you could set up a shader to govern particle sticking in the displacement channel but leave that turned off in the material editor. The modifier can still sample that channel even though it is not being used in the material.
Distribution Channel
This is the material channel which can be used to control the distribution of particles on the surface of the target object when you don't want to use the Color Channel for that purpose (because you want the Color Channel to hold colour information only). See 'Blend Color' for an example of its use.
Shader
Instead of using an existing texture tag, you can set up any shader in exactly the same way as if you were using the material editor. Or, you can copy a channel from a material and paste it into this field. Note that the 'Shader' field is disabled if there is a texture tag in the 'Texture Tag' field. If you set up a shader, then add a texture tag, only the tag is used; the shader will be ignored.
Threshold
The threshold is a colour value. The sampled colour from the texture must either be equal to or greater than (or equal to or less than, depending on the 'Mode' setting) this value for particles to be stuck to that point on the target. The default is mid-grey (RGB 127, 127, 127) so if 'Mode' is set to equal or or greater than, particles will only be stuck where the sampled texture colour is brighter than mid-grey.
This colour is also used when the 'Use Specific Colors' switch is checked - see below.
Mode
'Mode' has two settings:
- Texture Color >= Threshold
- Texture Color <= Threshold
If the first setting is selected, the brightness of the colour in the texture must be equal to the threshold, or brighter than it. Particles will not stick to darker areas. If the second option is chosen, the texture colour must be as dark as, or darker than the threshold. Particles will not stick to brighter areas.
Use Specific Colors
This switch controls how the modifier compares colours in the texture to the threshold. When unchecked (the default) the average brightness of the two colours are compared. When it is checked, the RGB components of the colours are compared individually.
For example, we can represent RGB colour values as ranging from 0 to 1, so that white is RGB 1, 1, 1. The average brightness of that colour is then (1 + 1 + 1) /3, which is of course 1. Now, suppose we have a texture with two colours - a yellow-orange with RGB values of 1, 0.5, 0 and a blue with values 0, 0.5, 1. We set the threshold to be the same yellow-orange (1, 0.5, 0).
You can see that the average brightness of the colours is the same in all cases - it works out at 0.5. So with 'Use Specific Colors' unchecked, particles will stick to any areas of the texture which are either yellow-orange or blue, because the average brightness of the texture colour is the same as the threshold colour brightness..
Now suppose we turn on 'Use Specific Colors'. The individual RGB components are now compared. For the yellow-orange, its RGB values are the same as the threshold, so particles will be stuck to areas with that colour. But the blue colour does not match: its red component is lower than the threshold, so particles will not stick to that area.
The usefulness of this switch is that you can specify exactly what the colour in the texture must be in order to stick particles. Suppose you set the threshold to pure red (RGB 1, 0, 0) and turn on 'Use specific colours'. Now particles will only stick to those areas in the texture which are pure red.
Blend Color
If this switch is turned on, the cover modifier will send the particles to points on the target object such that the source texture is remapped to the target. In this example, the source object is the sphere and the destination is a cube:
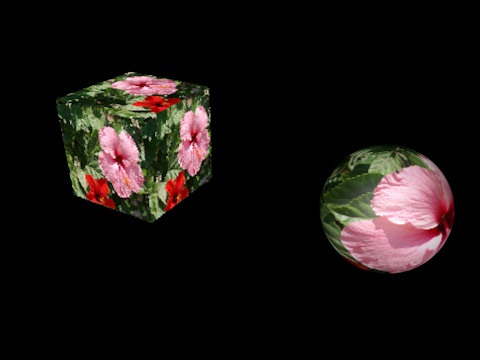
You can see that the texture from the sphere has been reproduced on the cube. It appears on each face because of the UV mapping of the cube; different UV maps would give different results.
To achieve this effect, you need to do the following:
- Set up the emitter to emit from an object, under texture control
- Add the texture tag from the source object
- Set the Emit Channel to None (you want particles to be emitted from the entire surface) and the Color Channel to Color
- In the Cover/Target modifier, set Operation to Texture and Channel to Color
- Drag the texture tag from the source object into the Texture Tag link field
- Finally, set the Threshold colour to black and the Mode to 'Texture Color >= Threshold' to ensure that all points on the surface are covered
But there is more you can do with this technique. In this animation, the texture tag link in the modifier contains the texture tag from the blue sphere. Now, when the animation runs, the original colour on the yellow sphere is blended with the blue texture to cover the cube:
This works well, but what if you want to alter the distribution of particles onto the cube? You can do that by using another channel from the texture in the 'Distribution Channel' field. The material on the blue sphere contains a black and white noise texture in its diffusion channel (which is not active, so you can't see it). If we select 'Diffusion' in the 'Distribution Channel' menu, we see this:
Selection
Drag a point or polygon selection into this field. Polygon selections are ignored unless the 'Operation' is set to 'All Polygons' or 'Object Vertices (Random)' (in which case the polygon selection is first converted into a point selection). Note that this means that the 'Object Vertices (Ordered)', and 'Object Vertices (Ordered, Random)' modes cannot be used with a polygon selection, only a point selection.
Point selections are ignored unless 'Operation' is set to 'Object Vertices (Random)', 'Object Vertices (Ordered)', 'Object Vertices (Ordered, Random)' or 'All Polygons'. (In the case of 'All Polygons' the point selection is first converted to a polygon selection, where possible.)
Vertex maps can be used instead of a selection tag, but will be ignored unless Operation is set to 'Object Vertices (Random)'.
Acuteness of Turn
This is the angle at which the particle turns towards its target when the modifier begins to influence it. Lower values will give shallower turns but may result in particles missing their target, depending on for how long and/or how strongly the modifier influences them.
Setting the particle speed
Speed Mode
This setting determines how quickly the particles will arrive at the target. It has three options:
Use Particle Speed
In this mode, the particles use the speed given to them by the emitter when they were created. This means that some particles will take longer than others to reach their target point, because they were further away from their target than other particles. It also means that if the target object is animated and moves away from the emitter, the particles will have to chase it and will take longer to reach the target.
With this option, the braking parameters also become available (see below).
Set Time to Reach Target
This mode takes the value from the 'Time' field and the modifier then gives each particle a speed which will enable it to reach its target point in that number of frames. For example, if the value in 'Time' is 80 frames, a particle created at frame 10 will reach its target at frame 90 (10 + 80 = 90). If you set the emitter to shot mode, all the particles released in that shot will arrive at the target at the same time even if some particles were further away from their target point than others. If the target is animated and moves away from the emitter, the particles will speed up in an attempt to reach their target in the specified time. Note that if the target moves very fast, and the value in 'Time' is small, the particles may have to move very fast indeed to catch up, and may then overshoot the target as a result.
Gravity
in this mode the particle will be pulled towards the target, increasing its speed as though it was being attracted by gravity.
Time and Variation
This value is used in conjunction with the 'Speed Mode' setting 'Set Time to Reach Target', as described above. You can use the 'Variation' setting to add some variation in the time taken by the particles to reach the target.
Gravity Strength
The strength of the attraction force when 'Gravity' speed mode is selected.
Use Braking
This and the next three parameters are only available if 'Speed Mode' is set to 'Use Particle Speed'.
When this switch is enabled, the modifier will slow the particle as it approaches its target. This gives a much smoother effect than an abrupt halt when the particle hits its target.
Note: with a slow-moving particle, the final snap to its target point will be much more noticeable than for a faster particle. To remove the snapping effect, turn the 'Tolerance' value (see below) down to a lower value - you may need to reduce it to 2 scene units or less, depending on the final speed.
Brake Distance
If 'Use Braking' is checked, the modifier will start to slow the particle when the distance to its target point is less than this value.
Brake Strength
This is a percentage value and the modifier will slow the particle by this percentage of its speed each frame.
Min. Speed
This is the lowest speed the particle will have when braked. If this is set too low, there is a risk that the particle could move so slowly that it will never reach its target.
Aligning particles
Align to Normal
If this switch is checked, the modifier will rotate the particle to align its Z-axis to the normal of the polygon it will stick to. For this to work, particle rotations must be enabled in the emitter.
Align Distance
If 'Align to Normal' is checked, the modifier will start to rotate the particle when the distance to its target point is less than this value. If the distance is very short, there may not be sufficient time to complete the rotation before the particle reaches its target. In that case, you can increase this value or try increasing the 'Align Strength' value.
Align Strength
When the modifier starts to align the particle, it will do so by mixing the values for the current rotation and the target normal, with a strength given by this setting. The higher the value, the faster the particle will be aligned. If the value is small, there may not be sufficient time to complete the rotation before the particle reaches its target. In that case, you can increase this value or try increasing the 'Align Distance' value.
Other options for Cover/Fill mode
Maximum Hit Attempts
This is used to determine how many attempts will be made to find a suitable polygon or vertex to act as a target for a particle. If this was not present, it would be possible in some cases for the system never to find a polygon or point and enter an endless loop. The default value is 20, which is enough in most cases. If you find that some particles do not find a target on the object, you can try increasing this value, but this may slow down the system. It is not used in the ‘All Polygons’ or ‘Object Vertices’ modes.
Kill Particles Without Target
If the count in 'Maximum Hit Attempts' is exceeded, the particle will not have a target point on the target object. It will then follow whatever direction given to it by the emitter and influenced by any other modifiers. In the next frame, it will try again to find a target point, and will keep on doing so in successive frames until it eventually succeeds.
However, this has two consequences: if it never finds a target point you are left with 'loose' particles that don't move to the target; and it may slow down playback in the editor if many particles have to keep trying to find a target point each frame.
This switch prevents this from happening: if checked, any particles which fail to find a target point in one frame are simply removed from the scene.
Fill Offset
This is only available in ‘Object Volume’ mode. It enables you to shrink the space inside the object which the particles will try to fill. It can be useful to increase this value if you find particles are too close to the object’s surface so that any sprites or generated objects protrude from it (which you may want, of course!).
Tolerance
This is the minimum distance that the particle must be from its target before the particle will snap to the target. It is needed because each particle moves a set distance per frame, so it is unlikely that the particle will ever hit the target exactly. When it gets to within this distance therefore, it will be snapped to the target. You may need to increase this for very fast particles, or reduce it if you are doing close-ups and the particle appears suddenly to jump to a new point.
Stick Point Offset
With this setting you can alter the distance away from the target at which the particle adheres to the target object. For example, if you choose 'All Polygons' mode, the modifier will find a point on the surface of the target object. If 'Stick Point Offset' is set to 20 units, it will then set the target point to 20 units away from the selected point along the polygon or vertex normal.
The purpose of this setting is to allow you to offset the sticking point so that the objects associated with the particles do not partially embed themselves in the surface of the target. It works best with regular objects such as spheres, cubes, or platonics and less so with less regular objects such as cylinders or capsules. This setting is not available with the 'Visible Polygons (Using Rays)' mode of operation or, of course, with the 'Fill Object' mode.
Variation
This setting adds random variation to the 'Stick Point Offset' setting.
Other options for Target mode
Target Effect
This can be set to either 'Attract', which causes the particles to head towards the target, or 'Repel', which makes them move away from it.
Actions quicktab
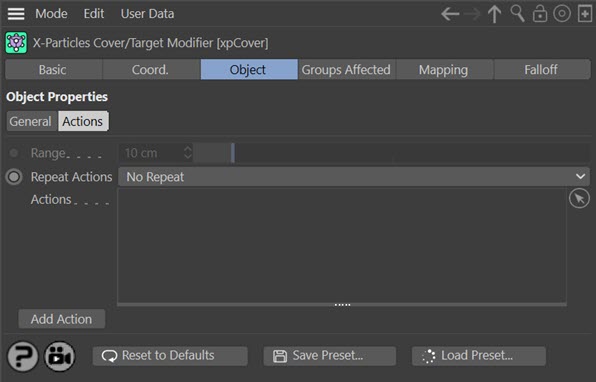
Actions
You can drag any Action, or multiple Actions, into this box.
In Cover/Fill mode, these Actions will be carried out each frame for each particle while it is stuck to the object (but see 'Repeat Actions' below). When it is unstuck again, the Action(s) will no longer be carried out. Note that you don't need an accompanying Question to trigger this Action. The Action is triggered directly by the modifier.
In Target mode, the Action will be triggered when the particle comes within range of the target. The range is set in the 'Range' attribute.
Range
In Target mode only, the Action will be triggered when a particle gets within this distance to its target.
Repeat Actions
In Cover/Fill mode only, this setting determines if the Action(s) will be carried out each frame while the particle is stuck to its target. There are two options:
Repeat
The Action(s) are repeated each frame while the particle is stuck to the target.
No Repeat
The Action(s) are carried out once when the particle arrives at its target, but are not repeated after that.
Add Action
Clicking this button will automatically create a new Action and add it to the 'Actions' list.