Fluid FX
To see how to use the Fluid FX object, please see the 'Using Fluid FX' section below.
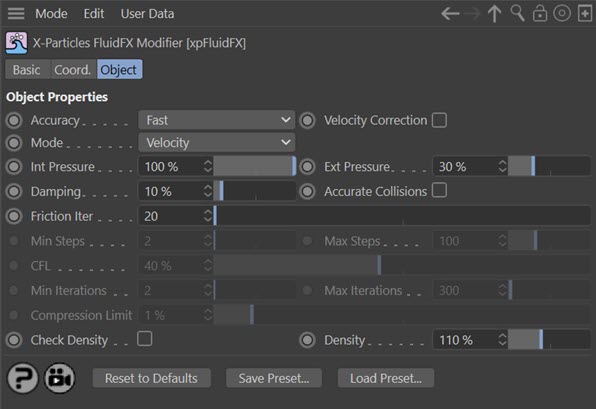
Interface
The object's interface looks like this:
For the buttons at the bottom of the interface, please see the 'Common interface elements' page.
Parameters
This object is the overall controller of Fluid FX and most of the changes you will want to make are either in the emitter's Fluid Data section or in the Fluid FX Collider tag (current release version only, not the Early Access builds). You may not need to change much in this object, but you need to add this object to the scene to use Fluid FX.
Accuracy
This drop-down menu contains a number of presets for the settings in Fluid FX. With the more accurate options, the simulations will run more slowly.
If you choose 'Custom' you can set your own values for 'Min Steps', 'Max Steps', 'CFL', 'MIn Iterations', 'Max Iterations' and 'Compression Limit'. With all other options, these settings are not available.
Velocity Correction
Checking this switch causes Fluid FX to correct the 'divergence' when the fluid tends to compress or expand (which should not happen, fluid being incompressible). The solver first corrects the density, but this alone will not change how the particles flow so in theory they will still not be moving in a technically fluid flow motion. 'Velocity Correction' does an extra solve to them change the velocity so the fluid flows around and does not compress/expand (divergence free).
Note that turning this on will slow the simulation, so it is off by default.
Mode
Due to the solver used in FluidFX (by default it is a velocity solver) it takes over particle movement and does not interact with other X-Particles objects that move the particles. This makes it difficult to use with the new X-Particles dynamics engine. This menu enables you to change the solver to a position-based solver which enables full interaction with other X-Particles objects.
Note that using the 'Position' mode results in a slower simulation and in the fluids being iterated, which can make them more viscous.
Velocity
This is the default solver and gives the same behaviour as in previous versions of X-Particles.
Position
Changes to a position-based solver to allow full interaction with other X-Particles objects.
Int Pressure
Internal pressure forces the particles apart, ensuring the fluid does not compress. It acts together with 'Ext Pressure' to produce a surface tension-like effect.
Ext Pressure
External pressure pushes the particles together, ensuring the fluid does not expand. It acts together with 'Int Pressure' to produce a surface tension-like effect.
Damping
Damping helps to reduce explosive forces. If you simulate a fluid with a density that is very low then the forces trying to keep the density can become very large, if the smoothing radius isn't sufficiently large enough to smooth over enough particles (low density means the particles are spaced further apart, and if this is beyond the smoothing distance it can become unstable). Increasing this setting damps the forces but also reduces motion from the fluid.
Accurate Collisions
Check this switch to improve the accuracy of collisions between the particles and a collider object.
Friction Iter
Friction (between fluid particles) is only used for granular simulations. Therefore this setting has no effect unless in the emitter's Fluid Data section you have set the 'Fluid Type' to 'Granular'. You can then use it to alter the friction between granular particles.
Min Steps
Fluid FX uses subframes and this parameter is the minimum number of time steps per frame.
Max Steps
Fluid FX uses subframes and this parameter is the maximum number of time steps per frame.
CFL
In each subframe, a particle must never move farther than its own diameter. (Note: this means that the particle radius will have a significant effect on the simulation.)
The CFL parameter controls how aggressively the solver increases subframes to ensure this condition is met. Technically, a value of 40% is safest (you can lower it but the usual result is a slower simulation and not much else).
Practically, in some simulations, you can increase this value to 90% but collision accuracy and also stability may suffer. It is a matter of testing and experience.
Min Iterations
This is the minimum number of solver iterations. If you reduce it the simulation can be faster but at the cost of reduced accuracy.
Max Iterations
This is the maximum number of solver iterations. If you reduce it the simulation can be faster but at the cost of reduced accuracy.
Compression Limit
This is the maximum loss of fluid volume which can occur during the simulation expressed as a percentage value. If you increase it, fewer iterations are required but the amount of bouncing and elasticity increases, which may not be desirable. Smaller values require more iterations (so the simulation is slower) but reduces the bouncing/elasticity effect.
Check Density
Fluids are normally incompressible so have a constant density. If this parameter is turned on the density will be checked to ensure consistency in the particle stream. If it is turned off, no check will be applied. The value used in the density check is found in the 'Density' setting.
This setting is off by default. Occasionally (for example, with slow-moving particles on emission) you may still need to turn this on, but there is now much better control and you can alter the 'Density' value to obtain a stable simulation.
Density
The value to use when 'Check Density' is on.
Using Fluid FX
Fluid FX vs. PBD Fluids
As you will have noticed, there are two fluid simulation objects in X-Particles - the PBD Fluid object and Fluid FX. Which one should you use and when?
In general, the PBD Fluid object is simpler and often faster. But it is not as realistic. Being essentially a particle modifier it works in a similar fashion to other modifiers and can be used along with other modifiers and dynamics objects, including the Cloth object.
Fluid FX is more realistic but can be slower. It is a solver in its own right, so takes over control of the particles and can't be used with other objects.
If you need large or medium scale fluid simulation, Fluid FX is the better choice. If you need small scale, fast simulation and the loss of realism is less important, choose PBD Fluids.
How to use Fluid FX
To use this simulator you will need:
- a particle emitter
- the Fluid FX object
- optionally, a container enclosing the emitter - that is, a polygon object such as a cube - which will be filled with fluid; this object must have a Collider tag attached to it
- optionally, other objects for the particle stream to collide with - these must also have a Collider tag attached to them
- optionally, something to mesh the particles such as an OpenVDB object or Skinner object
With a very basic setup you will see something like this:
You can make further adjustments to the simulation in the emitter's Fluid Data section. Those settings are usually more important than the ones in the Fluid FX object, for which the default values are often satisfactory.
Hints on using Fluid FX
Leaking particles
If particles are leaking through the container check the following:
- If you need a collider tag on an object (perhaps for Foam particles to collide with) use the Exclusions tab in the collider tag to exclude the emitter used with Fluid FX.
- Do you have sufficient substeps? Try increasing the minimum and/or maximum substeps. The more substeps you have, the more accurate the simulation but it will be slower. Bear in mind also that altering the substep values may in some cases change the look of the simulation itself.
- Are there enough subdivisions in the collision geometry? Try subdividing the geometry or increasing segment or similar values in parametric objects.
- Is the collision offset distance in the Fluid FX Collider tag sufficient? The default is zero, but internally this is difficult to resolve and you may see better results with a small non-zero value in this parameter.
Collisions and Actions
In the X-Particles Collider tag, there is a list of Actions to be carried out when a collision occurs. However, please note that with Fluid FX, particles will collide with an object but will NOT trigger actions. This is currently a limitation of Fluid FX.
Animated geometry
Introducing animated geometry adds to the complexity of the simulation. Geometry is updated only once per frame, but the solver operates on many steps per frame. This means that the solver cannot see what is happening between its own substeps, because to the solver, a geometry object always looks static. This means that information about the animation is effectively lost and this results in possible issues with rapidly moving geometry.