ExplosiaFX: Solver
This page contains the reference manual for the Solver tab in the ExplosiaFX object.
Interface
The tab interface looks like this:
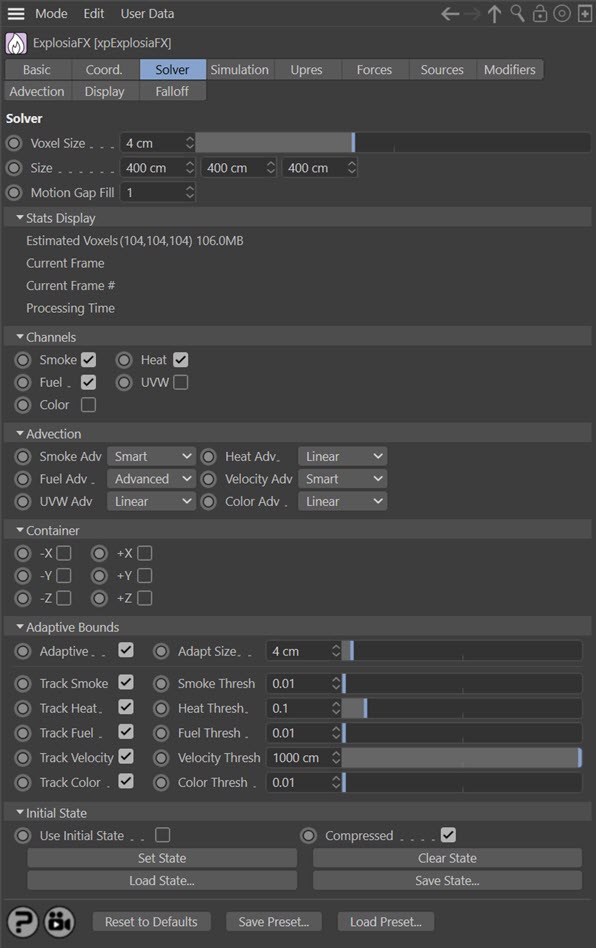
For the buttons at the bottom of the interface, and the Falloff tab, please see the 'Common interface elements' page.
Parameters
General Settings
Voxel Size
This is the voxel size within the boundaries of the solver. The solver volume is divided into cubes of this size. Smaller values result in more accurate simulations but are slower to playback and render. As the voxels get smaller, more particles are required to generate the smoke, etc.
Size
The size of the outer boundary of the solver, shown as a pink box in the viewport. The simulation always remains within the confines of this box.
Motion Gap Fill
This setting causes extra steps to be added to fill in motion between frames.
If the source object is geometry, the value indicates the density of the infill, not an actual number. The higher the value the better the result, but higher values will slow the simulation.
If the source is an X-Particles emitter, the only relevant setting is either 0 or 1. There is no difference with higher numbers when using particles.
Stats Display
These are some statistics regarding memory use and processing time. They are updated as the simulation runs.
Estimated Voxels
The total number of voxels used and the overall memory requirement. This will change if the voxel size and/or the solver size changes.
Current Frame
The actual number of voxels used for this frame and the memory requirement.
Current Frame #
The current frame being simulated.
Processing Time
The time in seconds to process this frame.
Channels
These checkboxes indicate which channels are used in the simulation. The default is for smoke, heat and fuel to be checked.
Smoke, Heat, Fuel
In fire simulations, a fire requires fuel to burn and heat to ignite the fuel. This may then generate smoke, or it may not, and you can turn smoke off if desired. But if you turn off fuel, there's nothing to burn and you won't see the fuel or smoke even though there is still heat. Turn off heat and there's nothing to ignite the fuel, so you will see nothing happening at all.
As an example, suppose you have the Display tab set to display fuel and smoke. If you uncheck 'Smoke' in this tab you will only see the fuel display as no smoke will be generated. But note that, if you turn off 'Fuel' and leave 'Smoke' enabled, you won't see anything, because without fuel there can't be any burning or any smoke. If you look carefully though, and you have adaptive bounds enabled, you can see that something is happening because the adaptive bounds are visible. You can see why this is if you change the display to temperature: this shows that you still have heat but no smoke or burning.
Color
If you check this switch, to add the colour channel to the solver, you can specify a specific colour to be used in the display. To do this, you would also turn the 'Display' setting in the 'Display' tab to 'Color'.
Where does the colour come from? This is set in the ExplosiaFX Source tag. See that tag for details of how to specify a colour to use.
UVW
If this switch is checked, UVW data is generated so that textures such as noise can be mapped to the simulation for extra detail.
Advection Settings
Smoke Adv, Heat Adv, Fuel Adv, Velocity Adv, UVW Adv, Color Adv
Advection is the process of the transport of some quantity - e.g. smoke or velocity - through a fluid or gas by motion. You can read about the technical aspects in this Wikipedia page.
ExplosiaFX carries out advection for six different properties. For each one there is a drop-down menu giving a choice of algorithm. In each case the options are:
Linear
The fastest algorithm but tends to lead to blurring. The best choice for heat advection and is also recommended for color and UVW.
Advanced
A slower algorithm giving less blurring. Recommended for fuel advection.
Smart
The slowest algorithm and the most memory-intensive. It is the most detailed of the three and is therefore recommended for smoke advection, for which fine detail is important.
Container Settings
The simulation can only take place within the bounds of the solver. But what happens when the smoke (or whatever) reaches the boundary?
Compare these two videos. In the first, none of the Container switches is checked. In the second, the Y+ (i.e. the top) container is checked, effectively adding a 'wall' at the top of the solver:
You can see that when a container switch is set the smoke collides with the wall and moves over it, but when it is not set, the simulation is simply cut off at the top of the solver.
Note that setting these container walls will slow the simulation, which is why they are not set by default.
Adaptive Bounds Settings
When solving the simulation, we could simply solve each voxel inside the bounds. But that would be slow and inefficient. Instead, we could solve only those voxels where something is happening, adjusting the volume to be solved as the simulation progressed. This is what adaptive bounds does. In general you should leave this enabled unless you require the whole solver volume to be solved each iteration. Doing that will be significantly slower than using adaptive bounds.
Adaptive
Check this switch to enable adaptive bounds.
Adapt Size
This is the size of the additional 'padding' around each active voxel as the simulation progresses. In most cases the default setting is fine and there is no need to change it.
Track Smoke/Heat/Fuel/Velocity/Color
To adjust the bounds the solver must keep track of some parameter, such as smoke or fuel. With these switches you can choose which parameters the solver will track.
Smoke Thresh, Heat Thresh, Fuel Thresh, Velocity Thresh, Color Thresh
These are the minimum values of a tracked parameter which must be present in a voxel before a change in bounds takes place. If these values are never exceeded, the bounds will never change.
For example, if you track only the heat, the heat value in any voxel must reach the heat threshold level to trigger the adaptive bounds. If the ExplosiaFX Source tag has a Heat value set to 100%, and you set the threshold in the solver to 1.1 (i.e. 110%), nothing will happen because the threshold will never be exceeded. But if you set the tag's Heat value to 120%, the simulation will run again.
Initial State Settings
One problem with any simulation is that each time you make an adjustment you have to play it again from the beginning. Sometimes though, you would like to start the simulation already part-way through and proceed from there. This is what the initial state controls do.
With these controls you can run the simulation to a point you like, then set the initial state and rewind the animation. When you play it again, it will start from the point you saved it rather than from the original start point.
Use Initial State
Check this switch to use an initial state once you have set one. If at any point you want to run the simulation from the beginning but not lose the saved state, uncheck this switch.
Compressed
If this switch is checked, the saved stated will be compressed to save memory.
Set State
Run the simulation to the desired point then stop it and click this button to set the initial state. This will also automatically check the 'Use Initial State' switch for you.
Clear State
Click this button to clear the initial state.
Load State... & Save State...
If you save a scene file with a set initial state, the state is saved with the file. But you can also save and load the initial state independently, so that you could load the state into a solver in a different scene.
Click the 'Save State...' button to save the state to a filename of your choice. Click the 'Load State...' button to load a saved state.