Skinner Object
The Skinner object enables you to create a mesh from the emitted particles, or indeed from the vertices of any point objects. It is similar in concept to the standard Cinema 4D metaball object, but is much faster and far more powerful.
Interface
The object's interface has the following tabs and sections:
Object tab
For the buttons at the bottom of the interface, please see the 'Common interface elements' page.
Surface quicktab
Surface
Several different algorithms are available for the construction of the mesh. Choose which one gives the best results for your purposes.
Render Only
If checked, the generated mesh will only appear at render time.
Surface level
This setting governs how readily the individual "blobs" generated around each particle are to coalesce and form a continuous mesh. The higher this is the more blobs will be incorporated into one mesh; the smaller, the more likely you are to see lots of individual small blobs. You can set values over 100% but the mesh will become larger and may eventually explode.
Polygon Size
The Polygon Size is the size of the voxels used to define the mesh and therefore is a measure of the resolution of the mesh. The smaller the size, the higher the resolution and more polygons are created. However, a smaller polygon size also results in a smaller mesh.
If polygon size is increased, the mesh size itself will eventually become larger and will start to lose definition, becoming a single large round blob.
Render Polygon Size
The polygon size at render time. If it is smaller than 'Polygon Size', this results in a smoother mesh when rendered. However, if the 'Render Polygon Size' is less than the 'Polygon Size', as is usually the case, the rendered mesh will not match that in the editor. This is inevitable and a function of the way the Skinner works.
You should therefore treat the 'Polygon Size' as a low-resolution mesh for editing purposes. If you want to see in the editor what the mesh will look like on render, alter the 'Polygon Size' to match the 'Render Polygon Size'. But be aware that this may cause a significant slowdown in the editor.
Surface Size
This drop-down has two settings:
Source
With this setting, the particles use their own radius setting (which can vary between particles) to generate the mesh. Non-particle sources, which don't have a Radius parameter, use the 'Custom Radius' setting.
Custom
With this setting, the particles use the Custom Radius setting (which will therefore be the same for all particles) to generate the mesh. Non-particle sources also use this setting.
Custom Radius
The radius to use when 'Surface Size' is set to 'Custom'.
Scale
Scale will scale all the radius values internally (scaling the surface), so if you have particles with different sizes (radius) the Scale can be used to tweak the surface size without having to change the particle radius values.
Speed Stretch and Strength
Speed Stretch "squashes" the mesh as though it was being stretched. The effect is changed with the Strength setting.
Preserve Volume and Strength
When either of the two smoothing modes, Geometry or Particle, are selected, the size and shape of the mesh will change. Checking 'Preserve Volume' will attempt to retain the volume and shape. The 'Strength' setting determines the strength of the effect.
Geometry
This switch is used to smooth the generated mesh. One effect of this is to reduce the size of the individual blobs and any intermediate mesh.
Iterations and Strength
This will refine the smoothing but will cause further reduction in size. The amount of smoothing is controlled by the 'Strength' value. A value of 0% is the same as unchecking ' Geometry'. Note that setting this too high may cause the mesh to break up.
Particles
This switch is used to smooth the generated mesh. One effect of this is to reduce the size of the individual blobs and any intermediate mesh.
Radius
The smoothing radius around each particle. A value of zero is the same as unchecking ' Particles'.
Iterations and Strength
This will refine the smoothing but will cause further reduction in size. The amount of smoothing is controlled by the 'Strength' value. A value of 0% is the same as unchecking ' Particles'. Note that setting this too high may cause the mesh to break up.
Objects
Drag the source object(s) from which you want to use to generate a mesh into this list. This can be an X-Particles emitter or group, a standard Cinema 4D or Thinking Particles emitter, or any object that has vertices (or would do if made editable, such as a C4D generator object or spline primitive).
Each object has two flags which affect the result:
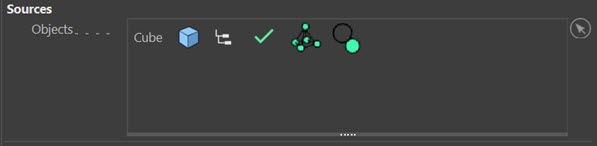

The first icon switches between using the object's points (if point based) or using its surface (if polygon based or the spline if spline based). Try a simple cube primitive as the source and switch between the two, you will see the difference immediately.

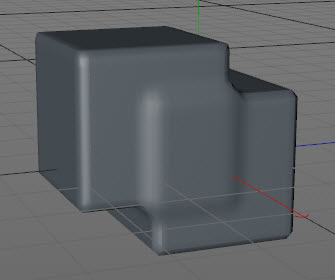
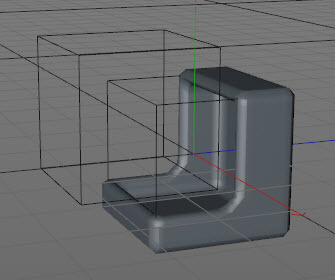
This icon switches between whether the source is a positive source or negative. What does this mean? Consider a Skinner with two cubes as source objects, both set to positive. The result would look like the screenshot on the left. If the leftmost cube is set to a negative, it acts like a Boolean and you see the effect in the right-hand screenshot.
Generate quicktab
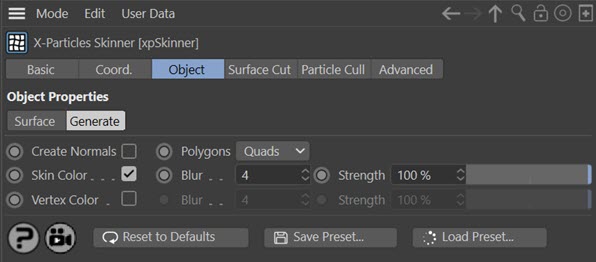
Create normals
If checked the Skinner will generate normals for the mesh.
Polygons
This drop-down determines if the Skinner creates quads or triangles when it generates a mesh.
Skin Color
This switch should be checked if you wish to use the Skinner Shader with the skinner. It will add colour information from the particles which will shade the polygons on rendering. If it is unchecked the Skinner Shader will return plain white, regardless of the particle colour
Blur
Polygon colours between neighbouring particles of different colours can be blurred to smooth transition from one colour to another. This setting is the number of iterations the blur process uses. Essentially, the higher the value the better the blur, but the slower the process.
Strength
The strength of the blur.
Vertex Color
Note: only present in Cinema 4D R18 and above. Not shown in the above screenshot.
If checked, this switch will generate a Vertex Color tag using the particle colours. Because this tag can only be applied to an editable object, you will not see the tag on the skinner until you make it editable.
Blur
Vertex colours between neighbouring particles of different colours can be blurred to smooth transition from one colour to another. This setting is the number of iterations the blur process uses. Essentially, the higher the value the better the blur, but the slower the process.
Strength
The strength of the blur.
Surface Cut tab
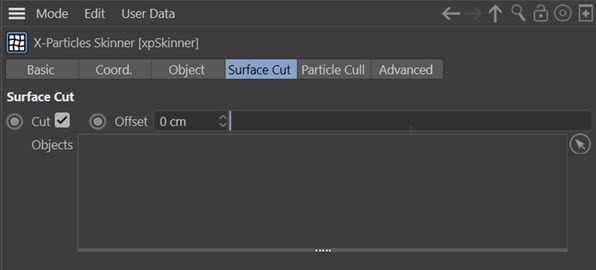
This tab is used to cut the mesh generated by the Skinner with another object or objects.
Cut
If checked, objects dragged into the Objects list will cut the generated mesh.
Offset
The size of the 'gap' between the cutting object and the mesh.
Objects
The objects to use as cutting objects. Each object has a flag which affects the result:
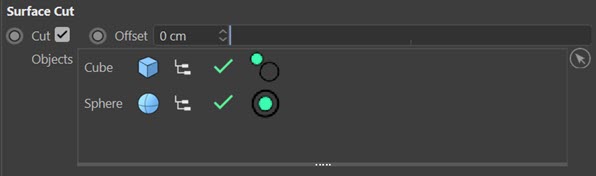
The 'outside' flag shown on the Cube will cut the mesh where it and the cutter intersect. The 'inside' flag shown on the Sphere will remove the mesh outside the intersection. Think of this as similar to a Boolean in Cinema 4D.
Particle Cull tab

This tab is used to kill particles which either enter the culling object or leave it, depending on the flag state on the object.
Cull
If checked, objects dragged into the Objects list will cull particles.
Offset
Defines an area of influence around the culling object within which particles are culled.
Objects
The objects to use as culling objects. Each object has a flag which affects the result:
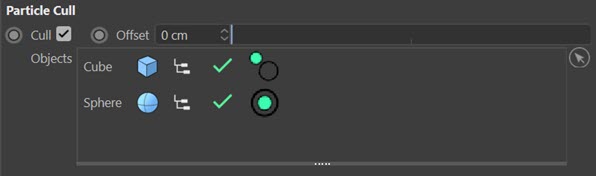
The 'outside' flag shown on the Cube will cull particles which enter it (subject to the Offset setting, this may be a larger area than just the object itself). The 'inside' flag shown on the Sphere will cull particles which enter it.
Advanced tab
Threading
By default the Skinner is multi-threaded. You may disable this if you find the multi-threading is reducing your system responsiveness when using multiple applications.
Notes on using the Skinner
1. Priorities
It is possible to use objects other than an X-Particles Emitter as the source for a Skinner object. If you use an object which is itself a generator object (and that would include all Cinema 4D primitive objects, the Cloner, Lathe, Sweep, Extrude, Loft and Boolean objects among many others) then you should place those objects in the Object Manager above the Skinner that uses them. If you don't, then there is a possibility that the generator object might not exist when the Skinner wants it. A good example of this is if you use a Render Region, because that creates a new internally-cached version of the source object rather than using an existing one.
Although you may never see this if you don't use a Render Region, it is still good practice to put the Skinner below the object(s) it uses. Please note that this is an issue with the priority system in Cinema 4D and not X-Particles itself.