Follow Spline Modifier
Summary
This modifier moves a particle along a spline. For information about how to use it, please see the section 'Using the Follow Spline modifier'.
Interface
This modifier has the following sections:
For the 'Groups Affected', 'Mapping', and 'Falloff' tabs, and for the buttons at the bottom of the interface, please see the 'Common interface elements' page.
Parameters
General quicktab
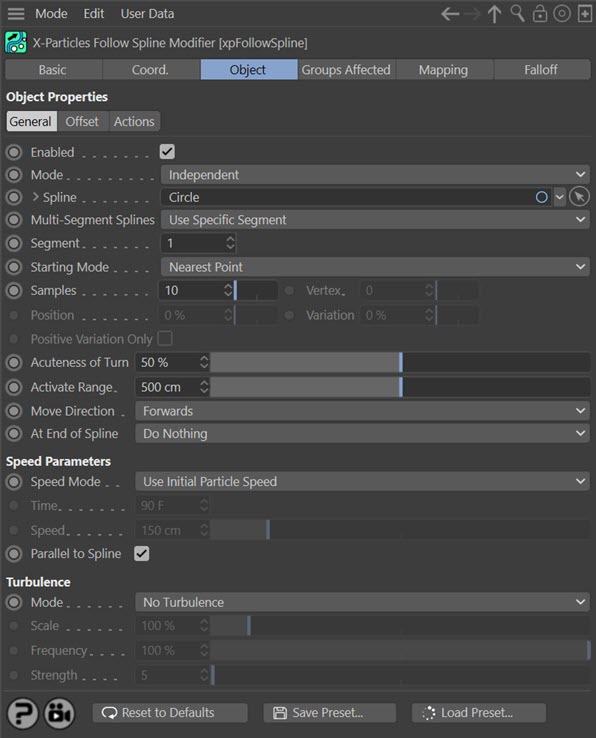
Enabled
Uncheck this switch to disable the modifier.
Mode
Independent [default setting]
In this mode, particles will be affected if they come into the field of effect of the modifier. X-Particle Actions have no effect on the modifier in this mode.
Action-Controlled
In this mode, the modifier will only act on a particle when told to do so by an Action. Until that point, the particle will not be affected, but once activated for a particular particle, the modifier will continue to influence it as long as it is in the field of effect of the modifier. The modifier's effect on a particle can be halted by means of another Action, if desired.
Spline
This is the spline the particles will follow. Spline primitives may be used in here as well as editable splines.
It is possible to use an X-Particles Trail object in this field. However, note that a particle cannot be made to follow its own trail. In other words, if you have a Trail object in this field, and the particles to be affected by the modifier are generated by the same emitter used by the Trail object, those particles will be ignored. But you can use a second emitter to follow the trails of the one which generates the trails.
Note: if you need to resize a spline, use the scale tool either in Object mode or in Model mode, but do not use both on the same object. That is, do not resize it in Object mode then switch to Model mode and resize it again. If you do, the modifier will not work correctly.
Multi-Segment Splines
If the spline has more than one segment, you can use this drop-down to choose which segment to use.
Use Any Segment
The modifier will randomly select from all the segments and send the particle to the chosen point on that segment.
Use Specific Segment
The modifier will use the segment you specify in the 'Segment' field.
Use Segments in Sequence
With this option, the modifier will send each particle to different segments in sequence. That is, if the spline has five segments, particle 1 will go to segment 1, particle 2 to segment 2, and so on. Particle 5 would go to segment 5, then particle 6 goes to segment 1 (since there are only 5 segments, the cycle is then repeated).
This option does NOT move particles along segment 1, then move them to segment 2, then segment 3, etc. You can do this but only with separate modifiers under action control.
Use Nearest Segment
In this mode the modifier will find the nearest segment of the spline to the particle and use that segment.
Segment
This is the segment to use when 'Multi-Segment Splines' is set to 'Use Specific Segment'. It is up to you to enter a sensible value here. If the spline has three segments and you enter '4' in this field, the modifier will do nothing.
Starting Mode
When the modifier acts on a particle, the particles may initially be at some distance from the spline. So the first thing the modifier needs to do is move the particles to the spline. This setting determines where the particles will move to before moving along the spline itself. The options are as follows.
Nearest Point
The modifier will move particles to the point on the spline which is nearest to the particle. This is not a spline vertex, but a point in 3D space somewhere along the spline.
Nearest Vertex
The modifier will move particles to the vertex on the spline which is nearest to the particle.
Specific Vertex
The modifier will move particles to the spline vertex which is specified in the 'Vertex' setting. If a number is entered into 'Vertex' which exceeds the vertex count of the spline, the modifier does nothing.
Position Along Spline
The modifier will move particles to the point along the spline which is given in the 'Position' setting.
Note: if the emitter is positioned in the exact centre of a regular spline such as a Circle or Rectangle spline, and you choose 'Nearest Point' or 'Nearest Vertex' the modifier may send particles to more than one point on the spline, because all points are equidistant. If this happens, move the emitter slightly so that it is closer to one point on the spline than any other.
Samples
This is only available if the 'Nearest Point' option (see above) is chosen. To find the nearest point to the particle, the modifier checks the distance from the particle to a number of points along the spline. If this value is low, you may see different particles moving to very different points on the spline. You can reduce the gaps between sample points by increasing this value, but high values will slow the system down.
Vertex
This is the spline vertex used in the 'Specific Vertex' setting (see above). The first vertex in the spline is numbered 0. It is up to you to make sure that this value is a sensible one (i.e. that the spline really does have a vertex with that number. For editable splines, you can use the Structure Manager in Cinema to see how many vertices the spline has.).
Position
The position along the spline in percentage terms, used in the 'Position Along Spline' option (see above). 0% is the start of the spline; 100% is the end.
Variation
When 'Position Along Spline' is chosen, you can add some variation to the selected location with this setting. A value of 100% will distribute the particles along the entire spline.
Positive Variation Only
If you have added some variation to the starting point on the spline, the actual starting point will be somewhere either side of the chosen starting position. For example, if the starting position is set to 0% and the variation to 10%, the actual starting position will be somewhere between +5% and -5% along the spline. For a closed spline like a circle, -5% is the same as +95% along the spline, but what does -5% mean for an open spline? 95% of the distance along a closed spline is very close to the start of the spline, but that is often not the case for open splines. For this reason, you can select to have only a positive variation from the starting position so that you don't start somewhere which is not on the spline. To do that, check this switch.
Acuteness of Turn
This setting is only used when the particles are moving to their starting position on the spline. A lower value results in a curved path to the starting position rather than an abrupt change of direction. However, if this is set too low, the particle may not be able to reach its starting position on the spline.
Activate Range
The modifier will start to move the particle to its starting position when its distance to the starting position is within this range. If some or all of the particles are failing to move to the spline, you probably need to increase this value.
Move Direction
The direction the particles move along the spline, Forwards or Backwards.
At End of Spline
This setting determines what happens when the particle reaches the end of the spline (or if the particle is travelling backwards, when it reaches the start of the spline). There are four options.
Do Nothing
When the particle reaches the end the modifier will no longer affect it and the particle will continue to travel in its most recent direction. This is the default setting.
Loop
This setting causes the particle to carry on around the spline again. It is most useful when used with closed splines. If the spline is not closed then the particle cannot loop around the spline and will simply loop around the last point in the spline.
Repeat
This causes the particle to leave the spline and move to a new starting position (which may be the same as its original starting position), not by travelling back along the spline but in a direct line. It will then move along the spline as before. It is most useful when used with splines that are not closed but will work with closed splines too. Note that you may see no or little effect if the 'Nearest point' or 'Nearest vertex' options are selected, since the modifier will simply choose the nearest point or vertex to the particle - which is likely to be the start/end of the spline.
Reverse
This will cause the particle to reverse direction and travel back the way it came. With this you can set the particle to oscillate backwards and forwards along a spline.
Speed Mode
The speed mode chosen has a significant effect on particle movement around the spline. The particles will now remain parallel to the spline during travel around it. This differs from earlier versions where the particles would often cross over the spline being followed.
This drop-down has four options:
Use Initial Particle Speed
The particle will travel around the spline with the speed it has when it starts to follow the spline and will remain fixed from then on. With this option the speed cannot be changed by other modifiers but can be altered using data mapping.
Note: this is the same as the option 'Use Particle Speed' in X-Particles 3.5 and earlier. Its function and mode of working has not changed, only the name.
Use Current Particle Speed
The particle will travel around the spline with its current speed. With this option the speed can be changed by other modifiers but cannot be changed using data mapping in this modifier.
Complete Length in Time
With this setting, the particle may speed up or slow down so that the particle would travel along the complete length of the spline by the value in 'Time'. With this option the speed cannot be changed by other modifiers but can be altered using data mapping.
Set Speed
The modifier will set the particle speed to the value found in the 'Speed' parameter. It cannot be changed from then on except by data mapping.
Time
The time to move along the length of the spline, when 'Speed Mode' is set to 'Complete Length in Time'.
Speed
The value to use when 'Speed Mode' is set to 'Set Speed'.
Parallel to Spline
If this switch is checked, the speed of the particle will be adjusted to ensure it remains parallel to the spline being followed. Some particles may speed up a little and some will slow down, depending on their relative position to the spline.
When the switch is checked it gives the smoothest movement of the particles along the spline. When unchecked, you may see jitter in the particle's movement, which is especially noticeable if you are using a Trail object. It is therefore strongly recommended that you leave this switch checked (the default setting). However, if you want to alter the particle speed using another modifier, such as a Turbulence modifier, you can uncheck this switch, as otherwise you may see little effect from the other modifier.
Turbulence
These settings allow you to add some chaotic movement to the particles as they move along the spline.
Mode
This drop-down controls how turbulence affects particle movement. It has four options:
No Turbulence
The default setting. No turbulence is applied to the particles.
Affect Offset
The turbulence affects the offset from the spline (see 'Offset from the spline' above) but not its movement along the spline.
Affect Velocity
The turbulence affects the speed and direction of movement along the spline but does not directly affect the offset. Note that this mode has no effect if 'Speed Mode' is set to 'Complete Length in Time' or 'Set Speed' because then the modifier fixes the speed and turbulence will not change it.
Affect Both
Both offset and velocity are affected (but see 'Affect Velocity' above).
Scale, Frequency
These values alter the underlying turbulence which is applied to the movement. They have the same effect as in the Turbulence modifier.
Strength
The higher this value, the more chaotic the movement.
Offset quicktab

Normally the particles stick closely to the spline path. To spread the particles around the spline, set the maximum offset in the 'Offset Value' setting.
You can also vary the offset along the length of the spline. To do this, use the 'Offset Along Length' spline control.
Offset Along Length
This spline control alters the particle offset along the spline length. This is a percentage value, so 100% gives a maximum offset (from the 'Offset Value' setting) and 0% is no offset at all. The leftmost point on the spline control gives the offset at the start of the spline and the rightmost point the offset at the end of the spline.
Offset Value
The maximum offset from the spline. The actual offset will be somewhere between zero and this value.
Offset Blend
This setting controls how the object is offset from the spline along the spline axes. When set to 50% (the default) the particles are offset in all directions around the spline. If it is set to 0%, the offset is only along one axis (which one depends on the orientation of the spline axis); if it is set to 100% offset is along a different axis. In both cases the particle stream will appear to be flattened rather than forming a tube around the spline.
Actions quicktab
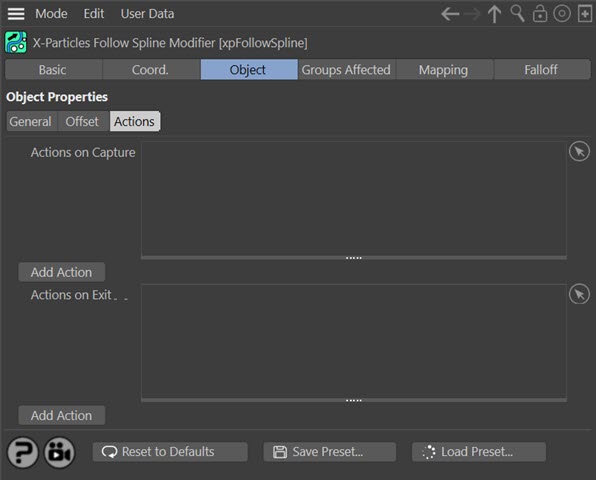
You can drag any actions into this list and they will be executed when the particle is first captured by a spline or it reaches the end of its travel along the spline.
Add Action
Clicking either button will add an action to the scene and drop it into the relevant Action list.
Actions on Capture/Actions on Exit
The lists of actions to be carried out at the start and end of travel along the spline.
Using the Follow Spline modifier
1. Stopping a particle moving along a spline
Possible methods include:
a) Use keyframes (or Xpresso) to disable the modifier in the object manager, or to turn the 'Enabled' switch off.
This will work but suppose you want to turn one modifier off and have another take control of the particle. With this method, you will run into trouble. The spline modifier maintains a set of internal flags and data in each particle which must be reset before a spline modifier takes control of the particle. If you simply turn the modifier off, the internal data is unchanged and the new modifier will try to use the settings already in the particle; that will give results which are not what you expected! This method is very quick to set up but not recommended if you are using more than one modifier in succession. Also, this is a brute-force method which will turn the modifier off for all particles in the scene at once.
b) Use the 'Control Spline Modifier' action.
To do this, the modifier MUST be in 'Action-Controlled' mode. You will first need an Action at some appropriate point to turn the modifier on for a particle. Then you can use any question - including those which test for distance travelled along a spline - to turn the modifier off (i.e. the Action would set the 'Modifier Will NOT Affect Particle' setting for that particle). This will automatically reset all the internal data of the particle and you can then use a new modifier with a clean set of particle data.
c) Use the 'Stop Following Spline' action.
This action works in the same way as the above action and also resets the internal data, but has several other options to change the direction and speed of the released particles.
2. What is the 'start' or 'end' of a spline?
For closed splines, the start and end are the same point. You can find the starting point in any editable spline by looking at it in points mode and looking for the region of the spline where the spline colour changes abruptly from white to blue (these are the default colours). The vertex where that happens is the start and end point. You can move this around the spline by using the commands in the Mesh->Spline menu in Cinema 4D.
For open splines the start point is the one where the spline is white and the end point where it is blue. Again you can move the point sequence around but this will change the shape of the spline.
You cannot alter the point order of primitive splines. Internally, X-Particles converts the primitive to an editable spline first, but that data is not changeable. Trial and error will show where the start/end points of closed primitives is located (make it editable and note the point position, then undo).
3. The problem of open splines
Many splines are closed, so that the start and end points are the same (e.g. Circle, n-Side, Rectangle) while others are open and the start and end points are in different places (e.g. Arc, Helix). The problem of the open spline and starting position variation has already been mentioned (see 'Positive Variation Only' above). Another issue is when you set the starting position to be 100% (which is the end of the spline) but forwards direction. The spline does not have a length of more than 100%, so where should the particles go? (This is not a problem for closed splines as the particles can just loop around the spline.)
In this case the modifier will reverse the direction of motion, so that the particles will move backwards. The opposite will be done if the starting position is 0% with backwards direction.
As a general rule, for open splines you should choose logical settings: the direction should make sense depending on the starting position and the action to take at the end should be either Repeat or Reverse (Loop does not work).
4. Using multiple spline modifiers
Suppose you want the particles to follow one spline, come to the end of it and do something else, then follow another spline. How you can do that? There are two options.
a) Use action-controlled modifiers
This the recommended method since it gives you precise control over when the particle starts to follow a spline. You can leave the falloffs of the two splines set to Infinite, if you wish. Simply use actions to determine which modifier will affect the particle and when.
b) Use independent modifiers with falloffs
If you put two independent modifiers in the scene, both with Infinite falloff, the two will clearly conflict. In fact, what happens is that the modifier which is lower down in the object manager is executed last, so it is the one which will move the particle. For this reason, both modifiers must have falloffs other than Infinite. You can then arrange the scene so that the particles leave the falloff of the first modifier then enter the falloff of the second one. In between the falloffs the internal data structures of the particles will be reset. Be sure that the falloffs do not overlap so that the reset can occur!
5. Data mapping
The parameters in the modifier can be mapped to other variables, as with most modifiers, and as described on the data mapping page. In this modifier, it is also possible to map values to the length of the spline segment the particle is moving along. You can use this, for example, to alter the speed according to the segment length (the speed mode must be set to 'Set Speed' to do this).