Using the Xpresso Nodes
X-Particles has 15 nodes available to enable the use of Xpresso in your scenes. These nodes either set or return particle data, or are used to iterate through all the live particles, or in the case of the question node, to test various items of data and carry out further actions accordingly.
Adding X-Particles nodes
To add any of these nodes, open the Xpresso editor in the usual way. Right-click in the editor, then go to 'New Node' and you will see a new entry - 'X-Particles'. Open up that menu and there are three sub-menus:
- General: contains the Question node
- Iterator: contains the Trail Points and XP Iterator nodes
- Data: contains nodes to get and set particle and other data directly
Using the XP Iterator and Trail points iterator nodes
XP Iterator
This node will iterate through all the particles emitted from an emitter and output their index values in the particle array, one at a time. This enables you to test whether a particle meets certain criteria, and if it does, do something with it.
Example
A simple example will help to explain how this node works. Suppose you want change the colour of particles that are 30 frames old or more. This screenshot shows the nodes to add and the connections to make. Pay particular attention to the inports of the Set Particle Data node:
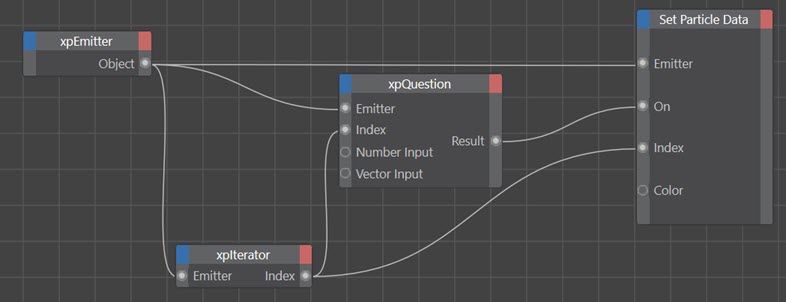
Note that you need to add the correct port to the Set Particle Data node so you can actually change some data. If you don't, then this example will have no effect. In this case the Color inport has been added and you can either set a new colour in the node itself or by linking a colour input to the Color inport.
The only other thing you need to change is in the Question node. Make sure that the 'Parameter to Test' is set to 'Particle Age' and that 'Mode' is set to '>=' (equal to or greater than). These are in fact the default settings. Finally, change the 'Number Input' to 30 (i.e. 30 frames).
When you play the animation, the particles will change colour to whatever colour you chose in the Set Particle Data node.
How does it work? Each frame, the Iterator node feeds each particle in turn to the Question node, which tests the age of each particle to check if the age is >= 30 frames. The result, which is either true or false, is sent to the 'On' port of the Set Particle Data node. If it is true, the set data node changes the colour of the particle; if false, the colour is unchanged. The actual particle to be changed is again fed to the Set Particle Data node by the Iterator node.
Trail Points Iterator
The XP Iterator iterates through all the particles emitted from an emitter. The Trail points iterator also does this but instead of outputting each particle index in turn it outputs the corresponding point in the spline generated by a Trail object. If the emitter is not linked to a Trail object, so no splines are produced, this produces an undefined result.
Using the X-Particles Question node
This node reproduces the Question object, but is also a very convenient shortcut to test a number of particle data parameters which might otherwise require a complex Xpresso setup to achieve. Using the node requires the following:
- an Emitter linked to its Emitter inport or dragged into the Emitter link field in the node's attribute manager
- a particle index - data from this particle will be tested, such as its age, speed, etc.; normally you would link the output of an XP Iterator node to the Index inport of the Question node
- the parameter to test, such as age, speed, distance to an object - these are the same as the Question object
- the test mode - this will vary between different parameters but include such things as equal to, greater than, etc.
- the value to test against; this is discussed more fully below
Please refer to the Question object manual page for details of specific questions. The reference manual for the node questions is not reproduced here, so important information may be found in the Question object page.
The test value
Numeric values
In most cases you will be testing a numeric value. For example, when testing a particle's age, the test value is an integer (number of frames); when testing speed, it is a floating-point (Real) value, but you don't need to worry about this - the Question node will always convert the input into the form it needs. In all cases when testing a number, the number to be tested must be found in the 'Number Input' inport.
In addition, for testing whether a number falls within a particular range, you will need to add the 'Number Minimum' and 'Number Maximum' inports and set these to the desired values.
Vector values
In some cases the parameter to test is a vector - for example, particle position or scale. In this case you must use the 'Vector Input' and 'Vector Range' ports, not the numeric ones.
Other question types
With other questions, what is being tested is not a number at all. It could be:
- a colour - use the 'Color' and 'Color Range' ports for testing colours;
- a particle group, if testing particle membership of a group; create as many 'Group' inports in the Question node as required and link Group objects to those ports
- an object, such as a camera, light, or other scene object (e.g. in questions such as distance to object, illumination, etc.); in this case, add the Question node 'Test object' port and link the appropriate object to that port
- a Boolean (True or False input); add the Boolean inport and you can link any Xpresso expression that outputs a Boolean into the port
- whether a particle is within a modifier's falloff; this is the only question for which the 'Weighting' inport is used, and it has the same meaning as in the same question in the Question object
Question types not included in the Question node
These questions found in the Question object are not present in the Question node:
- Custom Data (use the GetCustomData node and the built-in nodes within Xpresso to test custom data)
- Collision with a scene object (see the Custom Data examples for how to test for collisions in Xpresso)
- Particle-particle collision (see the Custom Data examples for how to test for collisions in Xpresso)
- Python scripts
- Random probability
Using the Data nodes
There are 12 data nodes, seven of which get particle data and five set it (there is no useful data that can be set in the Trail object or Branch modifier). It is vital to understand that these nodes do NOT get or set data from the respective objects. What they do is access the individual particle data directly. (This is what you would do with Actions of various kinds if you were using the X-Particles objects instead of the nodes.)
The Get Data nodes
To use these nodes, link an emitter to the node's Emitter inport. You also need to provide a particle index. Normally you would link an XP Iterator to the node's Index inport.
If you need to get data from a specific particle you will need to know its unique ID value. You can get this from the XP Console or by displaying the ID values in the emitter's HUD. Then you can enter this into the node's ID input port.
The node will then send the particle data to its various outports. Whether or not useful information is available will depend on what the object is doing. For example, you will not get useful data regarding light parameters from a Sprite object if the Sprite object is generating something other than lights.
Most output values are self-explanatory, but there are some which are not found in the various objects and modifiers. These are:
Get Particle Data node
- Count: the total number of particles emitted by this emitter (this is not specific to any one particle, unlike most other data)
- Group number: the number of the group the particle belongs to
- Type: the editor representation of this particle, e.g. Dots, Lines, etc.; this is a numeric value and the list of possible values is given at the end of this page
- Direction: a vector giving the particle's direction; note that the vector is normalised
- Speed: the particle's speed in scene units per second
- Vertex strength: only used with the Particle Deformer. It returns the vertex weight of the point linked to this particle.
- Infectio State: requires an Infectio modifier to be affecting the particle. If there is no modifier, or it not affecting a particle, the value returned is -1. Otherwise, it returns the following value:
- 0: particle is not infected or incubating
- 1: particle is incubating
- 2: particle is infected
Get Generator Data node
- 'Attached object index' refers to the index of the object in the 'Objects to attach' list of an 'Object link' tag.
- 'Completed morphs' is a counter for how many times the particle has completed a morph from one generated object to another. You can use this to take action when a particle has completed a specific number of morphs.
Get Sprite Data node
- 'Text' is the actual text string associated with this particle if the Sprite object is in Text mode
Get Trail Data node
- Growth time: this is a countdown value and is the number of frames to go before the trail is complete
- Length: the opposite of 'Growth time', this counts up until the trail is complete
- Point count: the number of points in the spline associated with this particle (this may or may not be the same as 'Length', depending on the 'Frame Sampling' value in the Trail object)
- Sample time: the value of the 'Frame sampling' setting in the Trail object
Note: the 'Max. Points' data item in previous versions of X-Particles has been removed from this node as changes to memory management have made it redundant. It will now always return zero.
Get Custom Data node
There are six outgoing ports which are:
- Integer
- Matrix
- Real
- String
- Time
- Vector
These correspond to the six possible data types for custom data. Normally, you would choose to output to the port corresponding to the custom data item's data type, so if for example it is an integer you would usually create the Integer out port and read the value from that.
However, you aren't restricted to doing that. If you choose a different port, the node will try to convert the data item into that data type. These are the conversion rules it uses:
| Out port used | Actual data type | Output |
| Integer | Real | An integer - the decimal fraction is discarded |
| String | The node will try to convert the string to a number and output that, if it cannot then it will output zero | |
| Time | The node will convert the time value to frames and output that | |
| Vector or Matrix | Zero (always) | |
| Real | Integer | A floating-point number with the same value as the integer |
| String | The node will try to convert the string to a number and output that, if it cannot then it will output zero | |
| Time | The node will convert the time value to seconds and output that | |
| Vector | The magnitude of the vector | |
| Matrix | Zero (always) | |
| Time | Integer | The data value is assumed to be the time in frames; this will be converted to a time value and that is then output |
| Real | The data value is assumed to be the time in seconds; this will be converted to a time value and that is then output | |
| String/Vector/Matrix | A time value of zero seconds | |
| String | All types | The value is converted into a string of text |
| Vector | Integer or Real | A vector with the same number value in all components (e.g. a value of '3.2' will output a vector of [3.2, 3.2, 3.2] |
| All other types | A null vector (all components zero) | |
| Matrix | All types | A unit matrix |
Get Branch Data node
The output values are:
- the length of the branch controlled by this particle, expressed in frames
- the branch level (for use with multiple sub-branch levels - see the Branching modifier for details)
- the maximum length of the branch, expressed in frames
- the number of branches associated with this particle
Get Physical Data node
The output values are:
- the particle physical data, such as mass, temperature, smoke, etc. plus the user value
The Set Data nodes
To use these nodes, link an emitter to the node's Emitter inport. You also need to provide a particle index which you would usually get by linking an XP Iterator to the node's Index inport. A third inport is created automatically: this is the 'On' port and you can use this to connect the output of a Question node, so that data is only changed for particles which pass the question.
If you want to set the data for a specific particle you will need to know its unique ID value. You can get this from the XP Console or by displaying the ID values in the emitter's HUD. Then you can enter this in the ID input port of the node.
The input ports are for the most part identical to the outports of the 'Get Data' nodes described above. There are a small number of data items which can be read but not set, and these are therefore missing from the Set Data nodes.
In some cases the value to be set is an integer value which in the object equivalent of the node is shown in a drop-down menu. For example, the sprite type (cube, sphere, etc.) is given in a drop-down menu in the Sprite object, but in the Set/Get Sprite Data nodes, an integer is input or output. To see the integer value which corresponds to the menu, please refer to this table:
| Node | Parameter | Possible values |
|---|---|---|
| Particle | Editor type | Dots = 0 |
| Particle | Infectio State* | Not infected or incubating = 0 |
| Sprite | Sprite type | Cube = 0 |
* to set the Infectio State requires an Infectio modifier in the scene which is affecting the particle. If this is not the case, nothing will happen.
Set Physical Data
This node is used to set physical data such as mass, temperature, smoke, etc. plus the user value.
This node now has a 'Group' input port. It is there to act as a filter. If you link a Particle Group object to this port, any other data which is input into this node will only be changed in the linked group.
Set Custom Data node
In this node, the Emitter, Index, ID and On ports work in the same way as the other 'Set Data' nodes. There are six additional incoming ports which are:
- Integer
- Matrix
- Real
- String
- Time
- Vector
These correspond to the six possible data types for custom data. Normally, you would choose to input to the port corresponding to the custom data item's data type, so for example, if it is a Time data item you would usually create the Time in port and input a value to that.
However, you can input to other ports. If you do that, the node will attempt to convert what you input into the data type it expects. So for example, if the custom data type is an integer (as defined in the emitter where the data item is created) but you input a string into the Set Data node, the node will try to convert that string into an integer. If it can't do that, the result will be zero (that is, a string which reads '0').
You should NOT rely on the conversion working in all possible combinations. Converting a string to a number may not always work, whereas converting a number to a string will always be successful. The same is true of conversion between other data types.
It is strongly recommended that you ensure the data type you are inputting to the Set Custom Data node is the same as defined in the emitter and that you use the correct port to input the new value.
Using a list of Groups
Many X-Particles objects make use of a list to hold particle groups. To add groups to a group list, create an Xpresso Constant node and set to type to In/Exclusion. Now you can drag the required groups into the node's list box, and link the constant node to whichever object requires a list, e.g. the 'Groups to Use' parameter in the emitter.