Fragmenter Object
The Fragmenter object performs two functions: it enables you to generate individual polygons from the faces of a polygon object used as an emitter source (which can give the appearance of a fragmenting object) or it can be used to move existing objects in the 3D world using the particle engine.
Note the Fragmenter currently does not work with n-gons, it always splits the object into polygons even if n-gons are present.
Interface
This is the Fragmenter object's interface:
For the buttons at the bottom of the interface, please see the 'Common interface elements' page.
Parameters
The Fragmenter has two modes with different parameters:
Faces (Polys) and Faces (Objects) mode
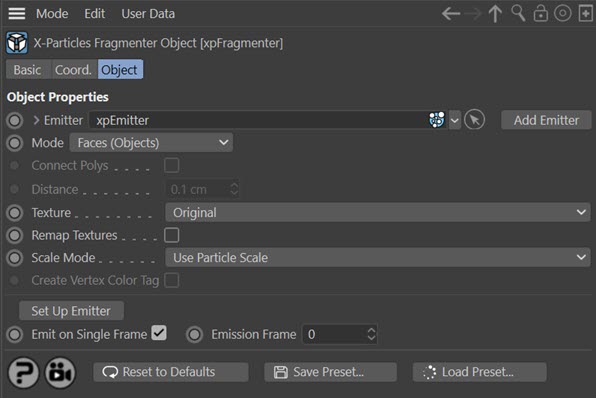
Emitter
In all modes, the Fragmenter requires an Emitter to work with. Drag an emitter into this field to make the other parameters available.
Add Emitter
Click this button to create a new emitter and add it to the 'Emitter' field.
Mode
This drop-down has three settings:
Faces (Objects)
A one-polygon object will be generated from each face of the source object used in the emitter from which a particle is generated. This mode generates multiple objects and can slow down playback, but each object can be individually scaled and rotated if required.
Faces (Polys)
A single object is generated with each polygon corresponding to a face in the source object used in the emitter. This is much faster to play back in the editor but the faces cannot be scaled or rotated individually. The appearance of the generated faces is the same as in 'Faces (Objects)' mode.
Objects
This is the other mode of the Fragmenter. It does not generate any new objects but enables existing objects to be moved around the 3D world using the X-Particles particle engine, modifiers, etc.
Faces (Objects) and Faces (Polys) modes
Please note: in these modes, the source object used by the emitter should not be scaled using the object's Attribute Manager. You can of course resize the object manually or use the Coordinates Manager to resize it, but do not alter the scale from the default in the Attribute Manager. This is because doing so will change the object's matrix and create problems such as incorrect polygon placing and rotation.
Connect Polys
Only available in Faces (Polys) mode, this setting causes the polygons to be connected if they are within range of each other. The range is given in the 'Distance' setting.
Distance
Polygons closer together than this value will be connected (only in 'Faces (Polys)' mode and if 'Connect Polys' is checked).
Texture
The generated faces can be assigned a texture with this setting. This setting is only available when 'Mode' is set to 'Faces (Objects)'.
Important: the texture to be applied MUST be applied to the Fragmenter object. It can be the same as any texture applied to the source object, but it must be copied to the Fragmenter.
The drop-down has three settings:
Original
The generated faces will each receive a copy of the texture applied to the Fragmenter. By default each face will receive a complete copy of the bitmap or shader applied to the Fragmenter. However, if 'Remap Textures' is checked, each face receives the same portion of the texture that was displayed by the corresponding face on the source object.
Note that the texture must be UV-mapped for this to work correctly. Other projections may not be successful.
Random/Multishader
If no texture is applied to the Fragmenter object and this option is chosen, each face will receive a randomly-generated colour. If a texture containing a Mograph Multishader is applied to the Fragmenter, each face will receive one of the shaders in the Multishader.
Note that if the texture applied to the Fragmenter is anything other than a Multishader, then this mode has no effect (e.g. a bitmap would behave the same as if the 'Original' setting was chosen).
Use Particle Color
If no texture is applied to the Fragmenter object and this option is chosen, each face will receive the colour of the particle which generated it.
Note that if any texture is applied to the Fragmenter, then this mode has no effect (e.g. a bitmap would behave the same as if the 'Original' setting was chosen). For this mode to work successfully, no texture must be applied to the Fragmenter.
Remap Textures
This switch is used when in 'Faces (Objects)' or 'Faces (Polys)' modes. See the 'Original' setting above for more details.
Note: the source object MUST be a polygon object for remapping to work. Primitive objects, C4D generator objects, cloners, etc. will not work. It must be an editable polygon object.
Scale Mode
This drop-down enables you to select how the generated faces will be scaled. It is not available if 'Mode' is set to 'Objects'.
The drop-down has two options:
Use Particle Scale
The scale of the particle will be used to scale the geometry. By default particles have a scale of 1, so with this option the generated polygons will have the same size as those of the source object, unless the particle scale is changed.
Use Particle Radius
This option will scale the polygon size up or down to match the particle radius. You will probably need to set a fairly large radius to see the generated faces if you select this mode.
Create Vertex Color Tag
This switch is only available in Faces (Polys) mode. It will cause a Vertex Color Tag to be added to the Fragmenter object, taking the colour from the particle associated with each polygon. You can then use this tag in a vertex map shader to colour the polygon faces.
This feature has some limitations:
- the switch is only present in Cinema 4D R18 and above, since it requires the Vertex Color Tag which was introduced in R18
- It only works in 'Faces (Polys)' mode
- it will not work if the 'Connect Polys' switch is checked
- finally, it only works if a single shot of particles is emitted - if you emit more than one frame's worth of particles, the tag has to be recreated on each frame and will lose its connection to the vertex map shader
To use this feature, check this switch and when you run the animation the tag is automatically created and populated with the colour data for each particle. To shade the polygons, add a new material to the Fragmenter object, then in the material add a vertex map shader to the desired channel, and in the shader drag and drop the vertex colour tag into the shader.
Important: do not change the tag from 'Points Only' to 'Polygon Points'. If you do, it will be deleted and recreated.
Note that if you do anything which changes the particle count, the tag is deleted and recreated. This will break its link to the vertex map shader. If you emit more than one frame's worth of particles, this will increase the particle and face count, causing the tag to be recreated. Unfortunately it is not possible to alter the amount of data stored by the tag without first deleting and rebuilding it.
Other actions may also cause the tag to be recreated. For example, if you subdivide the source object, or you change the source object to another one, the tag is recreated. This will also happen if you change the tag from 'Points Only' to 'Polygon Points'. In each case you will have to drop the new tag into the shader again.
If you need to delete the tag permanently, first turn off this switch then delete the tag. Otherwise, it will be created again automatically.
Set up Emitter
To set up the emitter to work correctly with the Fragmenter, you need to make several changes to the emitter settings. For reference, these are as follows:
Faces (Objects) and Faces (Polys) modes
- Set the emitter to emit from an object and drag the object to use into the 'Object' field. This cannot be a spline object or anything which doesn't have any polygons.
- Set the emitter to emit from 'Polygon Center'. No other mode will work.
That's all you need to do. However, you can optionally also make these changes:
- Turn on 'One Particle per Source Element'. This will generate one and only one particle for each polygon in the source object, each frame.
- Set the emitter to emit on one frame only (if 'Emit on Single Frame' is checked). In conjunction with 'One Particle per Source Element' in the Emitter this will cause the Fragmenter to generate one new polygon for each face in the original object.
If you click the 'Set up Emitter' button then assuming you have dropped an emitter into the 'Emitter' link field, the Fragmenter will automatically set up steps 2, 3, and 4 above for you. The only one you have to do manually is step 1, since the Fragmenter has no way of knowing which object you want to use.
Emit on Single Frame and Emission Frame
If 'Emit on Single Frame' is checked, which it is by default, clicking the 'Set up Emitter' button will carry out step 4 above. If it is checked, then the frame to emit on will be found in the 'Emission Frame' field. You can change this if desired, but the change will only be made in the Emitter if you click 'Set up Emitter' again.
Objects mode
In this mode the interface is slightly different and not all parameters are available:
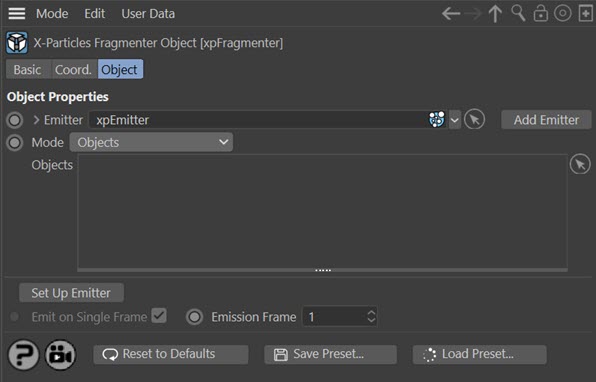
Objects
Drag any existing scene objects you want to control with the particle engine into this list. The emitter will generate a particle for each object and the Fragmenter will move the objects to match the particle movement.
In Objects mode, the Fragmenter does not clone objects or generate new ones: it simply moves objects which already exist in the scene. Therefore, it is not possible to emit particles on more than one frame, since that would not make sense.
For this reason, when you set up the emitter to use this mode, or use the 'Set up Emitter' button, the start and end frame emission parameters in the Emitter are disabled. The actual frame on which to emit the particles is controlled entirely by the 'On Frame' parameter in the Emitter's Object tab.
Set up Emitter
In this mode, clicking 'Set up Emitter' will set the emitter into 'Defined Emission' mode using a 'Fragmenter List'. The 'Emit on Single Frame' setting is ignored since in this mode the emitter will never emit more than one particle for each of the objects in the list. The frame on which to emit those particles can be set in the 'Emission Frame' parameter and this will be set in the Emitter's 'On Frame' setting if 'Set up Emitter' is clicked.
You can change the emission frame at any time if desired, but the change will only be made in the Emitter if you click 'Set up Emitter' again. Alternatively, you can directly change the 'On Frame' parameter in the Object tab of the Emitter.