Using Python in X-Particles
- Writing Python for X-Particles
- Adding your own custom data
- Questions
- The Python API
- API Reference
- Using the Xpresso Python node
Writing Python for X-Particles
This is not a guide to writing Python - you have to learn that yourself - but how to get Python scripts working with X-Particles.
When you create a Python modifier in X-Particles, you have a basic script that looks like this:
        import c4d, xparticles

          #Welcome to the world of Python
        def InitModify():

            return True
        def FreeModify():

            return True
        def ModifyParticle():

            return True
        def Draw():

            return True
This is the skeleton of your script. The key is the function 'ModifyParticle()'. What this does is simply iterate through every live particle. You can apply changes to those particles by getting or setting the particle data. Of course, you can also call any other Cinema 4D Python functions that you might need.
Global variables
Some global variables are available to use within your scripts, these are:
doc - the document containing the modifier
op - the modifier object itself
emitterObject - the emitter object (c4d.BaseObject)
emitter - the X-Particles emitter (xparticles.Emitter)
particle - the first particle in the particle array, only within Modify()
falloff - the falloff of the modifier evaluated at the particles position, only within ModifyParticle()
An example may help to clarify this.
Example 1
In this example, we will change the colour of the particle to red. It's a very simple script which looks like this:
        import c4d, xparticles

          #Welcome to the world of Python
        def ModifyParticle():

            particle.SetColor(c4d.Vector(1, 0, 0))

            return True
        def Draw():

            return True
This routine is called for every particle in the field of effect of the modifier, and turns the particle colour to red. If the modifier falloff was set to 'Infinite', this would happen immediately the particles were created, so they would look red from the start.
If you now change the falloff to 'Box', and move the box away from the emitter, the particles change colour whenever they enter the falloff (the actual value of the falloff has no meaning in this modifier). Of course, once they are red, they stay red unless you change them in some other way.
Note: for ModifyParticle(), remember that the script is only called when a particle is in the field of effect of the modifier. That will be always, if the falloff is set to Infinite, but for other shapes, the function is only called when the particle is in the modifier field. Also, particles will only be affected if they themselves are in the field of the modifier.
ModifyParticle() is the simplest way to use the modifier and the one you will probably use most often. The alternative is to use another function - Modify(). All this does is get the first particle in the emitter and executes the Modify() function on it.
So what use is that? Well, you can still iterate through all the particles if you have the first one. Example 2 shows how this works.
Example 2
This example will use the Modify() function to change the colour of all particles with an index in the particle array between 500 and 1000 to red (the very first particle has index 0):
        import c4d, xparticles

          #Welcome to the world of Python
        def Modify():

            px = particle

            while px is not None:

              ind = px.GetIndex()

              if ind > 500 and ind < 1000:

                px.SetColor(c4d.Vector(1,0,0))

              px = px.GetNext()

            return True
        def Draw():

            return True
This function checks the particle index and only changes the colour of those between 500 and 1000.
Note that Modify() works all the time - whether or not a particle is in the field of the modifier - and similarly it works on all particles.
Why use Modify() instead of ModifyParticle()? Due to the Python overhead, Modify() is about twice as fast compared to ModifyParticle(), which is important if you are dealing with large numbers of particles. It also gives finer control over the particles whereas ModifyParticle() just iterates through all of them whether you want to or not. With Modify(), you can just iterate through a small subset if that's all you need to do.
Important: you cannot use both ModifyParticle() AND Modify() functions in your script. If you do, ModifyParticle() takes precedence and Modify() will never be used.
Adding your own custom data
You aren't restricted to using the (large) set of data an X-Particle carries! You can add your own and use that. To do this you have four functions:
- AddCustomData()
- SetCustomData()
- GetCustomData()
- FindCustomData()
To use these, you would first see if the particle had the custom data item, by using FindCustomData(). If it does, you can use GetCustomData() to retrieve its value, or SetCustomData() to change its value. If the custom data item does not exist you can add it using AddCustomData(). This example may help to make this clear.
Example 3
In this example, we will create a custom data item and print it to the console:
        import c4d, xparticles

          #Welcome to the world of Python
        def ModifyParticle():

            index = particle.FindCustomData(0, "hello")

            if index is not None:

              print index

              mydata = particle.GetCustomData(index)

              print mydata

            else:

              particle.AddCustomData(0, "hello", 1234)

            return True
        def Draw():

            return True
Each custom data item has a name, in this case "hello". FindCustomData() checks to see if this data item exists, and if it does, returns the particle index. The index is then printed to the console. GetCustomData is then used to retrieve the data value using the particle index, and that value is then printed (which would be '1234' in this case). If desired, the data value could be altered using SetCustomData(index, value).
If the data item does not exist, it is added using AddCustomData, which is provided with the identifying name and an initial value.
Questions
In addition to the Python modifier, there is also a Python Question. This lets you test whatever aspect of the particle you need and trigger an action if required. To set up a Python question, create a Question object then select 'Python Script' from the 'Parameter to Test' drop-down menu. You have a default script like this:
        import c4d, xparticles

          #Welcome to the world of Python
        def question():

            return True
In this case, the function you need is called 'question()' and it MUST return either True or False. You would return True if the particle passes the question and False if it does not.
Example 4
Suppose we want to test if the particle index is between 10 and 20, and trigger an action for every particle which passes:
        import c4d, xparticles

          #Welcome to the world of Python
        def question():

            if particle.GetIndex() >=10 and particle.GetIndex() <= 20:

              return True

            else:

              return False
As you can see, the question returns True for all particles with an index between 10 and 20 inclusive. An action will be triggered for all such particles; this can be any action you like, just as for any other question. You can also use Sub-Questions and have a script in the Question and a different one in the Sub-Question if you like.
Remember that for Questions, unlike Modifiers, one particle is passed to the question at a time, and that particle will be tested against the question until it passes.
The Python API
To see the full API, you can do this:
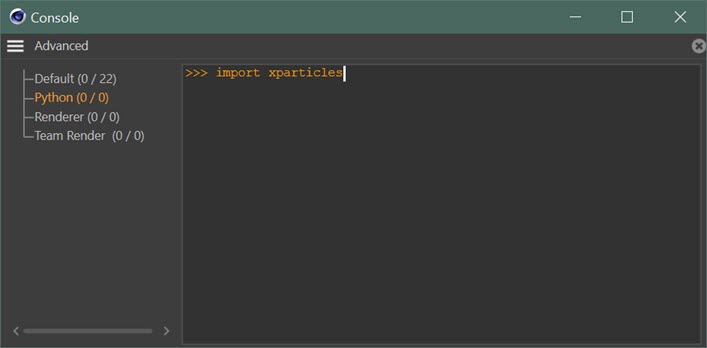
1. Open the console and select 'Python' in the bottom bar.
2. In the bottom bar, type 'import xparticles' (without the apostrophes) like so:
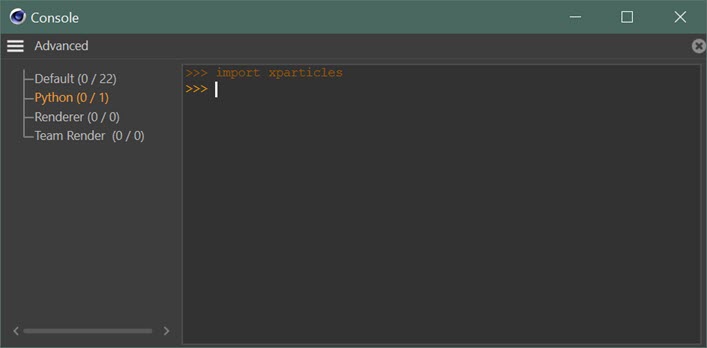
3. You should see this, that is, no error is reported:
4. Now type 'help (xparticles)':

5. You then see this (only a part is shown):
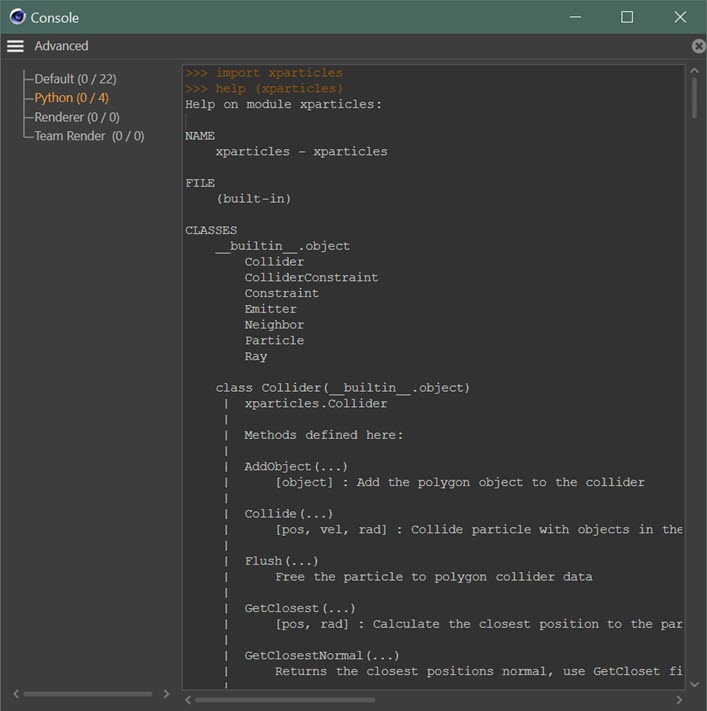
This lists all the available functions. If you right-click in the console, then select 'Copy All' you can copy all the text and paste it into a text editor of your choice for future reference.
API Reference
The full API reference can be found on the API reference page, but please note that it does change and this manual may not show the most up-to-date version. The most recent API can be seen in the console as shown above.
Using the Xpresso Python node
You can also use the Python node which is part of Xpresso to control X-Particles. For example, you can control an emitter completely and determine when it emits a particle and its starting position, velocity, etc.
The Xpresso setup would look like this:
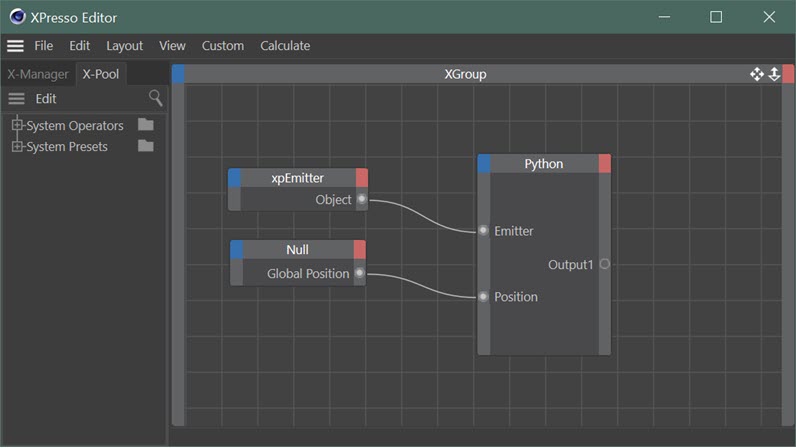
Here, the emitter object has been dragged into the Xpresso editor, linked to a Link inport of the Python node, and its birthrate set to zero - so it will not emit any particles. A null object has also been dragged in and its global position linked to a Vector inport on the Python node.
The Python code looks like this:
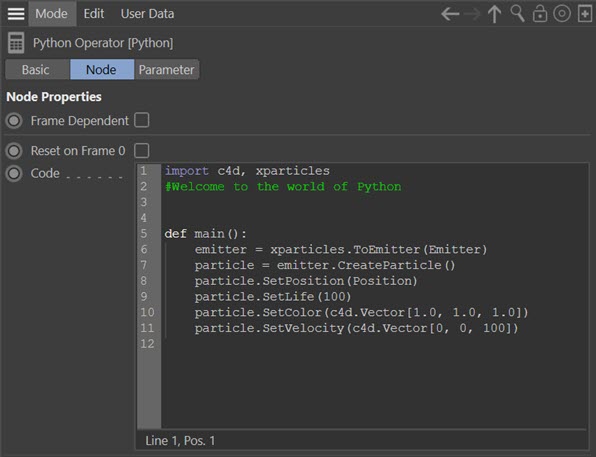
All this does is cause the emitter to create a particle, set its position to that of the null object, then set some basic parameters such as lifespan, color, and velocity. Each frame the emitter will now emit one particle with these parameters.