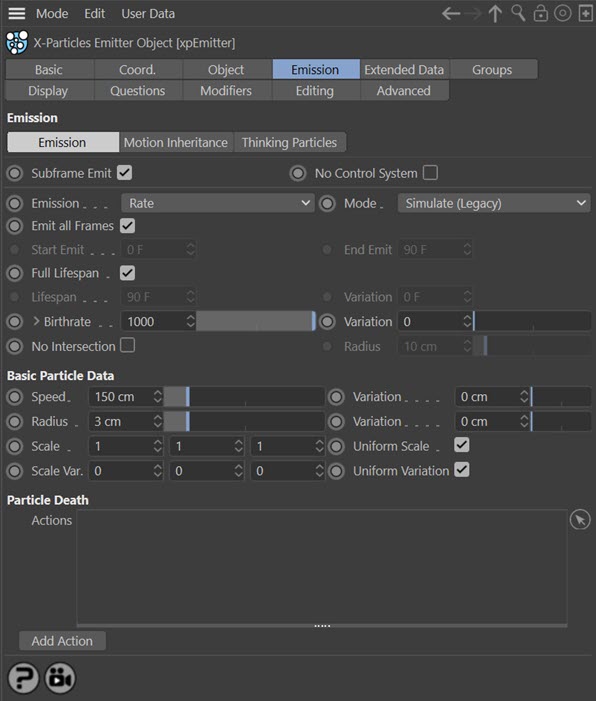
Emitter Emission tab: Emission quicktab
This quicktab is concerned with particle emission and death.
Interface
Parameters
General settings
Subframe Emit
One problem with any particle system is that since particles are emitted each frame, regular 'bands' of particles may be generated. This is especially noticeable when the emitter itself is animated. For example, you might want to produce the trail from a rocket but find that instead you get a series of pulses or bands of particles. Sub-frame emission helps to overcome this. Normally you should leave this enabled, but if you need to turn it off, uncheck this switch.
The number of sub-frames cannot be set differently for each emitter. Therefore, the setting is found in the project settings (X-Particles tab).
No Control System
If this switch is checked, the X-Particles control system will be ignored by the emitter. That is, no Question objects will be tested and no Actions carried out.
Emission
The 'Emission' drop-down has seven options:
Rate
This is the default setting; particles are emitted each frame at a rate determined by the Birthrate settings (see below).
Pulse
Normally, the emitter emits particles in all frames. If you want the emitter to emit one big pulse of particles in one frame, turn on this option. The number of particles emitted in each pulse is found in the 'Birthrate' parameter.
Note that with a high number of subframes, the number of particles emitted may be slightly higher than expected. This is due to arithmetical rounding in the calculation of the number of particles to be emitted.
The pulse length and interval between pulses can also be set:
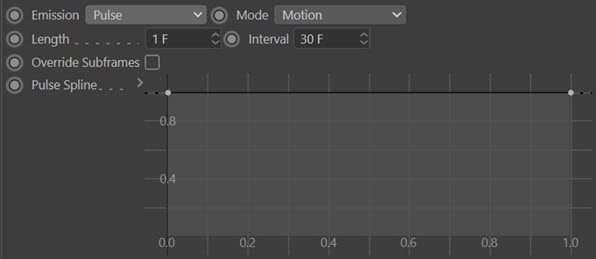
Length
You can specify the number of frames the pulse will last for here. So if you want a 5-frame pulse every 30 frames, set the 'Interval' to 30 and the 'Length' to 5.
Interval
Set the number of frames between pulses here. If you want just one pulse to be emitted in the scene, simply set this value to a higher number than the scene length.
Override Subframes
This switch is intended for use when you have a pulse emitter which emits very small numbers of particles each pulse and the X-Particles subframe count is greater than 1. Consider a scenario in which you want to emit 1 particle every 10 frames. With subframes set to 1, that is what you will get, but if you increase the number of subframes to 3 (for example) you will only get about one-third of the number of particles expected. This is because the emitter tries to divide the number of particles up into a certain number per subframe, but of course it can't divide 1 particle into 3!
The solution is to check this switch. This will cause the emitter to ignore the increased subframes when emitting in pulse mode and emit them only on the first subframe. This is not useful for larger particle counts as you may see banding in the particle emission, but for larger counts this switch isn't needed anyway. It is recommended that you leave this unchecked unless you are using multiple subframes in pulse mode and don't see the correct number of particles.
Pulse Spline
If you have a pulse with a Length of greater than 1 frame you can control the emission over the pulse with this spline. This will let you give a feathered edge to the pulse rather than a solid block of particles. The spline gives best result with medium or large numbers of particles and a pulse length of 5 frames or more (any less and you won't see much effect).
Shot
In this mode the emitter fires a single shot of particles on one or more frames. Additional parameters become available in this mode:

Shot Type
 There are three options in this menu:
- Random: particle emission positions are generated randomly (this is the conventional shot mode in previous versions of X-Particles)
- Regular or Hexagonal: the same as the 'Regular' and 'Hexagonal' emission modes (see below)
Shot Time
The time when the shot will take place. This can be animated to fire multiple shots.
Note that if you animate this parameter, conventional linear animation will probably fail. This is because the animation will result in times such as 5.2 frames (for example) in the 'Shot Time' parameter. X-Particles considers whether to emit particles when a new frame is reached, but since the scene time will never be anything other than whole frames, the scene time will not match the shot time and nothing will be emitted. You can easily solve this by ensuring that the animation is done in step-wise fashion to give integers and not part frames in this field.
Duration
The length of time for the shot. It is recommended that the duration is left as a whole number of frames (e.g. 3F). If part frames are used (e.g. 10.5F) then arithmetical rounding during the calculation of the number of particles to emit may mean that slightly fewer particles than expected are emitted. This will not happen with whole frames.
Shot Count
The number of particles in the shot.
Per-Frame
If this switch is checked, on each frame the number of particles emitted is the value in 'Shot Count'. If it is unchecked, the value in 'Shot Count' is a value per second. For example, if the value in 'Shot Count' is 1200, the 'Duration' is three frames, and this switch is checked, 3600 particles will be emitted in total (1200 x 3 frames = 3600). But if this switch is unchecked, and the project frame rate is 30 frames per second, 120 particles are emitted (1200 / 30 = 40 particles per frame for 3 frames = 120).
Note that arithmetical rounding in the calculation of how many particles to emit per frame may result in slightly fewer particles being emitted than expected.
Also note that if the shot count is less than the number of frames specified in the 'Duration' setting, no particles are emitted. This is because the number of particles per frame will be calculated at less than 1 (which is clearly not possible - less than 1 particle cannot be emitted).
Regular and Hexagonal
These are special emission modes specifically for use with fluid simulations. Although you can use them with standard emitters such as the rectangle or circle, they are principally intended for use when emitting from an object. If you select one of these modes, you will see that particles are only emitted from the object's volume and they are packed into the volume so as to ensure no overlapping particles. This is because particles which overlap at birth can result in unstable or exploding fluid sims.
The difference between them is the method of packing. 'Regular' uses a regular grid (as in the Mograph cloner) but 'Hexagonal' uses a more efficient packing method allowing more particles to be emitted from the same volume.
Note that these are special modes and if you select them none of the usual birthrate options are available. In addition, they do not work with the emitter falloff - the falloff is ignored in these modes.
These modes have additional options:

Jitter XY & Jitter Z
These settings allow you to disturb the regularity of the grid by offsetting the particle position across the plane of the emitter ('Jitter XY') or along the particle direction ('Jitter Z'). There will still be no overlap, so using these options will result in fewer particles being emitted.
(These options were previously labelled 'Jitter X' and 'Jitter Y' but have been renamed to prevent confusion as to their purpose. The functions remain unchanged.)
Spacing
This setting enables additional space to be added between each particle. If you make this too large, you may find that few or no particles are emitted.
Trigger
With this setting three other parameters become available:

The purpose of this mode is to allow you to fire a burst of particles at any desired time, rather than using continuous or pulsed emission. Particles will ONLY be emitted when the switch 'Pull Trigger' is checked. You can do this in several ways:
- keyframe the 'Pull Trigger' switch - this will turn the emitter on and off at set frames
- use Xpresso to set and unset the switch. The input to the 'Pull Trigger' switch is a Boolean so you can use any expression which evaluates to a Boolean to make particle emission start and stop
- use the 'Change Emitter' action to pull or release the trigger (the 'Trigger Count' option must be set to 'Set by Action' for this to work, if it is not then no particles will be emitted)
Trigger Count
The number of particles emitted in trigger mode uses the Birthrate by default. You can change the 'Trigger Count' drop-down to alter this:
- Use Birthrate: uses the 'Birthrate' setting to determine the number of particles to emit
- Specify: the number of particles is given in the 'Count' field
- Set by Action: the number is set by the Change Emitter action
Count
The number of particles to emit if 'Trigger Count' is set to 'Specify'.
Pull Trigger
Check this switch to fire a burst of particles. Only useful when turned on and off by one of the methods described above.
Controlled Only
If this option is selected, the emitter will not emit any particles until told to do so. This option will be set automatically by any other object which requires an emitter to generate spawned particles - for example, a Spawn modifier, Collider tag, Particle-Particle Collisions object, etc. - to avoid the problem of 'self-spawning' (see the Spawn modifier for details).
It can also be used when the emitter Initial State is used or when an emitter is partially cached. In both cases, you can set the emitter to this mode and it will only emit those particles stored in the initial state or by the cache, and no more.
Important: this option is automatically selected when you drag an emitter into the link field of any X-Particles object which has a link for a spawning emitter. This is to prevent the phenomenon of 'self-spawning' described on the Spawn modifier page. If you really want your emitter to self-spawn, you can choose another mode after dragging the emitter into the object's link field.
A number of emitter settings are unavailable when this button is checked because they are not relevant when an emitter only spawns. These are:
- Emit all Frames
- Start Emit/End Emit
- Birthrate and Variation
Note that the emitter icon in the object manager changes when this mode is selected. In addition, the colour of the icon can be changed by using the 'Icon Color' parameter in the Display tab.
Mode
This menu adds some important new options to how particles are emitted. It has three options, which are as follows.
Simulate (Legacy)
This is the conventional emission mode in which particles are first emitted on the first frame (not the base frame, which is usually frame 0) of the animation. This is the default setting for backwards compatibility.
Simulate
This is identical to 'Simulate (Legacy)' except that particles are emitted on the base frame. This makes it possible to use the emitter as an advanced cloner-type object. If you combine this with setting emission to 'Shot' then you will have a single shot of particles available on the base frame even before the animation plays.
Motion
In this mode the particles are emitted on the base frame (usually frame 0) but each subsequent frame the existing particles are destroyed and re-emitted. For this reason they appear not to move, but they do have velocity - it's simply that they only live for one frame then are re-emitted in the same position (unless something else changes).
The real power of this mode comes when emitting from an object. In this animation, the particles in 'Motion' mode are emitted by texture, and the texture is animated. As the texture changes so the particles appear to change position to follow the texture, but in reality they are being recreated each frame:
Emit all Frames
When this is set (it is on by default) the emitter will continue to emit particles from the start of the animation until the end (or until the maximum number of particles is reached). If you uncheck this switch, you can then set when the emission starts and when it ends using the ‘Start Emit’ and ‘End Emit’ fields.
Start Emit and End Emit
These settings determine when particle emission starts and stops once you have unchecked the ‘Emit all Frames’ options.
Full Lifespan
This is a convenience feature which simply sets the lifespan of the particles to the length of the document. When this is selected, the 'Lifespan' option is unavailable.
Lifespan and Variation
The life of the particle in time units. Once the particle’s life exceeds this value, it is removed from the scene. This option is not available if 'Full Lifespan' is checked. You can add some variation to the particles' lifespan with the 'Variation' setting.
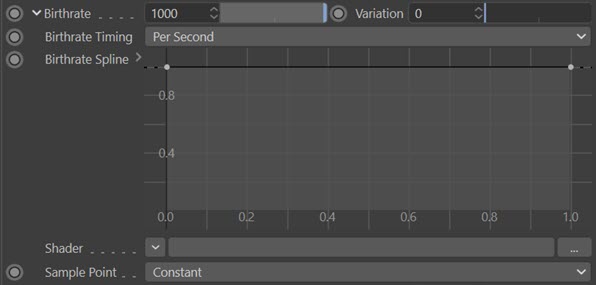
Birthrate and Variation
The number of particles emitted per second (not per frame), or per pulse if 'Pulse Emission' is turned on. Click the small arrow to the left of the parameter to show additional birthrate settings:
 .
.
Birthrate Timing
This setting controls how the birthrate value is calculated.
Per Second
This is the default setting and means that the birthrate value is the number of particles per second.
Per Frame
With this option the birthrate value is the number of particles per frame.
Birthrate spline
You can use the Birthrate Spline to vary the birthrate over time. The value in the spline is used to multiply the Birthrate value. For example, if the spline has two points and the leftmost point is set at zero while the rightmost point at 1, the birthrate will increase over time up to its maximum at the end of the animation.
When a point is set at 1, the actual birthrate is the same as the value in the 'Birthrate' parameter. Values smaller than 1 will reduce the birthrate in proportion.
Shader
The birthrate can also be driver by a shader. Add any shader to this link to see this. Animated shaders can be used to produce varying birthrates.
Sample Point
If a shader is added to the 'Shader' link, this setting controls how the shader is sampled to produce a value which is then used to calculate the number of particles to be emitted. The drop-down menu has two options:
Constant
With this option the shader is always sampled in the same place. This is the best option for use with animated shaders since the result of the sampling will be determined by the animation of the shader. For non-animated shaders this option will always give the same result.
Random
Here the shader will be sampled at a different, randomly-selected position each time. This is the best option for non-animated shaders or bitmaps since the sample value will depend solely on the shader or bitmap at the sample position.
No Intersection and Radius
If checked, the emitter will try to prevent particles intersecting at birth (useful if particle-particle collisions are enabled). The Radius is the size of the virtual sphere around the particle to check for intersections.
Note: if you want to avoid all particle intersections at birth, this value should be twice the particle radius. Smaller values than that risk intersections taking place.
Basic Particle Data
Important: if the emitter is emitting one or more groups, these settings will be ignored by any groups which control the parameters listed below, since then these settings are taken from the particle's group.
This section lets you set the 'basic' particle data that all particles have. This includes:
Speed and Variation
The particle’s initial speed in screen units per second.
Radius and Variation
The particle radius, in scene units. This is used for collisions, the Skinner object, and also determines the size of the particles in the editor when 'Spheres', 'Circles' or 'Boxes' are selected as the particle shape.
Scale and Scale Var.
The particle scale. This is used by the Generator, Sprite and Fragmenter objects to scale the generated geometry.
Uniform Scale and Uniform Variation
If these switches are checked, the value in each of the Scale and/or Scale Var. fields are changed uniformly - that is, a change in one vector component is made in the other two components. This is a convenience feature to save having to change all three components to match. If you need to set the components to different values, uncheck either or both switches.
Particle Death
It is possible for Actions to be triggered when a particle dies. Drag the Action(s) into the 'Actions on death' list, or click the 'Add Action' button to add an Action.
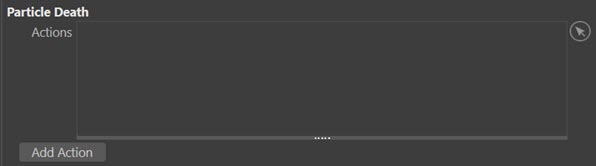
Actions
Drag and drop any Actions to be carried out on particle death into this list box.
Add Action
Click this button to add an Action object to the scene and automatically add it to the list.