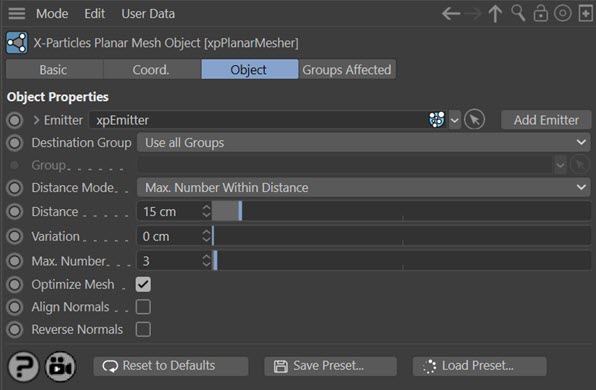
Planar Mesher Object
The Planar Mesher object takes a particle stream and adds polygons (triangles) between particles depending on the closeness of particles to one another. It uses exactly the same algorithm as the Trail object 'Nearest by Distance' connection mode, so if you wish you can use the two objects together.
The object's interface looks like this:
For the 'Groups Affected' tab, and for the buttons at the bottom of the interface, please see the 'Common interface elements' page.
Parameters
Emitter
Drag the emitter the object will use as the particle source into this field.
Add Emitter
Click this button to create a new emitter and add it to the 'Emitter' link field.
Destination Group
This lets you select which particle groups are used in making the connections. The available options are:
- Use All Groups: each particle will form connections to other particles regardless of which group they are in
- Only Same Group: each particle will only form connections to particles in the same group as itself
- Only Different Groups: each particle will only form connections to particles in different groups to itself
- Specific Group: each particle will only form connections to particles in a specific group; specify which group to use by dragging the Group object into the 'Group' link field
- All Except Specific Group: each particle will only form connections to particles which are NOT in a specific group; specify which group to use by dragging the Group object into the 'Group' link field
Note: the 'Specific Group' setting does not mean that only the particles belonging to the specified group will be used in the mesh. What it means is that all the particles will only link to a particle in the specified group. For example, if you have three groups and group 3 is the specified group, particles from all groups will form links to particles in group 3, but particles in groups 1 and 2 will never link to particles in either of those groups - only to those in group 3.
Group
This field contains the group to use when 'Destination Group' is set to 'Specific Group' or 'All Except Specific Group'.
Distance Mode
This drop-down menu has two settings:
All Within Distance
Each particle will connect to every other particle which is closer to it than the value given in the 'Distance' setting. Increasing that value will result in more connections because more particles will be within that distance.
Max. Number Within Distance
This is the same as 'All Within Distance' except that you can use the 'Max. Number' setting to limit the maximum number of connections. For example, if this is set to 5, and there are 10 particles within the threshold distance, connections will only be made to the 5 closest particles.
Distance and Variation
This is the maximum distance between two particles which will become one edge of a possible triangle. The lower this distance the fewer triangles will be generated, since there will be fewer pairs of particles which are that close together. You can add some variation for different particles by using the 'Variation' setting.
Max. Number
This is the maximum number of connections to use when 'Distance Mode' is set to 'Max. Number Within Distance'.
Optimize Mesh
If this switch is checked, the generated mesh will be optimized to remove unused points, duplicate points, etc. This is the same as using Cinema 4D's 'Optimize' command with the default values.
Normally you should leave this switch checked. If you add thickness to the mesh using a Cloth object or some other method (this is not recommended but the option is there) you may need to uncheck this switch. Doing so will avoid jumps in the mesh size as the polygon count changes but will result in a poorer-quality mesh.
Align Normals
If this switch is checked, the normals of the resulting mesh will be aligned. This is the same as the 'Align Normals' command in Cinema 4D. Note that with large numbers of particles this may slow down object generation.
Reverse Normals
If this switch is checked, the normals of the resulting mesh will be reversed. This is the same as the 'Reverse Normals' command in Cinema 4D. Note that with large numbers of particles this may slow down object generation.
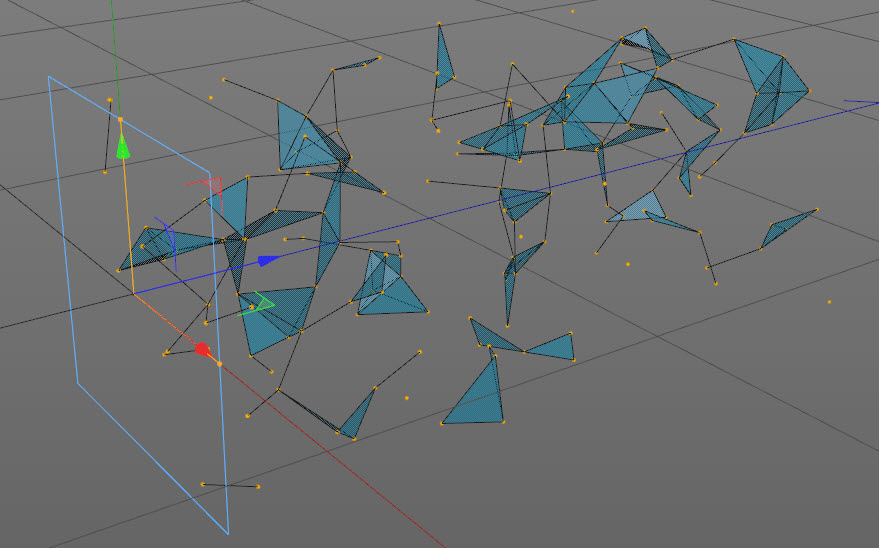
Using the Planar Mesher
This is a simple mesher which generates geometry between three particles, using the distance mode settings described above. Since the algorithm is the same as the Trail object (in 'Nearest by Distance' mode) you can generate and texture the geometry then render the splines from the Trail object to give an outline to the triangles.
Note that if you use the Trail object in this way the settings should be identical in the Planar Mesher and the Trail object. In that case, any spline triangle formed by connecting particles together in the Trail object will always be filled with a polygon.
However, if the 'Distance' setting in the Trail object is greater than the 'Distance' setting in the mesher, you will see spline triangles which are not filled. Of course, this may be what you want. Conversely, if the 'Distance' setting in the Trail object is smaller than the 'Distance' setting in the mesher, you will see polygons which don't always have a spline on each edge.
The mesher does not produce a closed mesh, nor does it produce a mesh with volume like the Skinner. The sort of results you get might look like this:
After rendering, it would look like this:
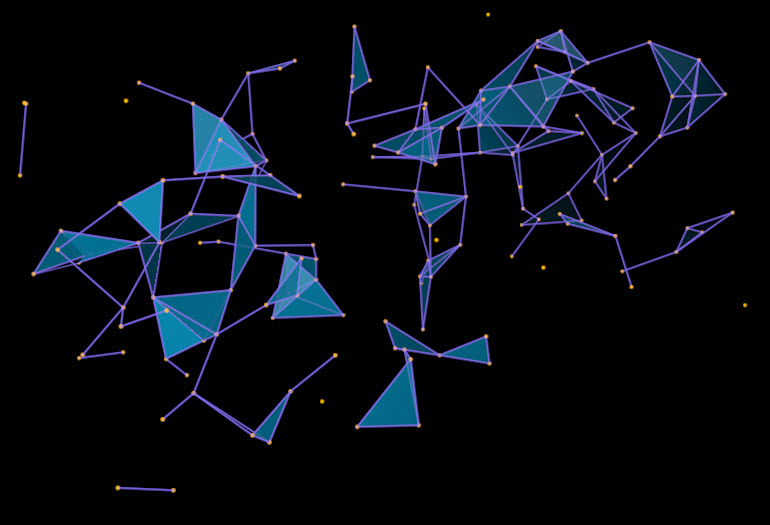
This shows the Trail object outlining each polygon. In this example, the X-Particles Distance Shader is also being used to fade out the polygons the further they get from the world centre.