Cache Object
The Cache object is used to cache the X-Particles system.
The cache data is held in tags on each object which has been cached. This makes it a simple matter to exclude objects from caching if desired. Since multiple cache tags can exist on each object, you can set up multiple caches and switch between them. See Multiple caches below for more details.
Before using the Cache object, please the see the Workflow notes below.
Special note regarding filenames
DO NOT use Unicode characters in cache filenames or file paths! If you do, and you cache the scene externally, Cinema may fail to read the cache files when you reopen the scene. This appears to be a bug in Cinema's file handling.
Very importantly, if you give a name to any XP object which will be cached, and you use Unicode characters in the object's name, the cache files which are created will use the object name, so will also contain Unicode characters. So for example, if you name an emitter as xpEmitterÊ (note the trailing Unicode character) this will generate filenames such as xpEmitterÊ_000001.xpc - and it may not be possible to reload these files.
If you run into this problem, delete the Unicode characters from the file names on disk and from the object name in the scene, and the cache should then be reloaded.
The moral of this is, only use ASCII characters in object or file names when you intend to cache a scene.
Interface
The object's interface includes the following tabs and sections:
Parameters
Object tab
Build quicktab
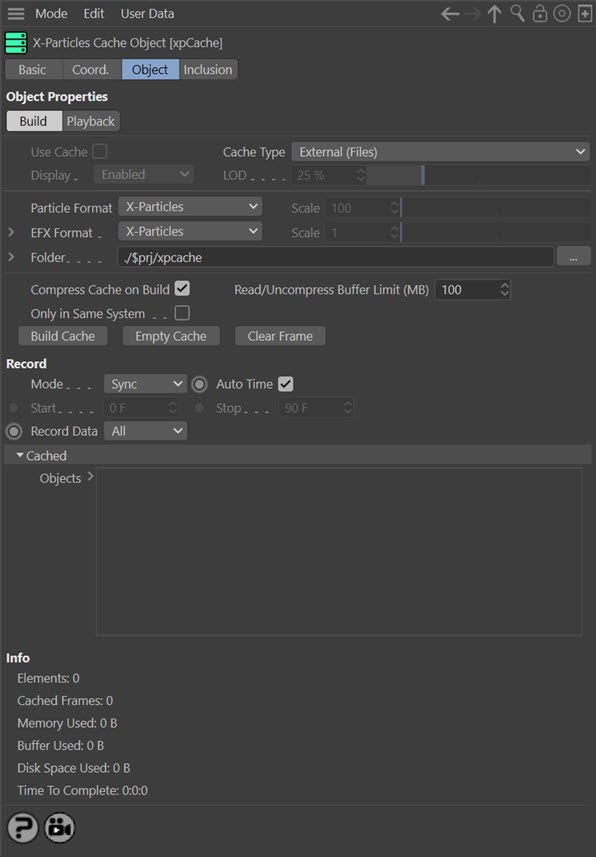
Use Cache
When checked, the objects in the scene will use cached particle data, if available. This switch is checked automatically whenever the cache is built or when a scene with saved cache data is loaded.
If this switch is unchecked, the cache is not used even if it is held in memory. You can go back to using the cache by checking this button again. This switch is not available if no cache has been built or loaded from disk. It is enabled as soon as you load a scene file with saved cache data or you build the cache. If you have multiple caches in the scene, you can switch between them by checking/unchecking this switch in each object.
Cache Type
This is a very important control which affects the way the cached data is stored. The drop-down menu has two choices:
External (Files)
With this option selected, cached data is saved to disk as a series of files.
Cached data is saved to disk as relatively small files, one per frame for each cached object. The file name used is a combination of the object name (so we recommend changing names from a simple 'xpEmitter', for example) plus a number in sequence for each file, which will be '000001' for the first frame to be cached, and a three- or four-letter extension for the object type. The files are saved to the folder given in the 'Folder' field.
The files for each object to be cached are saved into a separate folder. To avoid problems with duplicate names (e.g. two emitters both named 'xpEmitter') each folder will have a unique ID number attached to it.
In the screenshot above, tokens and a relative path are used to specify the location. You can find out more about this in the article 'Using Tokens With X-Particles'. But as an example, if the scene file is named 'cachetest.c4d' and there are two emitters (with the same name) plus a Sprite object in the scene, we get a directory structure on disk at the scene file's location like so:
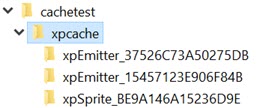
Inside each folder you have the cached files:

Internal (Memory)
Here, the cached data is stored in memory and saved with the scene file. All cached data is saved to memory then when the scene file is saved, the cached data is saved with it.
The default setting is external, and for any kind of long or complex scene with multiple X-Particles objects, we recommend this method. One advantage is that the scene file is not increased in size by what can be hundreds or even thousands of megabytes. If such a large scene is cached internally, it may result in a huge scene file which may take several minutes to load and save. Another advantage of using separate files is that the cache data can be imported into another scene, or data from other sources such as RealFlow can be imported into an X-Particles emitter. For more details, please see the Workflow notes below.
Internal caching is a little more convenient - you can give a single file to a friend or co-worker without having to send all the cache files as well - but is recommended only for short, test scenes with few objects.
Display
With this setting you can control the screen display when the cache is being built (not on playback). This can speed up the caching process if you have a lot of particles, because the emitter doesn't have to spend time drawing them. There are four options:
Enabled
The display appears as normal.
No Particles
No particles are drawn but any generated objects associated with them are shown.
Reduced
Selecting this option displays a level of detail (LOD) control. Reduce this value to reduce the number of particles displayed. Note that any generated objects associated with the particles are shown in full.
Disabled
No particles or geometry is displayed.
This parameter is not available in Cinema 4D versions 17.053 and later. This is due to changes in the MAXON SDK which prevent the screen being updated during caching.
LOD
Only used when 'Display' is set to 'Reduced'. Reduce this value to reduce the number of particles displayed. Note that any generated objects associated with the particles are shown in full.
As with the 'Display' parameter, this is not available in Cinema 4D versions 17.053 and later. This is due to changes in the MAXON SDK which prevent the screen being updated during caching.
Particle Format
If caching to external files, X-Particles can save the particle data in either its own native format, or in a variety of other formats so you can export the data to other applications such as RealFlow if desired. It is also possible for the cache object to import RealFlow BIN files, but see the note below for important information about this.
The Cache object can also export in RealFlow 2013 file format, but be aware that this format is not always supported by other software yet.
Scale
This parameter is only available when saving to files with an external format. It scale up or down the particle position and velocity data. It is required because other applications which can use exported XP data (or when importing data from them) have much smaller world scales than Cinema 4D.
EFX Format
If you cache an Explosia FX object you can choose the format to use. The default is to use a format internal to X-Particles; this is fine if you don't need to export the cache data to another application.
Explosia FX can also be cached in OpenVDB format, which is useful if you then want to import the data into another application. Instruction for how to do this can be found on this tutorial page.
If you click the little arrow next to the 'EFX Format' label, you see these additional options, which are only available if you have chosen 'OpenVDB' as the format:
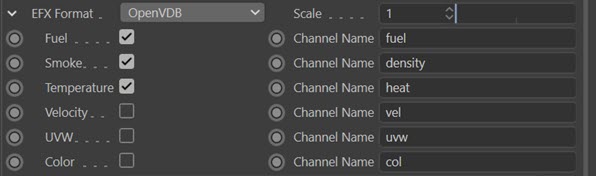
With these options, you can choose which channels you want to cache, and the channel name. What you select here will depend on the importing application.
Scale
This is the same parameter for the EFX Format files as for the 'Particle Format' Scale parameter.
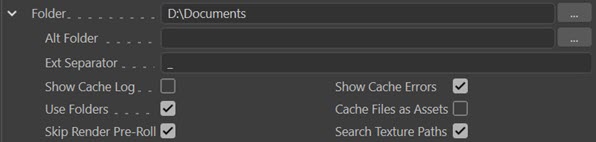
Folder
The folder on disk where the emitter data files are stored. If this field is empty a warning message is displayed and no caching will take place.
The following parameters are made visible by clicking the little arrow to the left of the word 'Folder':
 Note that you can use Cinema 4D tokens in this field. For more details, see 'Using Tokens with X-Particles'.
Alt Folder
This parameter enables you to enter an alternative folder for reading cache files. For example, if sending files to a render farm this can be set to the folder to use on the render farm, or if using a mixture of Windows and OSX rendering nodes this can be set to give the correct path for either Windows or OSX (i.e. for the opposite OS to the one given in 'Folder'). This is required since the way folder paths are constructed is different in the two operating systems.
Ext Separator
Here you can specify the separator to be used when building cached file names. The default is an underscore so this will result in file names such as xpEmitter_000001.xpc, xpEmitter_000002.xpc, etc.
Show Cache Log
If checked, the Cache object will output progress and details of the cache reading to the CINEMA 4D console. It is useful for checking why a particular rendering node may fail.
Show Cache Errors
If checked, does the same as 'Show Cache Log' above but only outputs if an error occurs (such as the cache folder not found).
Use Folders
If this switch is checked, the cache files for each cached object within the scene will be within a separate sub-folder of the directory given in 'Folder'. If it is unchecked all the cache files for all objects will be stored in the folder given in the 'Folder' setting.
Note that if it is unchecked it is VITAL that none of the objects to be cached has the same name as another one. If you have two emitters named 'xpEmitter' you will only have one set of files and both emitters will use the same cache!
Cache Files as Assets
Currently we recommend not using this switch. For a full discussion of why, please see the page 'Using X-Particles with Team Render'.
If checked, any cache files will be saved as assets when using Save Project with Assets from the Cinema 4D File menu. This can be useful to gather all cache files into a project, but in doing so Cinema will put all the cache files into the project root which will slow down cache reading.
Important: if you are using Team Render and have enabled this switch, be sure to turn on the 'Copy Tag Data' switch in all cache tags. Please see the Cache Tag for further details.
Skip Render Pre-Roll
If this switch is checked, X-Particles does not read the cache for all frames before the starting render frame. This greatly speeds up rendering to the Picture Viewer and render nodes, but if other objects and/or expressions depend on the particles (or on any cached data) this may affect the animation (the pre-roll frames will essentially have no particles).
Search Texture Paths
If this is checked, then if the specified cache folder isn't found the cache folder name is searched for within the texture paths. This can slow down cache reading if you have many texture paths defined.
Compress Cache on Build
The cached data is compressed during caching to save on memory/space. With large numbers of particles that can add a noticeable speed penalty both on caching and playback.
Read/Uncompress Buffer Limit (MB)
The maximum size in megabytes for the buffer used to hold cache data in its uncompressed state.
Only in Same System
This switch is there in case you have more than one System object in the scene but you only need to cache the objects in one System, not all of them.
If this switch is unchecked it has no effect and the Cache object will cache everything in the scene (subject to any changes in the 'Inclusion' tab of course). This is the behaviour found in X-Particles 3.5.
If it is checked, then if the Cache object is NOT inside a System object hierarchy, nothing will be cached, since by definition no objects can be in the same System object as the Cache object.
However, if the Cache object is within a System object and this switch is checked, only those objects in the same System object as the Cache object will be cached. No other objects in the scene will be cached.
Build Cache
Click this button to build the cache (see 'Building the cache' below for more details). If a cache already exists, or if any object has a cache tag, the following dialog box will appear:
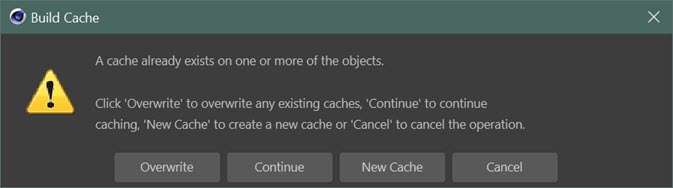
The four possible options are:
Overwrite
This will delete the existing cache and create a new one.
Continue
If a scene was only partially cached, 'Continue' will continue to cache any frames not cached so far rather than re-cache the whole simulation.
New Cache
This will preserve the existing cache and create another one. You can then choose which cache to use by checking or unchecking the 'Enable Cache' switch in each cache tag.
Cancel
This will cancel the caching operation.
Empty Cache
Clicking this button will delete the cache from memory and free up the memory used. For external caches the cached data will also be deleted from disk. You will be asked to confirm the deletion if the cache already exists.
With internal caching, the cache is deleted from memory but it does NOT delete cache data from disk if it was saved as part of the scene file. To delete the saved data, simply save the modified scene file with the empty cache, overwriting the old one.
To use the cache again, you will either have to click the 'Build Cache' button, or reload the scene from disk if you didn't save the scene after emptying the cache.
Clear Frame
Once a cache is built you can clear the cached data for the current frame by clicking this button. You will be asked to confirm that you want to do this.
Record Settings
These settings control which data is recorded when the cache is built.
Mode
This drop-down controls when the cache is built. It has three options:
Sync
The cache is built when the 'Build Cache' button is clicked.
Playback
The cache is built during playback. You can halt playback at any time and switch back to 'Sync' mode; the cache will not be deleted but will only be filled up to the point where you halted playback.
There is one restriction to be aware of in 'Playback' mode. The list of objects to be cached is created when you change the 'Mode' drop-down to 'Playback' (it has to be done this way, because the 'Build Cache' button is no longer available). Therefore, if you switch to Playback mode, and then add another object, expecting it to be cached, it won't be. You can tell this because the new object will not have a Cache tag. To rebuild the list of objects, change 'Mode' back to 'Sync', and then change it back to 'Playback'. Note that you may see a duplicate names warning at this point if one or more objects to be cached have the same name.
Auto Time
If checked, the entire scene is cached.
Start
Only available if 'Auto Time' is unchecked. Caching will start at the specified time.
Stop
Only available if 'Auto Time' is unchecked. Caching will stop at the specified time.
Record Data
This drop-down controls the data to be recorded. It has three options:
Basic
Only basic data is recorded. For particles this means the particle velocity (direction and speed).
All
All particle data is recorded. This can result in much larger cache files.
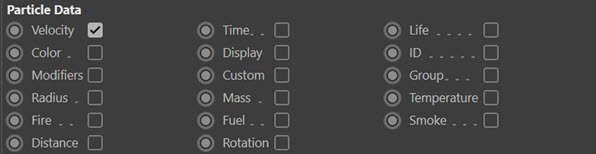
Custom
Selecting this option will enable a new group of settings headed 'Particle Data':
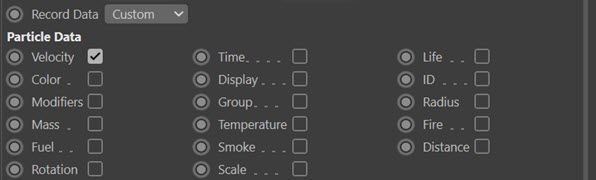
From this you can select which data you want recorded. For example, if you only want to record particle colour as well as velocity, check the 'Color' switch. This avoids the use of additional memory which would result if 'All' was selected.
Cached Objects
This list shows the objects which have been cached once the caching is complete. For example, with an emitter and a sprite object in the scene, you would see this when caching was completed:

If you disable a cached object in the object manager, it will be removed from the list, but will be added again if you re-enable it.
There are several switches or icons for each object. These are:
Checkbox
If you uncheck this switch the cache will not be used for that object. The cache icon will turn amber, so you would see this:
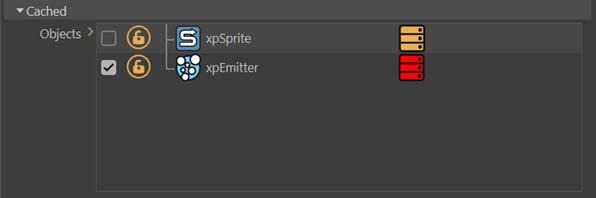
Note that emptying the cache will automatically uncheck this box.
Padlock
If the padlock is clicked it will turn blue:
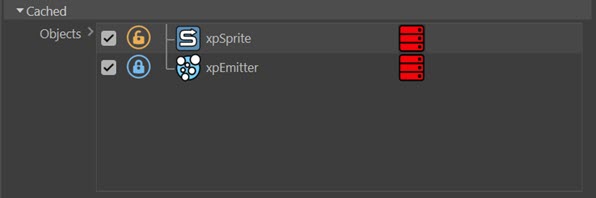
If you now rebuild the cache, any object with a blue padlock will not be re-cached - that is, the existing cache will be preserved.
Important: this does NOT prevent cache files on disk from being deleted if you click the 'Empty Cache' button.
Cache icon
This icon can have one of three colours:
Red - the object is cached and the cache will be used on payback.
Amber - the object is cached but the cache will not be used, because:
- the checkbox has been unchecked
- or because the 'Use Cache' switch has been unchecked
- or because the 'Enable Cache' switch in the object's cache tag has been unchecked
Green - the object has a cache tag but does not have a cache.
Note that the colour of the cache icon will always match the colour of the object's cache tag.
Info
Information about the cache is displayed here detailing the memory use and disk space used by the cache.
Playback quicktab
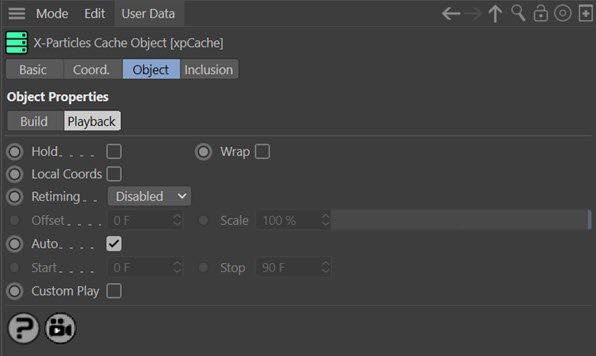
Hold
If checked, then at the end of the cached frames the last cached frame is kept (particles just stop and freeze). Otherwise (if unchecked) the particles will start to be evaluated as if they were not cached.
Wrap
If checked, the cache frames repeat (wrap) around and start playing again once past the last cached frame.
Local Coords
When this option is enabled the cache data is transformed to be local to the object (where possible, this does not affect Wet Maps). For example, this enables you to move an emitter and have the cached particles follow the emitters position.
Retiming
This setting gives you more control over cache retiming. The menu options are:
Disabled
Retiming is not used.
Frame
Retiming is done by keyframing the 'Frame' setting which appears when you select this option. Note that this does not generate an F-curve in the timeline.
If the scene was 90 frames long, and you keyframed the 'Frame' value from zero at the start of the scene to 45 at the end, the cache object would play back the first 45 cached frames over the 90 frames in the scene, reducing the playback speed by half.
Time (s)
Retiming is done by keyframing the 'Time' setting which appears, in the same way as keyframing the 'Frame' setting. The advantage of this is that an F-curve is generated in the timeline, which can be edited for greater control.
Custom
With this option, a control spline is made available:
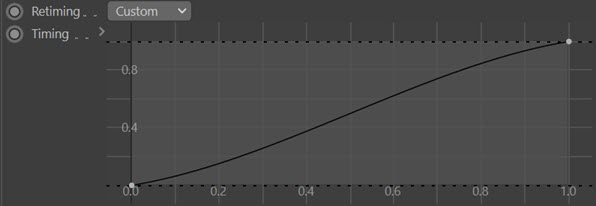
This gives you similar control to an F-curve in the timeline. The X-axis of the spline is the length of the scene. The Y-axis represents the frames to play. The default spline shown will play all frames. If, for example, the right-hand end of the spline was brought down to a value of 0.5, the first half of the scene would play in the full scene length, reducing the speed by half.
Frame
The frame value to use if 'Retiming' is set to 'Frame'.
Time
The time value in seconds to use if 'Retiming' is set to 'Time'.
Timing
The timing spline to use when if 'Retiming' is set to 'Custom'.
Offset
This setting offsets the cache time. For example, setting a negative frame will start playing the cache further into the cached frames.
This setting is only available if 'Retiming' is set to 'Disabled'.
Scale
This setting can be used to scale the cache time, so 200% will make the cache play twice as fast.
Important: this will not work with the trails, only particle caches can scale like this. If you use this with trails, and a Scale value of less than 50%, you will see gaps between the particles and the end of the trail.
This setting is only available if 'Retiming' is set to 'Disabled'.
Auto
If checked, the cache takes the playback time from the document's time (minimum to maximum).
Start and Stop
These settings are only used if 'Auto' is unchecked. They are used to set when to start/stop using the cache.
Custom Play
By default, all data recorded in the cache is used when playing back a cached scene. If this switch is checked, the options in the 'Particle Data' section become available:
By checking the required switches you can alter what data is used on playback. So if you recorded particle colour, for example, unchecking 'Color' will not retrieve the particle colour from the cache.
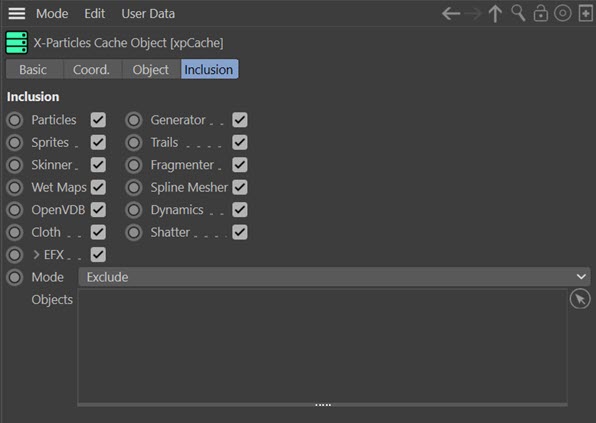
Inclusion tab
Within this tab you can select the types of data to cache and define what objects to include/exclude.
Important: the Domain object is now the xpFluidFLIP object and cannot be cached.
Particles, Sprites, Skinner, Wet Maps, Spline Mesher, Dynamics, Generators, Trails, Fragmenter, OpenVDB, Cloth and Scatter
Check or uncheck these switches to determine which X-Particles objects are cached.
EFX
This provides additional parameters when caching a scene containing an Explosia FX object. If you click the little arrow next to the 'EFX' label, you see this:

You can use these switches to control which aspects of the Explosia object are cached.
Mode
If this is set to 'Exclude' drag any X-Particles objects which should NOT be cached into the 'Objects' list.
When set to 'Include' drag any X-Particles objects which SHOULD be cached into the 'Objects' list. No other objects will then be cached.
Objects
Drag the objects to be excluded or included into this list, having first set the 'Mode' menu accordingly.
Using the Cache object
Caching has several advantages:
- it enables you to scrub backwards and forwards in the timeline
- you can run an animation once then play it back using the cache, which is much quicker for a complex animation
- the cache is saved to disk with the scene file and reloaded when you load the scene file again
- when rendering over a network, using the cache prevents discontinuity in the rendered frames from different machines, as all the machines will use the same cached data
All X-Particles 'generator' objects in the scene can be cached. These are the Emitter, Generator, Sprite, Skinner, Fragmenter and Trail objects. Wet Maps can also be cached; see the Inclusion tab for the available objects which can be cached.
By default when you cache a scene all of these objects are cached but you can select only certain objects to be cached by using the options in the Inclusion tab.
The Cache object icon
The Cache object icon in the Object Manager can have one of three colours to show you the state of the cache at any time. These colours are:
- Green - the default colour, indicating that the cache has not been built yet (or not loaded from a scene file with saved cache data)
- Orange - the cache is being built or it has been built but is not being used (the 'Use Cache' switch is unchecked)
- Red - the cache has been built and is in use
The Cache tag
Each cached object will have a Cache tag. For details, please see the Cache tag manual page. The tag actually holds the cache data, so if you delete it, the cache for that object is gone.
Note that the Cache tag icon uses the same colours as the Cache object icon (see above).
Workflow notes
The usual workflow is firstly to fill the cache by clicking the 'Build Cache' button. Once the cache is filled, the 'Use Cache' switch becomes available, and is automatically turned on (checked). Turning this switch on will force the cacheable objects in the scene to use the cache as the source of particle data.
If you chose the default external caching, the cache data is automatically saved to disk even if you decide not to save the scene file. These cache files are saved to disk when the cache is built, not when the Cinema 4D scene file is saved. With internal caching, once you are happy with the cached animation you can save the scene to disk, which will save the cached data along with it. Note that this can result in a very large scene file!
To save cache data to disk you must specify a folder before you cache the scene. During caching the cache data is saved to files within the folder. To change the folder, you must change it and then cache the scene again.
Saving the scene file
If you have cached your scene to external files, you should save the scene file before closing it. The cached data has already been saved, but if you don't save the scene file, when you reload it the cache will be empty because the Cache object did not 'know' there was a cache to load.
If this happens to you, you don't have to re-cache the scene. In the Cache object, change the 'Folder' to point to some other folder where there isn't any cache data - the exact location doesn't matter. Then change 'Folder' again, this time to the actual location where your cache data is stored. This will force the Cache object to reload its data. Alternatively, delete the existing Cache object, create a new one, and point 'Folder' to the cache data folder.
Importing an existing cache
To import an existing cache such as a RealFlow BIN cache into a new scene, first add an emitter to the scene and rename it to be the same as the common prefix in the cache filename. For example, an X-Particles cache file for frame 0 which was created using an emitter named TestEmitter, will have the name 'TestEmitter_000001.xpc'. To import this cache into a new scene, create an emitter, rename it to 'TestEmitter', create a Cache object, and then specify the folder where the files are located in the 'Folder' field. The cache will automatically be loaded and a cache tag applied to the emitter.
Building the cache
To build the cache, simply click the 'Build Cache' button. If you have previously filled the cache, a dialog box with several options will appear: see the 'Build Cache' button above for details.
The Cache object will cache each cacheable object in the scene, for each frame in the scene, assuming that object type is checked in the 'Inclusion' tab. (Note: objects which are disabled in the object manager will not be cached.) A small dialog box showing the progress of the cache building will appear.
If you only have a short scene with a small number of particles and a few objects to cache this box may only be visible for a few seconds. For longer or more complex scenes, you can stop the cache building by clicking the 'Cancel' button in the dialog box. Of course, if you do that not all of the scene will be cached and when you play the scene back it will stop at the frame where you cancelled the cache building.
When complete the Cache object will display some information about the cache, such the total memory/disk space used, and the number of frames cached.
The Cache object icon will turn red once the cache has been built, to show you that the cache has been built and is in use. Each object that has been cached will also have a cache tag, and this will also be red if the cache has been filled, or green if it has been emptied.
Excluding objects from the cache
If you want to prevent certain objects from being cached, you can drag them into the list in the Inclusion tab. If the list is set to 'Exclude' all objects in the list will be excluded from caching. If it is set to 'Include' then only those objects in the list will be cached.
Caching Explosia FX to OpenVDB
You can use the Cache object to export an Explosia FX simulation to OpenVDB format, which can then be imported into any other software capable of importing such files. You can also import OpenVDB volume files created in other software into Explosia FX, again using the Cache object.
The method is not complex but requires a page of its own, which you can find here.
Emptying the cache
If you want to stop using the cache, you can simply uncheck the 'Use Cache' button. This will turn the Cache object icon amber, to indicate that the cache is available but not being used. You can check the 'Use Cache' switch to use the cache again.
To delete the cache from memory and free up the memory used, click the 'Empty Cache' button. You will be asked to confirm that you want to do this. Note that when using internal caching this will not delete stored cache data on disk until you save the scene file. Once the cache has been emptied, the Cache object icon will turn green.
You can also delete cache data by simple deleting the appropriate cache tag. Once all tags are deleted the cache object icon will turn green.
Issues to note
Rendering cached scenes with Team Render/NET Render or the Command Line Renderer
In such cases it is advised to have a Folder which is available to all clients, setting the Alt folder where needed (if sending to a different system with different paths, or mixed OS render nodes).
Team Render Server does not support using the Cache Files as Assets parameter and will result in incorrect frames if that switch is checked. Team Rendering to the Picture Viewer can be done with Cache Files as Assets checked provided the 'Alt' folder is set to the project root (this can be done by setting the Alt Folder to './').
Project settings frame rate vs. render settings frame rate
You can set a frame rate in two different places in Cinema - the project settings and the render settings. If these are different, you may get confusing results.
As an example, say you set the frames per second in the project settings to 25, and the scene length to 200 frames. When you build the cache, X-Particles will cache 201 frames (0 to 200 inclusive). That's as expected. However, the default frame rate in the render settings is 30. If you opt to render all the frames by choosing 'All frames' from 'Frame range', then render to the picture viewer, Cinema will render 241 (not 201) frames. This changes how fast the playback appears to be and at the end of the cached frames what happens depends on the cache options (see the 'Hold' switch above).
Just be aware of this issue and to avoid it make sure you set the frame rate to be the same in both groups of settings.
Duplicate names
If you choose external files for the cache type, the cache files are named using the object name as the root. As long as the 'Use Folders' switch is checked, it doesn't matter if some objects have the same name, because the files for each object will be stored in a sub-folder with a unique name.
However, if 'Use Folders' is unchecked, the files from one object will overwrite the files from the other object with the same name. In that case you will need to ensure that the objects have different names before you cache the scene.
Scenes with some objects cached and some not cached
If a cacheable object is disabled in the Object manager it will not be cached. You should be aware that a scene in which some objects are not cached is fine for development and testing purposes but may lead to problems for the final render.
Consider a scene in which you have two emitters, the second of which is disabled. When you build the cache the first emitter is cached but the second emitter is not. You then enable the second emitter again. Now you have a scene in which one object is cached and the other is not. When the Cache object 'Use Cache' switch is checked, each object is instructed to use its cached data. But the second emitter doesn't have any cached data to work with, so will work normally - that is, as if it was not cached.
Why would this cause a problem? For one thing, if you then save the file, thinking it is all cached, in fact you are only saving cache data for one of the emitters. This might - or might not - cause a problem, particularly if rendering over a network.
More importantly, try repeating this exercise with a Sprite object linked to the disabled emitter. No sprites are generated because there are no particles. Now re-enable the emitter. You would expect the emitter to work normally (which it does, even if you can't see the drawn particles) but the Sprite object does not work. This is because the Cache object has told it to use its cache... but it doesn't have one, since it had no particle data to use when caching took place.
If you get into this kind of puzzle, the easiest solution is to empty the cache and rebuild it.
Multiple caches in the scene
You can add more than one cache object to the scene. When the cache is built each created cache tag is linked back to the cache object that created it. Alternatively you can use one cache object but allow it to create a new cache rather than overwrite the existing one.
When playing back, the objects use the first enabled cache tag. This enables you to simply disable or reorder the cache tags to choose which of your multiple cache are in use.
To make a particular cache object manage the cache data on an object, you must change the 'Cache Object' field in the object's Cache Tag. See the Cache Tag for more details.
Deleting a Cache object from the scene
Suppose you have a scene with an Emitter and a Cache object. You have cached the scene and are using the cache. Then you delete the Cache object. What happens?
Well, not much. It's important to remember that the work of building and emptying a cache, or loading from or saving to disk, is all done by the individual objects - emitters, generators, etc. The Cache object is there to act as an overall manager of the object caches. If there was no Cache object, you would have to build and enable caches in each individual object - time consuming and prone to missing some of them out.
So in the above scenario, deleting the Cache object does not delete the cached data. To do that you need to delete the cache tags from each of the objects.
Caching a scene with X-Particles and Cinema 4D Dynamics
If you have a scene with both X-Particles and C4D Dynamics, and you want to cache both, we recommend that you cache X-Particles first, then Dynamics. The other way round may (or may not) lead to problems in that X-Particles may not be able to control the particles at all if the dynamics are cached first. In some cases this may not work correctly and you may need to cache Dynamics first, then X-Particles.
Caching Thinking Particles
If you cache an emitter which generates Thinking Particles, there are certain issues to be aware of.
When using the cache, Thinking Particles are recreated each frame from the cached X-Particle data. This leads to a problem: because of the difference in priorities between Thinking Particles and the X-Particles emitter, the Thinking Particles behave a little oddly - try caching an emitter which generates TP and play it back, then stop it at some point. You will see what happens as the Thinking Particles seem to 'jump back' a little.. To stop this, turn on the 'Ignore particle speed when cached' switch in the Thinking Particles section of the Emitter.
This will stop the odd behaviour and is all you need to do in most cases. An exception is when using Pyrocluster. Pyrocluster requires the particle speed for its internal calculations, so if the speed is not available, Pyrocluster will not render correctly. To avoid this, turn off 'Ignore particle speed when cached' and turn on 'Ensure matching coordinates'. The cache will then work correctly with TP and Pyrocluster.
Other points
Please also be aware of the following points:
- once you have loaded and are using a cache, any changes you make to the emitter and other generator objects are ignored - for example, if you change the particle speed, you won't see any change until you turn the cache off or re-build it
- a cache may take up a LOT of memory - the more particles you have, the more cacheable objects you have, and the longer the scene, the more memory is used
- with internal caching, cached scene files on disk may be very large and take a few seconds or even minutes to load or save