Exporting data from X-Particles for import into Cinema 4D
In this example, we'll export some particle data from X-Particles then import that back into Cinema as a point cloud. Again, the only reason for using Cinema as the application to import the data is that everyone will have it.
Exporting particle data
To export some data, do this:
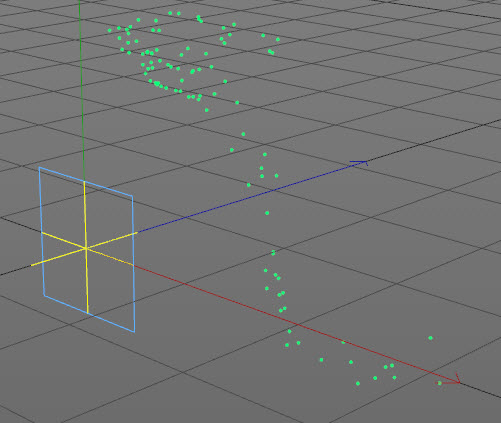
- Create a new scene and add an emitter
- Set the emitter to 'Shot' mode with 100 particles emitted on 1 frame
- Add a turbulence modifier and increase the strength to 10
- Run the animation to about frame 60; you should now have 100 particles moving in all directions:
- Click the Data Exporter in the X-Particles menu
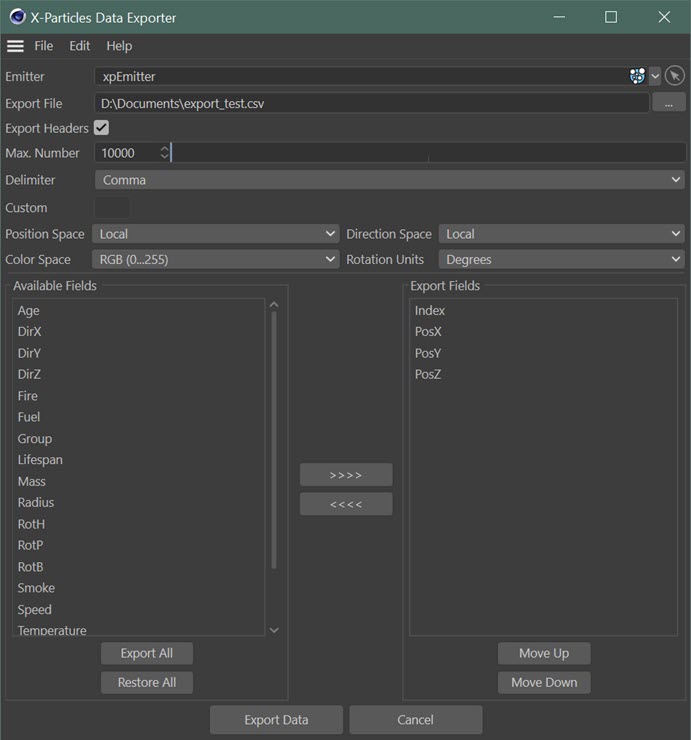
- When the dialog appears, drag the emitter into the 'Emitter' link field - this is the emitter whose particles are going to be exported
- Navigate to a file (it can be a new file which doesn't exist yet) in the 'Export File' field; name this file 'export_test.csv'
Now we just need to specify which fields to export. We're going to import this into Cinema using the Structure Manager, which requires its data in a specific format. First it needs the vertex index, then the X, Y, and Z coordinates of the vertex. The coordinates are already in the 'Export Fields' list in the correct order but we need to add a data field which will start at zero and increment for each particle. The particle index is fine for this.
- Click 'Index' in the 'Available Fields' list then click the '>>>>' button to move it to the 'Export Fields' list.
- 'Index' is now at the bottom of the list but it needs to be first, so select it and click the 'Move Up' button three times so it's at the top. The dialog box should look like this:
- Click the 'Export Data' button to write the particle data to the file.
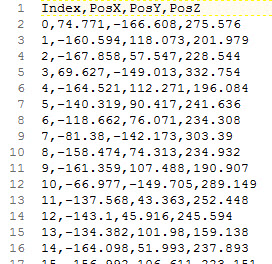
If you look at the file in a text editor, it will look like this (the exact numbers will be different, of course):
Importing the data into Cinema
Now we can import that data back into Cinema.
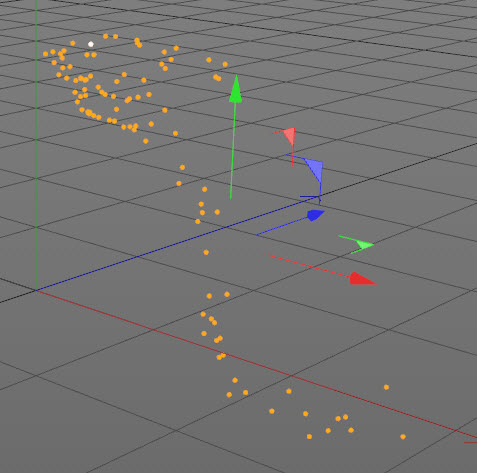
- Create a new scene and add an 'Empty Polygon' object (Cinema 4D Create menu -> Primitive -> Empty Polygon or depending on the C4D version it may be Create menu -> Object -> Empty Polygon); this is an object with no points or polygons
- Open the Structure Manager (you may need to do this from Cinema's main menu -> Windows -> Structure Manager, if it isn't visible on screen)
- In the Structure Manager, click 'File menu -> Import ASCII Data...' and navigate to the file 'export_test.csv' that you created earlier
When you click OK in the file selector the data is imported and a series of points are created in the empty object; you now have a point cloud with each point having the position of the corresponding particle (you will need to be in Points mode to see the points in the viewport):
Importing the data into X-Particles
You can import the same data back into X-Particles using the steps from the first example if you wish. Note that, if you do that, the imported particles will have the default direction and speed in the emitter - this is because we didn't export the direction and speed field when creating the file.
In the final example we'll import some real-world data into XP from a third-party data source.