Shatter Object
The xpShatter object is used to break polygon objects into fragments using several different algorithms. It is specifically geared towards visual effects rather than motion graphics, and has features which make it rather more complex but very powerful and flexible.
Before using the Shatter object for the first time, please read the section 'How to use the xpShatter Object' at the end of this page.
Interface
This is the default appearance of the interface when the object is first created. See below for a discussion oh how it changes as you select deeper layers in the hierarchy.
This is a shortcut list of links to various features in the Shatter object:
Object Tab
This is the interface of the object when first created:

For the buttons at the bottom of the interface, please see the 'Common interface elements' page.
Parameters
Mode
This menu has two options:
Volume
This is the default option. The shattering is carried through the volume of the object as though it was a solid object, so produces 'solid' fragments.
Surface
Only the surface of the mesh is broken, so produces thin, not solid, fragments.
Emitter
A link field for an emitter which can be used to move the fragments, It can also be used to generate more fragments if 'Trigger' is set to 'Speed'. See 'How to use the xpShatter Object' for more details.
You can either drag and drop an existing emitter into this scene or click the 'Add Emitter' button to add a new one. Either way, note that the emitter speed will automatically be set to zero so a modifier such as gravity or turbulence will be needed to start the particles moving.
Add Emitter
Click this button to create a new emitter and add it to the 'Emitter' link field.
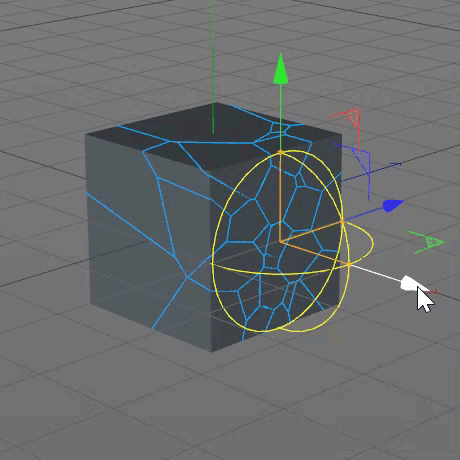
Scene Scale
This option is used when shattering very small objects. Due to errors in floating point calculations the shattering may not work correctly. For example, this cube measures two scene units each side and when shattered looks like this:
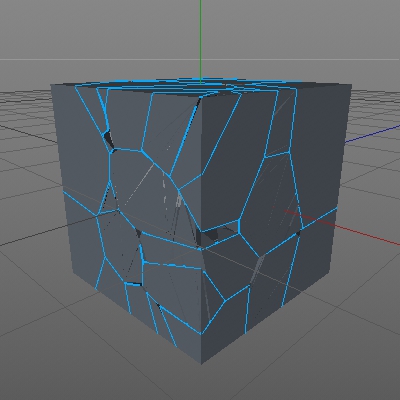
Note the shading artifacts due to errors in the shattering. With 'Scene Scale' set to 5, this is the result:
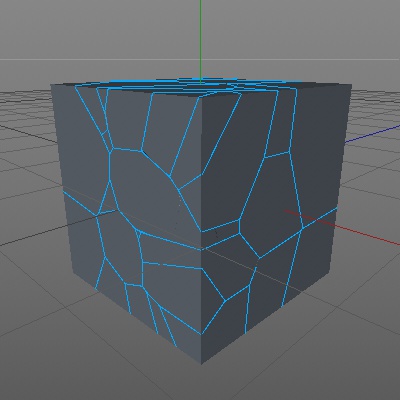
This option does not affect the size or scale of any object in the scene, it is only used internally to the xpShatter object.
Explode
If you increase this value, the created fragments are separated from one another and pushed outwards. This will increase the size of the bounding box of the object (compare this with the 'Offset' setting below).
Colorize Shards
If checked, this will cause each fragment to have a different colour.
Auto Particle Radius
This option is only applicable when you have added an emitter to the 'Emitter' link field. If this switch is checked, the radius of each particle is calculated automatically from the size of the fragment it is linked with. If this is unchecked, you can set the particle radius manually.
Source Layers section
See 'How to use the xpShatter Object' for a discussion of the layered structure in this object.
Layers
The list of source layers used to shatter the object. You can add or delete layers from the list and enable/disable them using the check boxes.
There must be at least one layer with at least one point generator in this list to break an object.
Add Layer
Select the desired layer type from this menu to add a new source layer.
The types of source layer are:
- Voronoi
- Wood
- Glass
Each type will result in a different pattern of shattering.
Note: the more layers you add, the more complex the shattering. If you add too many layers, it may slow down the computer very considerably.
Each source layer will be added to the list above the menu. Note that you can enable and disable individual layers by checking or unchecking each layer in the list.
If you click a source layer to select it, there are several option that can be set for each layer, as explained below. You can also add more point generators to the layer if desired.
Offset
This is very similar to the 'Explode' setting but produces a separation between fragments by reducing fragment size, so the overall size of the object does not increase.
Group
If you are using an emitter (that is, there is an emitter in the 'Emitter' link field) you can drag a particle Group object into this field. All particles emitted by the emitter when it is in controlled-only mode will then be in this group, regardless of any groups that may be in the 'Groups' list of the emitter.
Trigger
For each layer, you can use this menu to set when the shattering should take place. There are four options:
Always
The object is shattered immediately. There are no parameters for this option.
Time
Shattering will take place after a specified time has elapsed. The time can be set in the 'Time' field which becomes available with this option.
Speed
The 'speed' in this case refers to particle speed. So to use this option, you must have an emitter in the 'Emitter' link field and something (such as a gravity or turbulence modifier) to give some speed to the particles. For best results you should also add an xpDynamics tag to the Shatter object. If you don't, the particles will still move and the object will shatter, but it won't look realistic.
As the particles are moved, their speed increases and if they exceed the speed in the 'Speed' parameter, the object will shatter. You can have more than one layer set to 'Speed' with different shattering speeds if you need them.
Collision
With this option, as with the 'Speed' trigger you need an emitter in the 'Emitter' link field. Fragmentation will then occur on collision between the particles and an object or with other particles. You should add an xpDynamics tag to the Shatter object for realistic results.
Here is shattering on collision using an xpCollider tag on the Disc object, but without an xpDynamics tag on the shatter object:
Note how the shards don't separate from each other. Now the same scene with an xpDynamics tag on the shatter object but no other changes:
If you want particles to collide with an object and break it, you can't use the xpCollider tag for this as that tag is not suitable for use in this way. For details on how to break objects with particles, see the article 'Shattering an object with particles' in this manual.
Volume
This setting requires an xpVolumeContainer. When this is present, the object will shatter when it enters the volume of the container.
The xpVolumeContainer itself is a variant of the Point Generator Container object - see the reference page for that object for details.
In this example, a Cube is shattered when it enters the volume container, shown as a blue box. (The cube is moved by giving the xpShatter object an xpDynamics tag and using a Wind modifier to move the particles, and therefore the object.)
Trigger Settings
Depending on the 'Trigger' option, a number of other settings become available:
Time, Time Variation, Seed
Available when 'Trigger' is set to 'Time'. The 'Time' setting indicates when the shattering will occur. Variation can be added to this by using the 'Time Variation' setting; the 'Seed' value is the seed for the random variation which is added.
Speed, Speed Variation
Available when 'Trigger' is set to 'Speed', The 'Speed' setting is the speed which the linked particles must exceed for shattering to occur. Variation can be added to this by using the 'Speed Variation' setting.
Particle <-> Particle, Particle <-> Polygons, Collision Speed
Available when 'Trigger' is set to 'Collision'. The two switches indicate whether shattering will occur when the linked particles collide with other particles, and/or with a scene object. If a scene object is used, it must have an xpCollider tag attached to it.
For shattering to occur the speed of the object after collision must exceed the value in 'Collision Speed'. By default this is set to zero, so that shattering occurs immediately on collision.
Create xpVolumeContainer, xpVolumeContainer
Available when 'Trigger' is set to 'Volume'. Click the button to create an xpVolumeContainer and add it to the link field. Alternatively, simply drag an existing container into the link field.
Add Source
Click this button to add a new point generator to the selected layer. Each generator will be added as a child of the layer. Note that you can enable and disable individual generators by checking or unchecking each generator in the list.
If you click a point generator to select it, the options for that generator become available. Each generator has its own set of options.
Important note
You are not restricted to using the inbuilt point generator. You can use mesh objects, splines or an X-Particles emitter as well as, or instead of, the Voronoi point generator. For example, deleting (or unchecking) the point generator and dragging a primitive sphere into the generators list would produce this result:
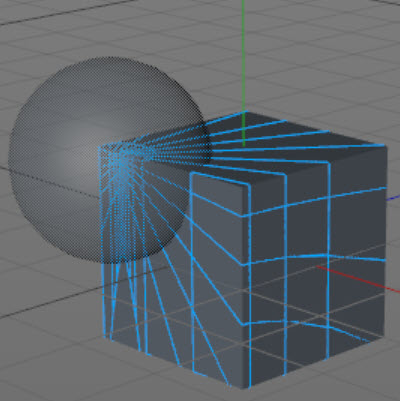
See the 'Generators other than the inbuilt Point Generator' section below.
Source section
The options for each point generator are shown below. The options vary, depending on the nature of the point generator.
1. Point Generator objects
These are the options you will see for the inbuilt Point Generator object:
Add Point Modifier
Select a point modifier from this list. The types of modifier and their settings are shown later on this page.
Point Generator Type
This drop-down menu controls how shatter points are generated. The options are:
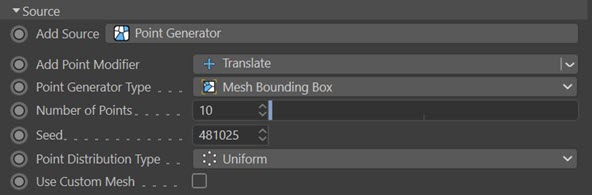
Mesh Bounding Box
The bounding box of the mesh is used to calculate the shatter points.
Mesh Surface
Calculation of the shatter points is confined to the mesh surface.
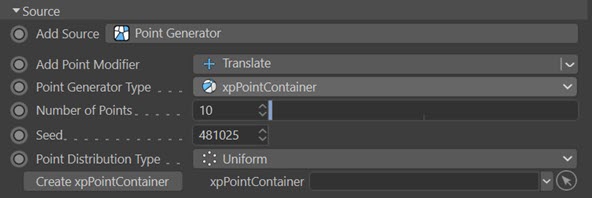
xpPointContainer
in this mode, the interface changes slightly. Please see the xpPointContainer section below.
Shader
in this mode, the interface changes slightly. Please see the Shader section below.
Radial
in this mode, the interface changes. Please see the Radial section below.
Number of Points
The number of points to be generated. The more points, the more fragments there are.
Seed
A random seed for the point generation. You can change this if you don't like the point distribution.
Point Distribution Type
Only available for 'Mesh Bounding Box' or 'xpPointContainer' generator types.
This drop-down menu has two options:
- Uniform
- Normal/Gaussian
These are different algorithms for distributing the generated points. Choose the one which works best for your scene.
Standard Deviation
Only available if 'Point Distribution Type' is set to 'Normal/Gaussian'. It give additional control over the point distribution.
Use Custom Mesh
Not available in the 'Container' generator type.
If you select this option you must drag a polygon object or spline into the 'Custom Mesh' field which appears. The vertices of this object are then used to control point distribution. It works in the same way as the 'xpPointContainer' point generator type does but uses a mesh or spline rather than the xpPointContainer object (which is limited to sphere and box shapes).
Custom Mesh
Only available if 'Use Custom Mesh' is checked. Drag the mesh you want to use into the link field.
2. Special Point Generator Types
2.1 xpPointContainer
Selecting this type results in a slightly different interface:
Most settings are the same as other point generator types apart from these two:
Create xpPointContainer
Click this button to create an xpPointContainer object and add it to the 'xpPointContainer' link field.
xpPointContainer
Drag and drop an xpPointContainer object into this field (or use the 'Create xpPointContainer' button).
Note that in this mode the point generator will have no effect until an xpPointContainer object is added to the 'xpPointContainer' link field. You can create one manually from the X-Particles menu, or add one by clicking the 'Create xpPointContainer' button.
An 'xpPointContainer' is a separate object from the xpShatter object. Please see the xpPointContainer page for more details.
When you have a container, the points are generated within the container's field of effect. If you move the container around, the shattering effect will follow the container, as shown in this animated image:
2.2 Shader
Selecting this type results in a slightly different interface:
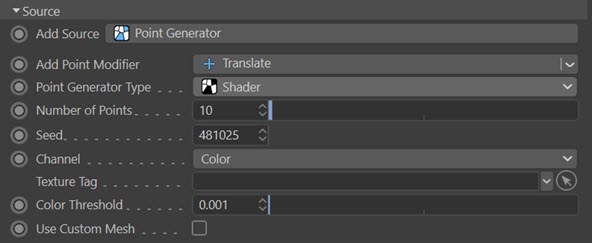
Most settings are the same as other point generator types apart from these three:
Channel
This the channel of the material in the texture tag to use for controlling point generation. You can use an active or inactive channel as long as there is a shader in the channel.
Texture Tag
Drag and drop a texture tag into this field. The point generator will sample the shader from the material in the texture tag, using the channel specified in 'Channel'.
Color Threshold
The brightness of a colour must exceed this value to be used in the point generation. Note that if, for example, you use a black and white Noise shader in the channel, and set this value to 1 (the maximum), no points will be generated since no colour can exceed that brightness.
2.3 Radial
in this mode, the interface changes to this:
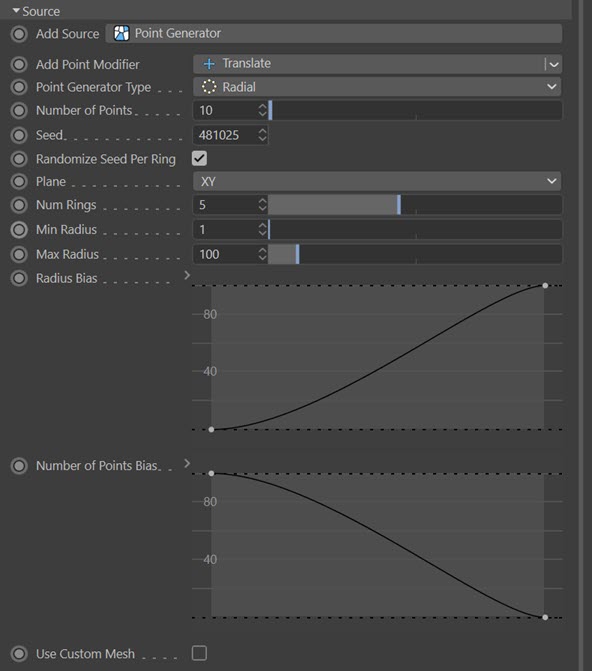 Note that this is the type of point generator which the
'Glass' shatter layer uses. That is, if you create a Glass shatter layer then look at the point generator for that layer, it automatically uses this type. The algorithm generates a series of concentric rings which resembles the appearance of broken glass.
Some of the settings are common to other point generator types, but there are some additional options:
Randomize Seed Per Ring
If checked, the seed used for each ring is randomized. This gives a less regular result than if the seed is not randomized.
Plane
This kind of shattering can only take place in one plane, so this menu enables you to select which plane to use. The choices are the XY, YZ or XZ planes.
Num Rings
The number of rings to generate. Note that the centre of the shattered area counts as the first ring, so with this value set to five, you see the centre point plus four surrounding rings.
Min Radius
The minimum radius of each ring. It can be greater than this, of course. Note that if you set this value to the same as the 'Max Radius' no rings are visible apart from the centre point.
Max Radius
The maximum radius of each ring. It can be smaller than this. Note that if you set this value to the same as the 'Min Radius' no rings are visible apart from the centre point.
Radius Bias
This controls how the radius of each ring is set between the minimum and maximum radius values. For example, with the default spline, the left hand point controls the radius of the innermost ring, so as this value increases from zero the inner ring will expand and all other rings will expand also, to maintain distance between the rings. If it is set to the same value as the right hand point, this effectively gives all the rings the same radius (the same as if 'Min Radius' and 'Max Radius' are set to the same value) and the rings disappear, leaving only the centre point.
Num Points Bias
This controls how the 'Num Points' setting is used for each ring. For example, with the default spline the number of points is set to the maximum value for the innermost ring but fewer points are used for the outer rings.
3. Generators other than the inbuilt Point Generator
As mentioned above, you aren't restricted to the inbuilt point generator. You can add a mesh object, spline, or X-Particles emitter into the Layers list as a child of a source layer.
3.1. Polygon Objects and Emitters
If the object is a polygon object or an X-Particles emitter you will see these options when you select it in the list:
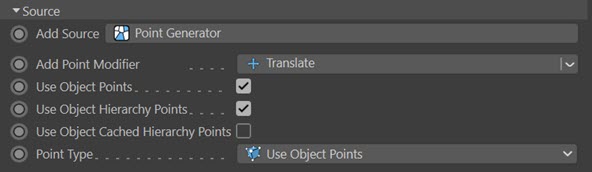
Use Object Points
If checked, the vertices of the object (if it has some) are used to break the mesh
Use Object Hierarchy Points
If checked, the vertices of any child objects of the object will also be used to generate shatter points. Otherwise, child objects are ignored.
Use Object Cached Hierarchy Points
If the object is a generator object such as a Mograph Cloner, checking this switch will cause the vertices of the clones to be used to generate shatter points. Otherwise the cloner will be ignored (since it has no vertices of its own).
Point Type
For polygon objects there is only one option in this menu, 'Use Object Points' so this cannot be changed. The vertices of the object are used to generate the shatter points.
For spline objects there is another option, 'Generate Points Along Spline'.
3.2 Spline Objects
If the object is a spline, the interface is initially unchanged but the 'Point Type' menu has an extra option, 'Generate Points Along Spline'. With this option, instead of the spline vertices being used to generate shatter points, the shatter points are generated along the spline's length. If you select this option, there are some additional settings:
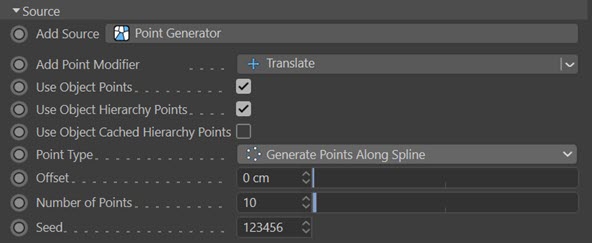
Offset
Increasing this value will offset the shatter points away from the spline. The direction and distance is random and can be changed by altering the 'Seed' value.
Number of Points
The number of shatter points to be generated along the spline.
Seed
If the 'Offset' value is greater than zero this is the seed value for the random offset of the shatter points.
Point Modifiers
Certain modifiers can be applied to the point generator, and each point generator has its own list of modifiers. To add a modifier, select it from the 'Add Point Modifier' drop-down menu.
Add Point Modifier
Select the desired modifier from this menu. This will add a new modifier and insert it in the Layers list as a child of the point generator. The choices are:
Translate
This modifier lets you move the shatter points along any of the three axes. If you select the modifier its interface looks like this:
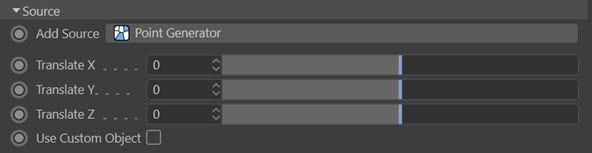
Translate X, Translate Y and Translate Z
Adjust these sliders to move the points along the required axis.
Use Custom Object
If you check this switch, a new link field appears - 'Custom Object'. You must drag and drop an object into this field, then when you move the object the generated points will be moved in that direction. You can use a null object for this, it doesn't have to be a mesh or spline.
Scale
This modifier lets you scale the shatter point distribution up or down on any axis. Note that negative values are possible and will have the effect of mirroring the current point distribution.
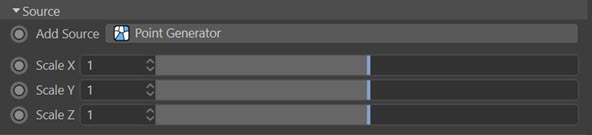
Scale X, Scale Y and Scale Z
Adjust these sliders to scale the points along the required axis.
Spawn Points
This modifier produces additional shatter points in the object, so giving greater detail in the shattering.
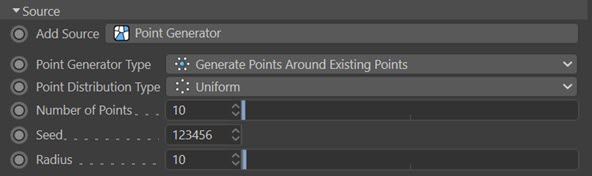
Point Generator Type
Currently only one option is available - 'Generate Points Around Existing Points'. As its name implies, this will produce additional shatter points using the original shatter points to determine their location.
Point Distribution Type
This drop-down menu has two options:
- Uniform
- Normal/Gaussian
These are different algorithms for distributing the additional points. Choose the one which works best for your scene.
Standard Deviation
Only available if 'Point Distribution Type' is set to 'Normal/Gaussian'. It give additional control over the point distribution.
Number of Points
The number of additional shatter points to be generated.
Seed
A random seed used when generating the additional points.
Radius
The radius of the distribution area around each original shatter point.
Selection Tab
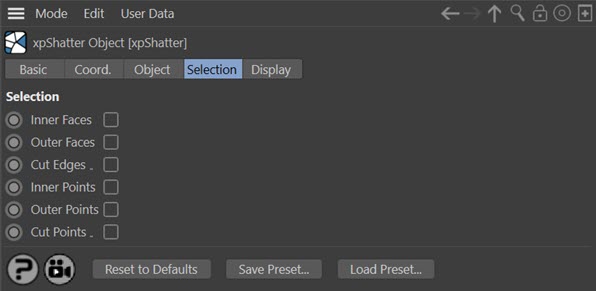
Inner Faces
If checked, adds a polygon selection tag containing the inner faces of each fragment. You can use this to assign a material to the inner faces only, for example.
Outer Faces
If checked, adds a polygon selection tag containing the outer faces of each fragment. You can use this to assign a material to the outer faces only, for example.
Cut Edges
If checked, adds an edge selection tag containing the newly-created cut edges of the fragments. (Note: not ALL the edges of each fragment, only the cut edges.)
Cut Points
These are the extra points created in order to make the cuts.
Outer Points
These are points which were present in the original mesh.
Inner Points
These are points which are neither cut points nor outer points (i.e. all the points other than those which are in the cut and outer points selections).
Display Tab
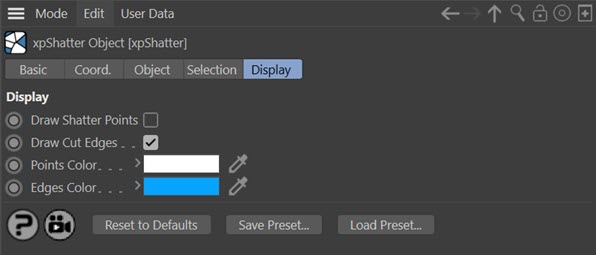
Draw Shatter Points
If checked, this will draw the points which are used to generate the fragments in the viewport. You can then see clearly how the object is shattered. For example, here is a cube shattered with a Star spline (the spline is used in the 'Shatter Generators' list instead of the default Point Generator):
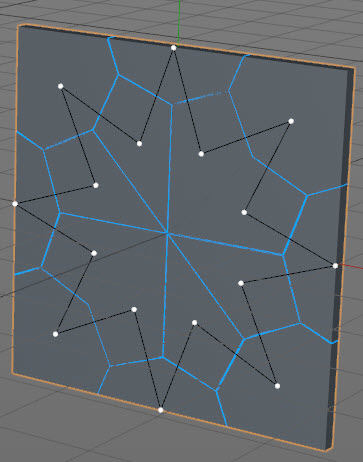
You can see that one shatter point is generated per vertex in the spline and that each shatter point is used to generate a fragment.
Draw Cut Edges
If checked, the cut edges are drawn on the object to be shattered.
Points Color
The colour of the shatter points, if 'Draw Shatter Points' is checked.
Edges Color
The colour of the cut edges, if 'Draw Cut Edges' is checked.
How to use the xpShatter Object
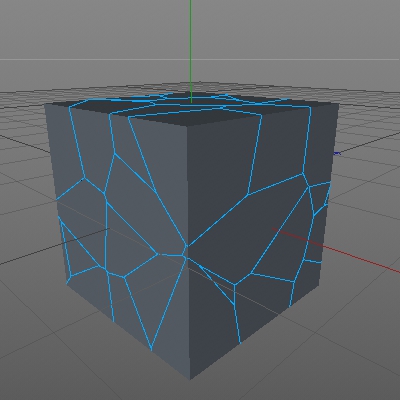
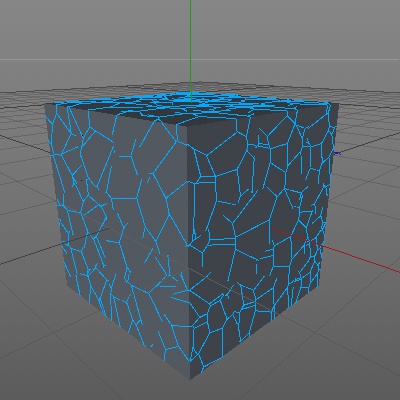
This object is built around the concept of source layers each with its own hierarchy. The xpShatter object must have at least one 'Source Layer' which is the source of the shattering and which by default is a conventional Voronoi shatter layer. You can, however, add multiple layers, each with its own distinct hierarchy of settings and options, and modify and/or delete the default layer if required. If you have more than one shatter layer, the first layer will break the object, then the second layer will break the fragments of the object, and so on until all layers have been processed. For example, a cube broken with one Voronoi shatter layer, then in the second a second identical Voronoi layer has been added:
Each source layer must in turn have at least one 'Point Generator' which actually generates the fragments of the object. Again, you can have more than one point generator for each source layer if desired, each with its own settings. The point generators must be child objects of the source layer.
Each point generator then has its own set of properties, some of which require additional objects such as a texture tag, a special xpPointContainer object, or another mesh object. Finally, each point generator can also have optional 'Point Modifier' layers applied to it, such as 'Translate' or 'Scale'.
You can see this in operation in this composite image which shows further parts of the interface revealed as you select each layer in the hierarchy:
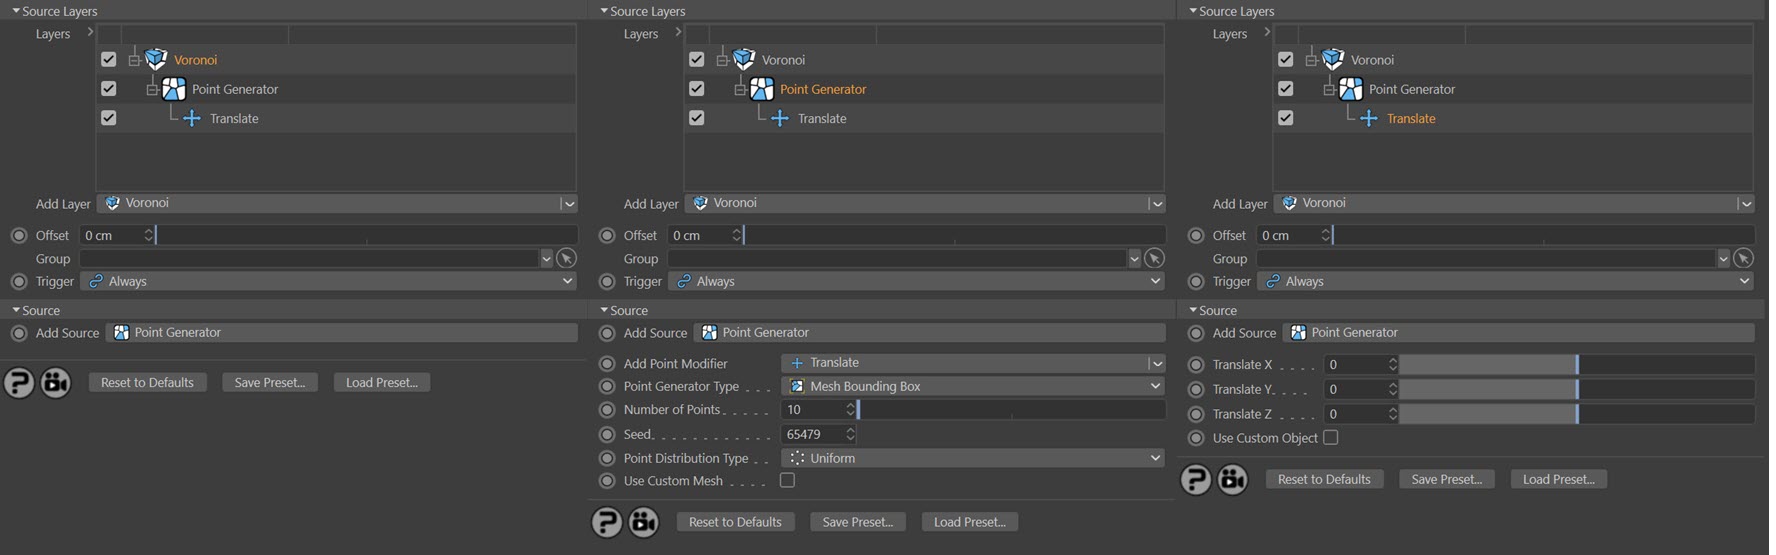
Click image for larger version
Getting started
Getting started with this object is very simple. Just make the object to be shattered a child of the xpShatter object and it will be broken using a single Voronoi source layer and a single Point Generator. Then you can add or remove source layers, add point generators, alter the settings etc. until you have the effect you want.
Just remember that as you add more shatter layers or point generators the simulation becomes more complex and will take more time to execute, so it may slow down the viewport to some extent.
Source Layers vs. Point Generators
Consider what happens if you try to break a cube object with xpShatter. Suppose you have a single Voronoi source layer with one point generator with 'Number of Points' set to 10. This will break the cube into 10 shards. If you add another point generator with 10 points to the same source layer, you will get 20 shards (10 + 10). In other words, adding point generators is cumulative.
Now suppose you have one layer with one point generator of 10 points and you add a second layer also with one point generator with 10 points. You will now get up to 100 shards (10 X 10), although the exact number will vary, depending on the seed values. With another identical layer you will get up to 1000 shards, and so on.
The problem is that each time you add a layer to the layers list, the first layer is processed using a complex and single-threaded function. It only has to be processed once though, no matter how many point generators the layer has. But if you add a second layer, that layer has to be processed separately, so the shattering process becomes much slower.
The moral is that if you just want to generate a lot of shards, use a single layer with one or more point generators. This will be much faster than multiple layers and is less likely to run out of memory due to the vast number of shards that multiple layers can generate. But if you want to break an object and then break the shards into smaller shards - for example, on collision - then you will need to use two or more layers.
Using Cloth Surface with xpShatter
If you need to do this, please see the page 'Using xpShatter with Cloth Surface' below.