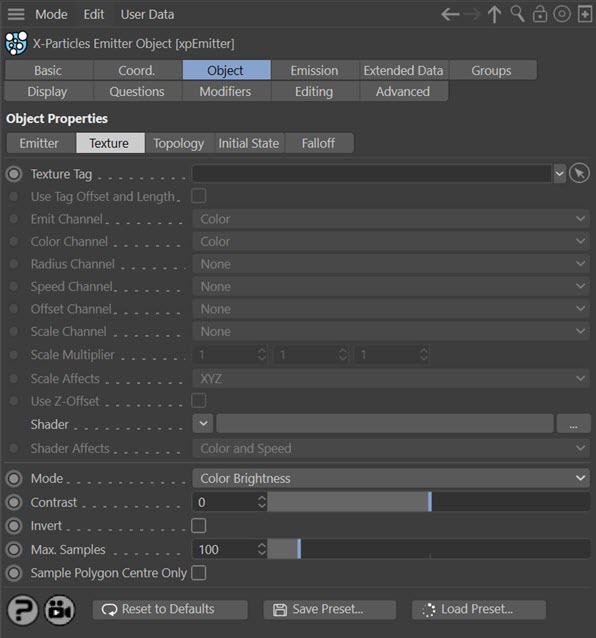
Emitter Object tab: Texture quicktab
These settings are used when emission from an object is controlled by a texture. This quicktab is only available when 'Texture' is selected from the 'Emit From' setting.
Note: when selecting a material channel to control emission, color, etc., the reflection channel will only work in Cinema 4D R15 or earlier. This is due to the change to the C4D material which added the Reflectance channel in R16.
Interface
Parameters
Texture Tag
You can drag a texture tag into this field and the emitter will use the material referenced by that tag. Any of the texture tags assigned to the object may be used.
Any projection mapping can be used in the tag except Frontal or Camera mapping.
Using a tag is convenient if you have already set up a material and don't want to have to duplicate it in another shader. Once you add the tag to this field, you can select the channel to sample in the 'Channel' drop-down menu, but you can no longer use the 'Shader' field - that is, you can't use a texture tag and a shader simultaneously.
Note that not all shaders work correctly when used for this purpose. Please see the section headed 'Limitations' for details of any limitations in functionality with certain shaders.
Emit Channel
This is the material channel which governs the emission of particles.
If you have dragged a texture tag into the 'Texture Tag' field, you can choose the channel to use from the material. By default this is the Color channel, but you can choose from several others. One thing you can do is use a channel which is not being used in the material. For example, you could set up a shader to govern particle emission in the displacement channel but leave that turned off in the material editor. The emitter can still sample that channel even though it is not being used in the material.
If you set this channel to 'None' then the texture will not control the emission of particles but you can still use the 'Color Channel' and 'Speed Channel' settings.
Color Channel
This is the material channel which controls the particle colour. The particles will take their colour from this channel, which is the Color channel by default. This does not have to be the same channel as the Emission channel.
Radius Channel
This is the material channel which controls the particle radius. To see different particle radius values, you must set the radius variation parameter in the Emission tab to something other than zero. The minimum radius used will be the radius setting minus the variation value; the maximum radius will be the radius setting plus the variation value. Areas of zero brightness in the texture (i.e. black) will give the minimum radius while white areas will give the maximum radius.
Speed Channel
This is the material channel which controls the particle speed. The particles will take their speed from this channel, which is turned off by default. This does not have to be the same channel as the Emission or Color channels. The actual speed will be between zero (for black surfaces) and the speed set in the emitter (for white surfaces).
Offset Channel
 The selected channel controls the offset of a particle from the surface. To use it, first set 'Offset Origin' in the 'Emitter' quicktab) to a suitable maximum value. Then any particle emitted from a black area of the surface will have zero offset, while any particle emitted from a white area will have the maximum offset.
Scale Channel
This is the material channel which controls the particle scale. The particles will take their scale from this channel, which is turned off by default. This does not have to be the same channel as the Emission, Color, or Speed channels.
Each component of the sampled colour affects one axis of the scale value. That is, the red component affects the X-axis scale, the green component the Y-axis scale and the blue component the Z-axis scale. Note that if you select a pure colour such as red (for which blue and green are zero) this will result in the particle having zero scale along the Y and Z axes.
When this channel is used, two more controls become available. These are the 'Scale Multiplier' and 'Scale Affects' controls.
Scale Multiplier
The sampled colour from a texture will always return values between 0 and 1. Clearly, the particle scale cannot be restricted to such a narrow range. The value in this setting is multiplied with the colour value to give the actual scale. This enables you to scale the particles up (or down) as much as desired. You can affect each scale axis independently.
Scale Affects
By default, the scale colour will affect all three axes in the scale. But you may want to restrict its effect to one or two axes instead. This drop-down has all seven possible combinations ranging from only one axis up to all 3, in any combination.
Use Z-Offset
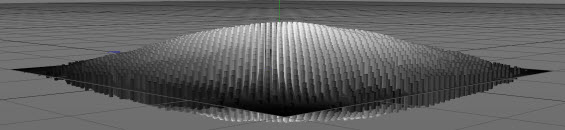
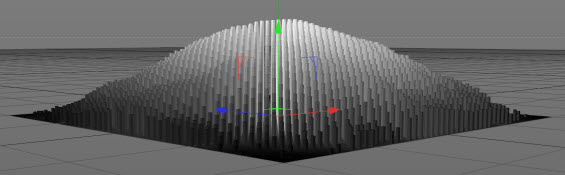
If the particle scale is affected by the texture, then the particle will continue to be emitted at the same point. This will cause larger particles to be 'embedded' more deeply in the polygon surface. In some cases you might prefer the 'base' of the particles to be aligned to the same level. To do that, check this switch. In most cases you will also need to turn on particle rotations and set them to 'Tangential' to align the Z-axis of the particle along the direction of travel (Normal or Phong Normal work best here). You may also need to adjust the offset from the surface with the 'Offset Origin' slider.
These two images show the difference. In both the scale is controlled by the texture (affecting the Z-axis only) and the particles are oriented along the Z-axis. In the first image 'Use Z-Offset' is unchecked, and in the second it is checked.
Shader
Instead of using an existing texture tag, you can set up any shader in exactly the same way as if you were using the material editor. Or, you can copy a channel from a material and paste it into this field. Note that the 'Shader' field is disabled if there is a texture tag in the 'Texture Tag' field. If you set up a shader, then add a texture tag, only the tag is used; the shader will be ignored.
Shader Affects
This drop-down governs which parameters of the particle are affected by the shader. The options are:
- Color
- Speed
- Color and Speed
- Neither
Mode
This is used when controlling particle emission with a texture. It has no effect on particle colour. It has four settings:
- Color Brightness: the brighter the colour, the more particles are emitted. If you find that more particles are being emitted from darker areas than you would like, you can increase the 'Contrast' setting to reduce emission from dark areas. Conversely, turning down the contrast below zero will increase emission from darker areas.
- Red, Green, Blue: these options will emit more particles where there is a higher proportion of red (or green, or blue) in the colour. Again, the contrast can be used to increase or decrease emission.
Invert
Checking this switch will invert the emission so that (for example) if 'Color Brightness' is being used, checking this switch will emit more particles from darker areas than bright ones.
Contrast
This is used in conjunction with the 'Mode' setting. See above for details.
Max. Samples
The emitter samples the colour of the object to find a point where a particle can be emitted. Imagine a surface which is pure black and the 'Invert' switch is unchecked. The emitter will never find a point where a particle can be emitted, so would potentially search for one for ever, which would lock Cinema up. To prevent that, the emitter only tries the number of samples in this field and then gives up if it can't find a suitable point. If you have a very dark surface with only one or two bright spots, you can increase this value to increase the chance of an emission point being found, but doing so will slow down playback time.
Sample Polygon Centre Only
Normally, emission from a texture works by sampling all areas of a polygon. If you only want to sample the centre of the polygon, check this switch. Note: this will cause particles to be emitted only from the centre of each polygon.
Limitations
Layer shader
Currently there is an issue with the Cinema 4D Layer shader. If the material channel selected has a Layer shader in it, the shader is not correctly sampled. X-Particles is threaded, and the Layer shader does not support being sampled in a threaded context except at render time.
The only workaround for this is to turn off threading in the 'Advanced' tab of the emitter. Since the Layer shader is no longer being sampled in a threaded context, it should then work correctly.