Infectio Modifier
This modifier simulates growth patterns. It is modeled on the idea of an infection spreading from one particle to another, but you can use it for any kind of growth.
The modifier is derived from a Python script originally written by Toma Bogdan. We are very grateful to Toma for allowing us to use his script in this way.
Interface
The modifier has the following sections:
For the 'Groups Affected', 'Mapping', and 'Falloff' tabs, and for the buttons at the bottom of the interface, please see the 'Common interface elements' page.
Parameters
General quicktab
Please see 'Using the Infectio Modifier' before using this modifier for the first time. You will find important information about setting up the system and more explanation of some of the terms used in the reference below.
'Using the Infectio Modifier' contains the following sections:
- Introduction
- Setting up the growth system
- Using Infectio with a Color modifier
- The X-Particles Seed Object
- Creating links between infected particles
- Other information
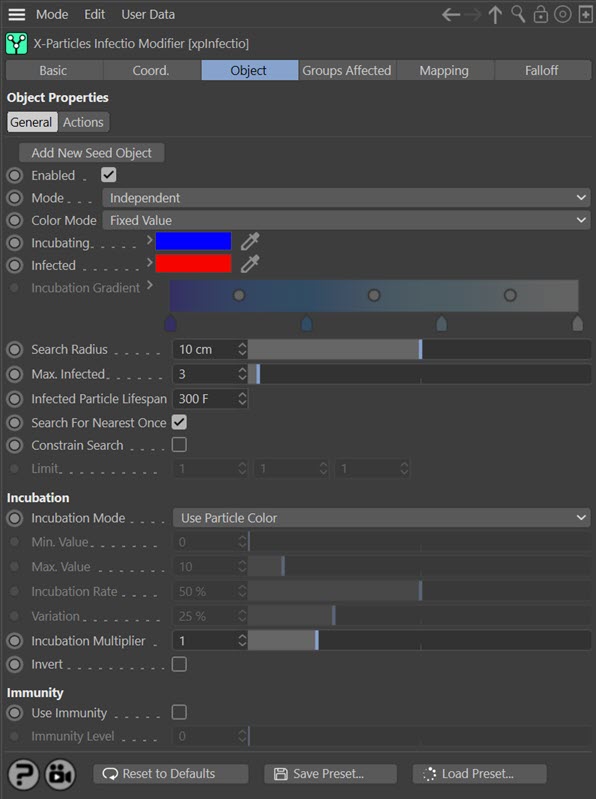
Add New Seed Object
Click this button to create a new X-Particles Seed Object and add it to the scene as a child object of the Infectio Modifier.
Note that without at least one seed object the modifier will not work and all the parameters will be disabled until a seed object is added.
Enabled
If this button is unchecked, the modifier will be disabled (inactive).
Mode
Independent [default setting]
In this mode, particles will be affected if they come into the field of effect of the modifier. X-Particles Actions have no effect on the modifier in this mode.
Action-Controlled
In this mode, the modifier will only act on a particle when told to do so by an Action. Until that point, the particle will not be affected, but once activated for a particular particle, the modifier will continue to influence it as long as it is in the field of effect of the modifier. The modifier's effect on a particle can be halted by means of another Action, if desired.
Color Mode
This drop-down menu controls what will happen to the particle colour when it changes from the uninfected to incubating, and from incubating to infected. The options are:
Fixed Value
The particle colour will change to the colour shown in the 'Incubating' colour field if the particle is now in the incubating state, and to the colour in the 'Infected' colour field if the particle is now in the infected state.
Gradient
With this option, infected particles will use the colour from the right of the 'Incubation Gradient' parameter. Particles which have just changed from uninfected to incubating will use the colour from the left of the gradient. Particles which are in the process of incubating will use a colour from somewhere along the gradient, depending on how close they are to becoming infected.
Use Groups
If you use this option, instead of colours the particles will change particle group when changing from uninfected to incubating, and again when changing state from incubating to infected. With this option the interface will change slightly and you will see this:

Drag the groups to use into the two fields or use the 'Add Group' buttons to create new groups. The emitter does not need to emit either group (in fact it should not do so).
Note that you must supply both groups. If either is missing, the colours used in the 'Fixed Value' mode will be used instead.
Incubating
The colour to use for particles in the incubating phase when 'Color Mode' is set to 'Fixed Value'.
Infected
The colour to use for particles in the infected phase when 'Color Mode' is set to 'Fixed Value'.
Incubation Gradient
The gradient to use when 'Color Mode' is set to 'Gradient'.
Incubating Group
The group to use for particles in the incubating phase when 'Color Mode' is set to 'Use Groups'.
Infected Group
The group to use for particles in the infected phase when 'Color Mode' is set to 'Use Groups'.
Group Color Change
Note that this replaces the 'No Color Change' switch in previous versions of X-Particles. Existing scenes which have this switch checked will automatically set this parameter to 'No Color Changes' when loaded.
This drop-down menu controls the colour change which normally occurs when a particle's group is changed. The options are:
Both Stages
The colour will always change when a particle's group is changed.
Uninfected to Incubating Stage
A colour change will only occur when a particle changes group on changing from uninfected to incubating.
Incubating to Infected Stage
A colour change will only occur when a particle changes group on changing from incubating to infected.
No Color Changes
Even when a group changes, the colour will not change.
No Colour Change
This switch has been replaced by the 'Group Color Change' parameter and is no longer available. Existing scenes which have this switch checked will automatically set this parameter to 'No Color Changes' when loaded.
Only available if 'Color Mode' is set to 'Use Groups'.
If you change particle groups, all the particle parameters contained in a group will be changed. If you would prefer that the colour did not change, check this switch. Note that all other parameters will still change.
Add Group
Clicking either of these buttons will create a new particle group and add it to the respective link field.
Search Radius
This is the radius to search around an infected particle for more uninfected particles. If there are none, the spread of infection will stop. If this value is small, you are more likely to fail to find any uninfected particles, but if it is too large, the growth may occur too quickly.
Max. Infected
This is the maximum number of uninfected particles an infected particle can infect. The higher this value, the faster the infection will spread.
Infected Particle Lifespan
When a particle becomes infected, its lifespan will be set to this value. You can use this to kill infected particles after they become infected, which can lead to some interesting effects. The default is 10 seconds (300 frames at 30 fps) which is longer than many scenes, but you may need to increase this for lengthy scenes if you don't want the particles to die, or decrease it if you do want them to die.
Search for Nearest Once
If this switch is checked, a search for uninfected particles will only take place once around each infected particle. This will speed up the simulation considerably. It is the best choice for static, non-moving particles since when a search has been performed once, there is no need to search again. But if the particles are moving you may want to uncheck this switch, since uninfected particles which were previously further away than the search radius may have become closer.
Constrain Search
By default the search for uninfected particles takes place in all directions around an infected particle. If you check this switch the 'Limit' setting becomes available.
Limit
Only available if 'Constrain Search' is checked. Use this setting to restrict the search for uninfected particles along the X, Y and Z axes. The default is a value of 1 for each axis, which represents no limit. Smaller values restrict the search along that axis.
For example, if you set the X component to 0.5, uninfected particles which lie along a direction vector from the infected particle with a large X-value will not be included in the search. Note that if you set this value too low, depending on the particle distribution you may detect no uninfected particles at all and the simulation will halt.
Incubation Mode
This menu determines how the incubation value for each particle is set when it is first generated. The options are:
Set From Incubation Rate
With this option the incubation rate is set from the 'Incubation Rate' value. You can use this to give all particles the same incubation rate, or you can add some variation by using the 'Variation' setting.
Use Particle Colour
The overall particle colour brightness determines the rate. Black particles have a rate of zero (so will never change from incubating to infected) while pure white particles have a rate of 100% and change to the infected state very quickly.
Particle Radius, Particle Mass
With these options the particle's radius or mass control the incubation rate. If you select one of these options you must also set the 'Min. Value' and 'Max. Value' settings. Particles with a radius or mass equal to or below the 'Min. Value' will have an incubation rate of zero, so will enter the incubation phase but never become infected. Those with a radius or mass equal to or higher than the 'Max. Value' will have an incubation rate of 100%.
As an example, suppose the particle radius can vary between 1 and 2 screen units. You might set the 'Min. Value' setting to 1, and the 'Max. Value' setting to 2. This ensures that the largest particles incubate the fastest, while the smallest ones don't incubate at all. if you want the smallest to incubate but only very slowly, you could set the 'Min. Value' to something like 0.9. You can see that these two settings are crucially important when determining how fast particles incubate and therefore how fast the spread proceeds.
Temperature, Smoke, Fuel, Fire
The same as for 'Particle Radius' or 'Particle Mass' but using the physical data settings instead.
Min. Value, Max. Value
The settings to use to determine incubation rates when 'Incubation Mode' is set to 'Particle Radius', 'Particle Mass' or the physical data parameters.
Incubation Rate, Variation
The settings to use to determine incubation rates when 'Incubation Mode' is set to 'Set From Incubation Rate'.
Incubation Multiplier
It may happen that depending on how you set the incubation rate, the rate for all particles may be too slow for the desired animation. This could happen, for example, if you set the incubation mode to use particle colour and all the particles have dark colours, and therefore a low incubation rate. If that is the case, you can use this setting to increase incubation rates for all particles; the rate is multiplied by this value.
You can also use values less than one if the simulation is progressing too quickly and you want to slow it down by reducing the incubation rate.
Invert
If this switch is checked, the calculated incubation rate is inverted. This would cause (for example) particles with the brightest colour to have the slowest incubation rate.
Use Immunity
Check this switch to enable the 'Immunity Level' setting.
Immunity Level
With this setting, you can make some particles immune to infection. The setting is measured against a particle's incubation rate. Those particles with an incubation rate lower than this value will never be infected - in fact, they will not even enter the incubating phase.
Actions quicktab
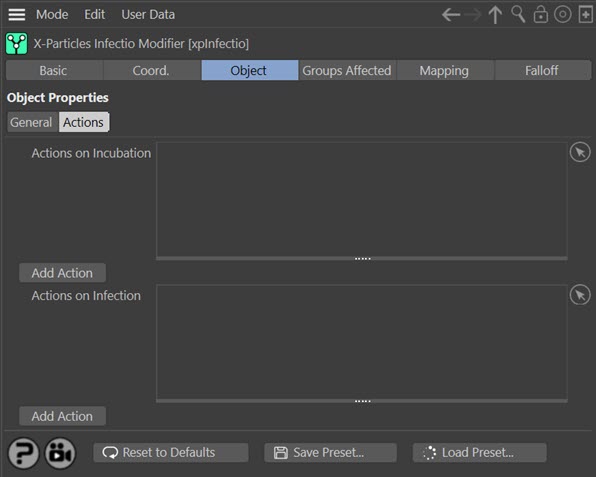
Actions on Incubation
These actions will be triggered when the particle first changes from the uninfected state to the incubating state.
Add Action
Click this button to add an action to the 'Actions on Incubation' list.
Actions on Infection
These actions will be triggered when the particle first changes from the incubating state to the infected state.
Add Action
Click this button to add an action to the 'Actions on Infection' list.
Using the Infectio Modifier
Introduction
This modifier simulates growth systems in X-Particles. It uses a classic paradigm of an infection spreading from one point to another, but it is really a general-purpose growth simulator. With it you can obtain simulations like this:
The most important thing to remember about this modifier is that it does NOT generate any new particles. Instead, it works by changing the state of a particle from one phase to another. The three possible phases (again, using the concept of a spreading infection) are:
- Uninfected
- Incubating
- Infected
An uninfected particle does nothing, and cannot infect other particles. Its colour is whatever colour was given to it when it was created. An infected particle will infect any uninfected particles within a given distance, which you can change. Infected particles can have a different colour to uninfected ones, but this is not required; the colour can be the same as uninfected ones, if you wish. When an uninfected particle is infected, it is said to be incubating, at which point it cannot infect other particles but may eventually become infected - and then it can infect other particles, causing the infection to spread. Incubating particles can also have a different colour if required.
Setting up the growth system
1. The first stage is to generate some particles. Best results are often obtained using a single shot of particles, but you can emit new particles every frame, if you wish. Particles can be emitted however you like, there are no restrictions.
It is recommended that you start with a single shot of particles and set their speed to zero so they remain in the same location. When you are familiar with the modifier you can start to experiment with different emission types and particle movement.
2. Next, each particle must be given an incubation rate. This is the speed with which a particle, once it enters the incubating phase, will turn from incubating to infected; the higher the value, the faster the move takes place. You can set the incubation rate in a variety of ways, and the default is to use the particle colour. This converts the overall colour brightness into the incubation rate, so it follows that if all particles have the same colour, they will all have the same incubation rate. This is a good choice if you are controlling particle colour by a texture, since you can use the texture to determine where the infection spreads rapidly and where slowly.
3. At this point, all particles are uninfected so no spread will take place. To start it off you need to provide a seed point - a point at which there are some infected particles which can infect others. You do this by adding an X-Particles Seed Object. If this object includes some particles in its sphere of activity, they will be changed to infected and the process will start when you run the animation.
4. You can also add a Trail object to show links between infected particles, as shown in the above animation. There is more information on how to do this in the Trail object page.
5. The advantage of using groups is that, as was done in the above animation, you can use the X-Particles material to render only the groups for the incubating and infected phases. This enables you to not render the original particle distribution if you don't want to. If you use the other colour options, the original particles will also be rendered.
Using Infectio with a Color modifier
A convenient way to set up the initial particle colour (and therefore incubation rate if you link the rate to the colour) is to use a Color modifier. But there is a potential problem here. The Color modifier will set the initial particle colour, and the Infectio modifier will change the colour as the simulation progresses. However, the Color modifier will then change it back again and you will not see any change!
The solution to this is a new switch in the Color modifier - 'Change on Birth Only'. This will cause the particle colour to be set on birth but the colour will not be changed by the modifier in any subsequent frame. This enables colour changes made by the Infectio modifier to be seen.
The other option in the Color modifier is 'Store Colour Brightness'. This will cause the overall colour brightness to be stored in the particle data whenever its colour changes. You can use this value in other areas of X-Particles, such as data mapping.
The X-Particles Seed Object
For the simulation to work, there must be at least one infected particle to act as a 'seed', start the simulation off, and infect other particles. You can add seed particles by adding an X-Particles Seed Object.
This means that there MUST be at least one seed object in the scene. You can have as many as you like, but ALL seed objects must be child objects of the Infectio modifier. Also, when the simulation starts there must be one or more particles within the sphere of activity of the seed object. If there are no particles inside that sphere, either move the seed object or increase its size.
Note that you can add a seed object by clicking the 'Add New Seed Object' button in the modifier.
Creating links between infected particles
You can do this by using a Trail object and selecting the Infectio algorithm.
Other information
That's really all you need to do to set up the system. You can then refine it by specifying colours or particle groups if desired, or add a Trail object to create links between infected particles.
The key to getting a good result is in deciding how the infection, or growth, will spread. This is determined by the particle's initial incubation time, so setting this up as required is essential. Good results are obtained with a texture controlling the initial particle colour and setting the incubation rate from that, but if you don't want to use colour you can try one of the other parameters such as mass or radius. Setting the mass, for example, will not affect many other components of X-Particles, and you can leave the particle colour unchanged if that's what you need.