Group Object
A particle can be assigned to a group. The group can then be used to determine whether scene modifiers or actions affect the particles in that group. You can add as many groups to a scene as you wish but the group must be created before you can assign a particle to it. To create a group, add a Group object to the scene. This can be done using the main plugin menu, or the system object, or in the Groups tab in the Emitter object.
A Group is not specific to a single emitter. You can have multiple emitters all emitting particles in the same group, if you wish.
Interface
The Group object's interface contains the following sections:
For the buttons at the bottom of the interface, please see the 'Common interface elements' page.
Parameters
General quicktab
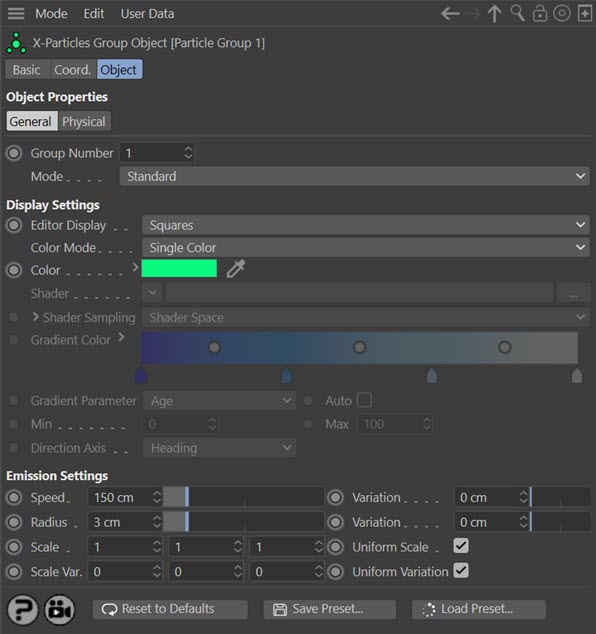
(Standard mode shown - not all parameters are available in other modes.)
Group number
This is a field which shows you the internal number of this Group.
This number is normally added when the group is created, but can also be edited by the user, if desired. Most of the time it is recommended that you don't do this, but in some circumstances, such as merging two scenes, you may have two or more groups with the same number. This number is used to identify to a particle which group it is in; if you have two groups with the same number the particle will assume it belongs to the first group it finds with that number.
If you do change it, the actual number isn't important as long as it isn't shared by any other group.
Mode
Groups can now control many more aspects of an emitted particle than previously. Exactly which parameters are taken from the group, and which from the emitter, are determined by this drop-down, which has three options:
Display Only
Only the display settings are taken from the group object. Emission settings and physical properties are taken from the emitter which emits the group.
Standard
In this mode, the group object controls the display settings and emission settings. Physical properties are taken from the emitter which emits the group.
Extended
Display and emission settings, and physical properties, are taken from the group. The emitter has no effect on any of these parameters.
Editor display
This is the same setting as found in the Emitter's 'Display' tab. Please refer to the Emitter object for more information.
Note that this and the Color setting make it possible for each group to have its own unique appearance (which does not depend on the group number being unique) without having to use Questions and Actions to accomplish that.
It is not possible to specify the size and transparency of spheres or circles for Group objects, so if you choose 'Spheres' or 'Circle (Filled)' as the display type, the size and transparency are taken from whichever emitter(s) emit particles in this group.
Color Mode
The Group object now has its own colour gradient and shader link, so it is no longer necessary to use the ones from the emitter as in previous versions. The Group object also controls the parameter used to determine the colour from the gradient when you select the 'Gradient (Parameter)' option.
This drop-down has five options. These are the same as in the Emitter display tab:
Single Color
The particles all have the same colour, from the 'Color' setting.
Random Color
Particles are assigned a randomly-chosen colour.
Gradient (Random)
A random colour is chosen for each particle from the 'Gradient Color' gradient.
Gradient (Parameter)
The particle colour is chosen from the 'Gradient Color' gradient but the colour chosen is determined by the 'Gradient Parameter' drop-down.
Use Shader
In this mode particles are coloured by a shader placed into the 'Shader' link.
Color
The color of the particle in the viewport. This is used in the editor and in the X-Particles material if that is set to use the particle colour. The default is a light green, as in the Emitter.
Note that if you change this setting, the colour of the Group object icon in the object manager will also change to the same colour.
Shader settings
If 'Color Mode' is set to 'Use Shader' there is the option to use a shader to generate the colour. In these modes, the following parameters become available; click the small arrow to the left of the 'Shader Sampling' label to access them:
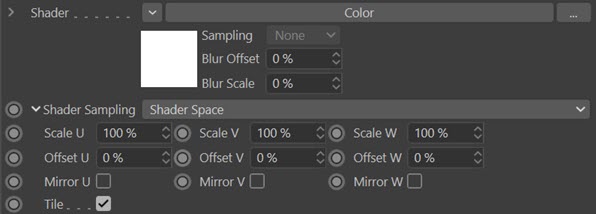
Shader
A link field for the shader to use.
Shader Sampling
This menu determines how the shader is sampled.
The options are:
- Shader Space: this will sample the colour at the particle position in the 3D world (this is the default setting)
- Random: this will sample the shader at a different random point in each frame.
To the left of the word 'Shader Sampling' is a little arrow. Cick this to reveal the other parameters.
Scale U, Scale V, Scale W
These three parameters control the size of the shader across the sample space. To put it another way, if the 'Tile' parameter is checked a bitmap will be tiled across the sample space and the number of tiles is controlled by these parameters. If 'Tile' is unchecked the bitmap is simply scaled.
Procedural shaders are scaled using these parameters but the 'Tile' switch has no effect.
Offset U, Offset V, Offset W
The shader will be offset by these amounts in the respective direction.
Mirror U, Mirror V, Mirror W
Checking these switches will mirror the shader across the respective axis.
Tile
If a bitmap is used, checking this switch will cause it to be tiled across the sample space. The number of tiles is controlled by the 'Scale U' and 'Scale V' settings. The switch has no effect on procedural shaders.
Gradient Color
This is used in 'Gradient (Random)' and 'Gradient (Parameter)' modes. By default this is a blue to white gradient.
Gradient Parameter, Auto, Min, Max
These are exactly the same settings as found in the emitter's Display tab. Please refer to the emitter manual pages for full details.
Emission Settings
These are identical to the parameters of the same names in the Emitter object Emission tab. They are only available in 'Standard' and 'Extended' modes.
Please refer to the Emitter manual page for more details.
Physical quicktab
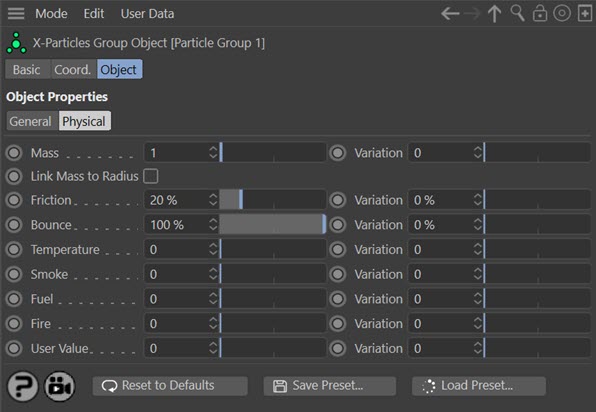
These parameters are identical to the parameters of the same names in the Emitter object Extended Data tab. They are only available in 'Extended' mode.
Please refer to the Emitter manual page for more details.
Using the Particle Group object
To use different particle groups in an emitter, drag the groups you want to use into the 'Groups to Use' list in the emitter. Alternatively, you can click the 'Create and Add Group' button in the emitter 'Groups' tab; this will create a group and automatically add it to the 'Groups to Use' list.
If no groups are present in the list, all particles will be in the default group and will have the colour and shape found in the emitter. If more than one group is in the list, new particles will be assigned randomly or sequentially to one of the groups, depending on the emitter setting.
Note that more than one emitter can use the same group if you wish.
Group numbers
The group number is generated automatically and held internally by the Group object. Each group should always have a unique number compared to the other groups in the scene. The group number is shown in the 'Group Number' field, which is editable should you need to change it. Also, by default the Group object name will be 'Particle Group' followed by the internal group number. Note that the default group, to which particles are assigned if no group is specified, always has the number 0 (zero).
You can change the name to anything you like, the number in the name is not required for the group to function correctly. The number will still be shown in the 'Group Number' field if you change the name.
Changing a group
You can change a particle's group using a Change Group modifier or Action. When you do this, you are not altering the number of a group. Instead you are moving a particle from one group to another.
Assigning XP materials to groups
The simplest way to render particles is to assign an XP material to the emitter. This will render all particle groups emitted by that emitter, using the same material. However, you can assign different materials to each group. Doing that will override the material on the emitter and render the particles in that group with its specific assigned material.
If you have materials both on the group and on the emitter, and then you disable the group in the object manager (see below), the group's particles will still be rendered but using the material on the emitter. If the emitter does not have a material, disabling the group will cause it not to be rendered. This can be very useful for comparing different material settings.
Disabling/Enabling a group
You will see that the in the Cinema 4D object manager a group object has a green tick that will change to a red cross when ticked. Since groups are simply a special kind of null object, disabling a group doesn't do anything. If you are emitting that group from an emitter then disabling the group will not prevent it from being emitted. A group which is dragged into a modifier groups list will still be used even if disabled in the object manager.
However, there is one case in which disabling a group is important. To render particles you can assign an XP material to a group instead of the emitter. If you do that, and you disable the group, that group will not be rendered. If both the group and the emitter have materials assigned to them, the group material is used if the group is enabled but if it is disabled the emitter's material will be used to render the group.