ExplosiaFX: Simulation
This page contains the reference manual for the Simulation tab in the ExplosiaFX object.
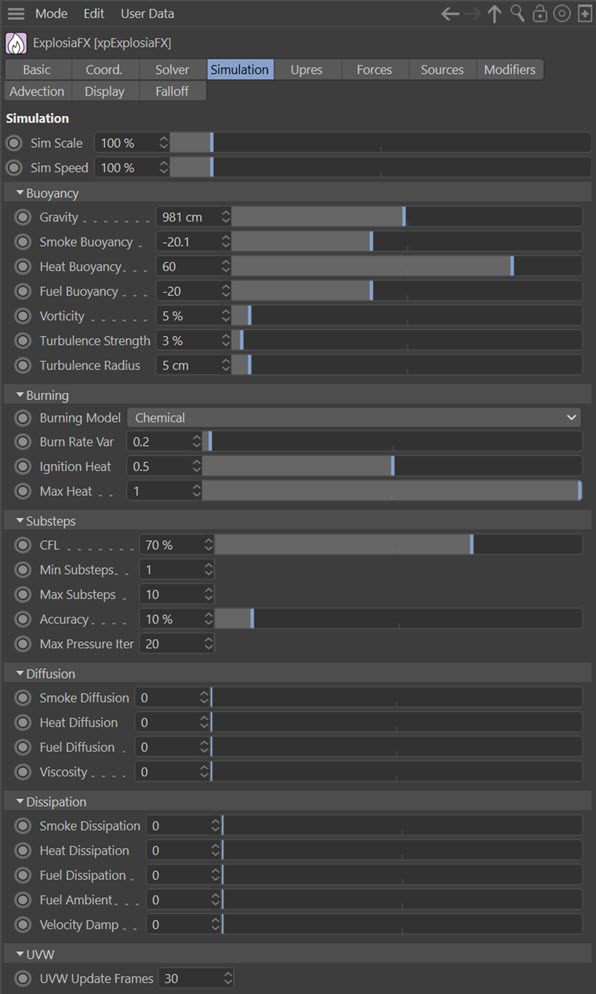
Interface
The tab interface looks like this:
Parameters
Sim Scale
Changing this value alters the resolution of the simulation so that reducing this value results in a larger and faster simulation (within the confines of the solver) but with lower resolution. A higher value causes a smaller simulation but a more detailed one.
Sim Speed
This is the speed with which the simulation progresses, so the higher this value, the faster it runs. If you set it too high though, you may see a jerky animation as the appearance seems to jump from one frame to the next. Compare these two videos with the basic setup video on the Explosia main page. In the first the Sim Speed is set to 250%, in the second it is 500%:
Buoyancy Settings
Gravity
Gravity is inherent in Explosia so a Gravity modifier is not needed. This is the gravity strength on the positive Y axis.
Note that increasing the gravity will make the smoke etc. rise faster. This may seem counter-intuitive but it is how the original ExplosiaFX worked and we have retained this method for compatibility. You can set negative values to make the smoke flow downwards (negative Y axis).
Smoke Buoyancy
Smoke rises due to the heat of burning. This value can reduce or increase the smoke buoyancy, so it will rise slower or faster.
Heat Buoyancy, Fuel Buoyancy
As for the smoke buoyancy but for heat and fuel respectively.
Vorticity
Increasing this value will increase the amount of curl within the simulation. For example, in this video, Vorticity is set to 50%:
Turbulence Strength
You can add turbulence to the simulation with this parameter, which controls the strength of the turbulence
Turbulence Radius
Increasing this value will increase the size of the turbulent areas in the simulation. Compare these two examples, where 'Turbulence Strength' is set to 35% and the 'Turbulence Radius' to 10 units in the first example, and 50 units in the second:
Burning Settings
Burning Model
This is a drop-down menu containing the various burning models used by ExplosiaFX. The model defines how heat, smoke and pressure is generated and dissipated. The options are:
Chemical
This model simulates actual chemical processes inside the burning fuel. This is the default setting.
Custom
With this option you can design your own burning model (see below).
Burn Rate Var
This controls the random variation in rate of burning of fuel, to model fuels of uneven consistency. The number represents a multiplier to the burn rate, so a variation of 0.0 will produce a relatively even burn, and a variance of 1.0 will cause the burn rate to fluctuate between zero and double its regular amount.
Ignition Heat
This is the threshold value above which burning occurs. That is to say, if the heat at a given point is greater than Ignition Heat, fuel will be burned.
The default is 0.0, meaning all fuel in the simulation is in the process of burning. The maximum amount is 1.0, in line with the maximum heat that can exist within a simulation.
Max Heat
The maximum heat value which can be achieved at a given point. The range is 0.001-1.0, with 1.0 being in line with the maximum heat that can exist within a simulation.
If 'Max Heat' is lower than 'Ignition Heat' then no fuel will burn.
Custom Burning
If you select 'Custom' from the 'Burning Model' drop-down menu, the interface changes slightly. You can then use this to design your own burning model. Experimentation is the key here.
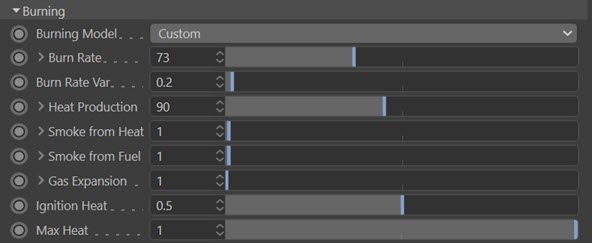
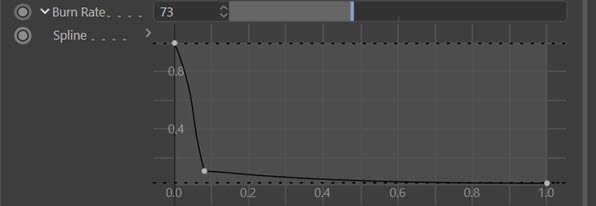
From here you can set the required parameters for the model. Note that each parameter has a small arrow next to it. Click that to reveal a spline giving further control over the parameter:
Splines allow different multipliers to be applied to different intensities of a field. These intensities are represented by the x axis, and map to the values on the y-axis. For example, here is the 'Heat Production' spline used for the chemical model:
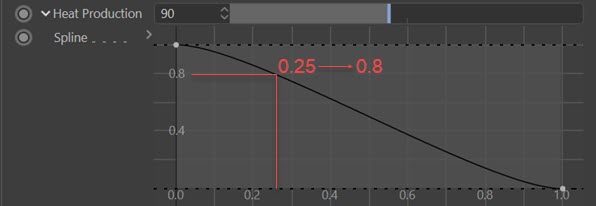
The Y axis is marked as 0.0 – 1.0, but will be multiplied by the value in the slider. The X axis represents the fuel density at a point. Therefore, in this example, if the fuel density at a point is at 0.25 (on the X-axis), it will have a (0.8*90) = 72 times multiplier to the heat generated by the amount of fuel burned. If, however, the fuel is close to saturated, heat production will be lower.
Burn Rate
This setting controls the amount of fuel that burns at any moment in time. A burn rate of 1.0 will consume 1.0 worth of fuel over the course of one second. The spline modifies this value based on the existing fuel amount.
Heat Production
How much heat is generated during burning. This is a multiplier applied to the quantity of fuel burned, as controlled by the ‘Burn Rate’ parameter. The spline modifies this value based on the existing fuel amount.
Smoke from Heat, Smoke from Fuel
How much smoke is generated during burning as a result of both heat and fuel. Both heat and fuel are needed to generate smoke; if one is absent there will be no smoke. Note that because any smoke generated above 1.0 is 'lost', the best way to increase the amount of smoke in a scene is in combination with higher 'Gas Expansion' values.
The splines modify these values based on the current heat and fuel respectively.
Gas Expansion
How much pressure is generated during burning. High pressure will result in smoke, heat and fuel being dispersed over a larger area more quickly. The spline modifies this value based on the existing fuel amount.
Substeps
CFL
The Courant-Friedrichs-Lewy number is important in controlling the accuracy and stability of the simulation. In this object the 'CFL' value is a percentage of the voxel size. If a simulation appears unstable (e.g. too lively or you see an exploding simulation) try reducing this value and/or increasing the 'Min Substeps' or 'Max Substeps' values. Both measures will, however, take longer to solve.
For a technical explanation of this parameter, see the same parameter in the FluidFLIP object.
Min Substeps, Max Substeps
The solving will only be accurate if particles don't move beyond a single voxel. The motion is broken into small times (substeps). These settings control the minimum and maximum number of time steps that will be used. Higher values, meaning more substeps, will slow the simulation but make it more accurate. For very fast moving simulations they may need to be higher if you notice incorrect simulations or artefacts.
Accuracy
EFX is an iterative solver, refining the calculations each iteration. More iterations result in a more accurate simulation but will take longer to complete. The accuracy setting determines how close to 'exact' the solution is; the higher it is the more likely it is to reach the maximum number of iterations. That maximum number is specified in 'Max Pressure Iter'.
Max Pressure Iter
For the most part you can leave this setting alone. It is used internally as the number of sub-frames used when calculating pressure changes each frame. If you have a very rapidly changing simulation, such as an explosion, you may need to increase this value.
Diffusion Settings
Diffusion in Explosia can be thought of as the rate of movement of a parameter, such as smoke or heat, throughout the solver. The higher these values are, the greater the even distribution of the parameter and so the less contrast you will see in the result. Consider these videos in which the display is set to temperature. In the first, heat diffusion is zero (the default setting); in the second, it is set to 250:
Note the much smoother appearance and reduction in contrast, consequent on a more even distribution of heat, when the heat diffusion value is raised.
Smoke Diffusion, Heat Diffusion, Fuel Diffusion
The diffusion values for smoke, heat and fuel respectively.
Viscosity
This setting is labelled viscosity but it is actually another diffusion setting, this time for velocity. As you might expect, increasing this value smooths out movement and gives the impression of a thicker, more viscous medium. In this video, it has been set to 300:
Dissipation Settings
These values control the dissipation of a parameter, the effect being to reduce it over time. It can best be explained in these videos, where in the first the smoke dissipation has been left at the default of zero, and in the second is set to 0.35:
You can see how quickly, even with a small dissipation value, the smoke fades away with time.
Smoke Dissipation, Heat Dissipation, Fuel Dissipation
The dissipation values for smoke, heat and fuel respectively.
Fuel Ambient
This is the minimum fuel value in a given voxel which is subject to dissipation. Smaller values will not be affected by dissipation.
Velocity Damp
This setting acts to reduce velocity over time. You can see this in these videos, which have display set to speed. In the first, velocity damp is zero, in the second it is set to 5. Note that red areas are the areas of highest speed:
UVW Update Frames
This is the duration over which the UVW fields recalculate UVW coordinates.