Using X-Particles with Team Render
Some users have experienced difficulty in using X-Particles with Team Render, so we have prepared this guide to using them together.
Setting up Team Render
For this purpose we assume you have a network of two or more computers which can all 'see' one another on the network. These machines can be all PCs, all Macs, or a mixture of both.
The first thing you have to decide is whether to use all TR clients (that is, Team Render to Picture Viewer, TR2PV) or to use Team Render Server (TRS). These are very different options with their own problems and solutions. Generally, using TR2PV is the simpler and easier to use, and probably the best option for hobbyists or small studios. For larger studios, TRS may offer more facilities.
We have found that getting X-Particles to work with TRS is not straightforward, so we will discuss the client-only solution first. Using TRS is discussed lower down on this page.
Caching
To use TR effectively in either configuration you must cache the scene. A very simple scene (e.g. one emitter) might work without caching but if it's that simple you don't need TR! You can find full details of the Cache object in this manual.
Internal (memory) or External (files) caching?
You must choose which option to use in the Cache object. They both have advantages and disadvantages as shown in this table:
| Method | Advantages | Disadvantages |
|---|---|---|
| Internal (memory) | Creates a single large file No need to share folders as the file is sent to all clients |
The file may be huge (gigabytes) if there are lots of objects and it's a long scene, and this will be sent to all clients on the network Need to turn on 'Copy Tag Data' in all Cache tags in the scene |
| External (files) | Creates multiple small files TR clients pull the files they need from the primary, reducing network traffic |
The folder holding the cache files must be accessible to all clients on the network, which can be tricky with mixed OS networks |
As a general rule, you could choose internal caching for small scenes with few objects and external caching for long scenes and/or scenes with many cached X-Particles objects.
Internal (memory) caching
To use this is very simple. Just do the following:
- in the Cache object, set the 'Cache Type' to 'Internal (Memory)'
- cache the scene
- for each of the Cache tags that have been created, turn on the 'Copy Tag Data' switch (this is essential!)
- save the file to save the cached data
- you are now ready to render the scene
You can find more details about the 'Copy Tag Data' switch on the Cache Tag page, but it is crucial that it is turned on for each tag in use.
External (files) caching
This method requires a little more work to set up. First, you need to decide where the cache files are going to go. This can be in the same folder as the scene file or somewhere completely different such as an NAS drive. However, whatever the location it MUST be one which is accessible to all the clients on the network. This isn't the same as the machines just being on the same net; the folder must be 'shared' so that it can be accessed by the other machines.
Sharing the folder
Sharing a folder is done differently on Windows and OSX. For fuller details you should see documentation for the relevant operating system, but briefly:
On a PC running Windows
- locate the folder in Windows Explorer and right-click it
- choose Properties from the context menu
- click the 'Sharing' tab
- click 'Advanced Sharing' and click 'Yes' if you get a User Account Control warning
- in the advanced sharing dialog, turn on 'Share this folder' then enter a 'Share name' - this can be any name, it can be the same as the folder name or different but you will need to know what it is later
- if you want to, you can click 'Permissions' and change that to add user accounts, alter permissions and so on, but it defaults to 'Everyone' and read-only, which is just what you want
- click 'OK' then click 'Close' and you're done
On a Mac running OSX:
- create the folder where you want it
- open the Preferences dialog
- click 'Sharing'
- in the dialog which appears, ensure that 'File Sharing' is checked in the left-hand pane
- click the '+' button under the 'Shared Folders' pane
- select the folder you created and click 'Add'
- you should see the new folder appear in the 'Shared Folders' list
- click the 'Options' button and make sure that 'Share files and folders using AFP' is on and if you are using a mixed network with PCs, turn on 'Share files and folders using SMB (Windows)' as well
- turn on the switch against each user account you want to use file sharing for; OSX will ask you for the password for that account, enter that then click 'Done'
- you should now see in the 'Sharing' dialog some text about how to access the shared folders - it should show 'File Sharing: On' and some text showing the machine name to use:
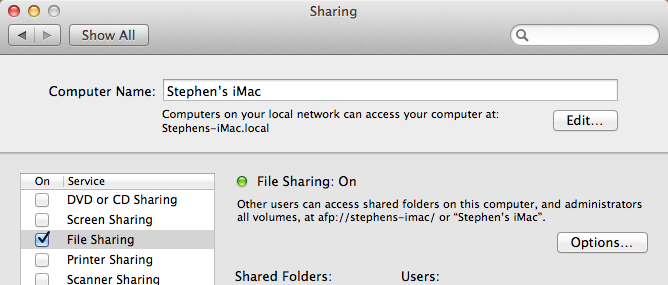
- make a note of the machine name (the bit after the 'afp://' characters) as you will need this later (in some versions of OSX this might be an IP address rather than a name)
- close the 'Sharing' dialog and that's it
Setting up the Cache object
In the Cache object you must enter the folder where the cache files will be saved into the 'Folder' link field - this will be the sharing folder you just created. If you click the little arrow next to the 'Folder' name you see some more options, some of which you may need to change later.
Using Team Render to Picture Viewer (TR2PV)
For this you will need at least two machines. One will have to run the full version of Cinema 4D; we'll call this the primary machine. The other(s) will all run Team Render Client - we'll call these clients. Note that each client must also have X-Particles running; you can install plugins into Team Render Client in the same way as any other installation of Cinema.
Setting up the clients
This is discussed at length in the Cinema 4D reference documentation, so we assume that you have set up your clients and that they are all visible and available to the primary machine. You can check this in the primary by going to the Render menu->Team Render Machines... and you should see something like this:
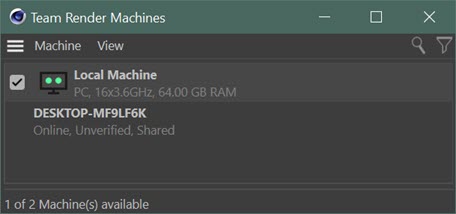
This shows that the primary machine is a PC and there are two potential clients available, only one of which is available at this time.
'Bonjour' and adding clients manually
MAXON recommend the use of 'Bonjour' to detect TR clients on the network. But you really don't need it and it may not always work, plus the fact that on a Windows machine you need to install it separately. If you don't see a machine in the list that you know should be available, you can use the Cinema 4D Render menu -> Team Render Machines... -> Machine menu -> Add Machine... to add it.
If you do this, you will need to add the IP address of the machine and its port in the little box which appears. The IP address you can find from the computer's OS but the port information (and security token) you get from the 'Preferences' tab of the TR client interface:

Note that 'Share Machine over Network' MUST be checked to use this client for rendering. Once you have this information, in the Team Render Machines dialog, click the 'Machine' menu then click 'Add Machine...'. A little window appears asking for the IP address or machine name plus the port. Enter this information like so (changing the IP address and port number to the ones applicable to your client machine!):
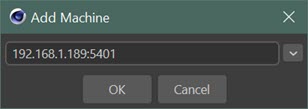
Note the use of a colon to separate the IP address from the port. TR should then ask you for the security token, also obtainable from the TR client preferences, and once you have done that, the machine should appear in the 'Team Render Machines' list.
Using Internal caching
If you are using internal caching, and you have carried out the steps in the 'Caching' section above, all you need to do is click 'Team Render to Picture Viewer' in the Cinema 4D Render menu.
Using External caching
If you are using external caching, what you need to do now depends on the type of machines you have on your network - that is, are they all one type of operating system or a mixture of PCs and Macs?
Windows-only or OSX-only networks
You don't need to change anything else once you have set up the sharing folder. The clients should be able to see and access the shared folder you created so you can just go ahead and team render to the picture viewer as for internal caching. If the clients can't access the shared folder then either the folder is not shared correctly or the client can't find it because the network isn't set up correctly. See the 'Troubleshooting' section below.
Mixed networks
This is where the fun starts. Because Windows and OSX don't handle file paths the same way, an OSX machine won't know what to do with a file path formatted in the Windows way and vice-versa. This is the reason for the 'Alt Folder' link field you see in the additional options in the Cache object:

What you put in there depends on whether the primary is a PC and the client(s) are OSX or the other way around.
Windows primary and OSX clients
To make this work the shared folder on the primary must be 'mounted' as a volume, effectively a virtual drive, on the Mac. There are many pages on the web about how to do this, but it's usually pretty simple. You will need to know the name of the primary machine by which it identifies itself on the network and the name of the share you created. Then on each client, do this:
- in the Finder menu, click Go->Connect to Server...
- when the dialog box appears, type 'smb://PrimaryName/SharedFolder' - so for example, if the primary machine is called 'myPC' and the share name is 'xpcache' you would enter 'smb://myPC/xpcache'
- OSX will then try to access that shared folder; it may ask for a username and password, for which you can use the login details for the account you are currently logged into on the PC
- once you have done that, assuming it was successful, if you open a Finder window you should see the new share under the 'Volumes' section (if you don't see that section you may need to show it by using Finder's Go menu->Go To Folder... and enter '/Volumes' without the apostrophes)
Yes, you do have to do this for each client, and you do have to mount each shared folder you want to use. Fortunately OSX allows you to mount external shares automatically on startup, so you only need to do it once. Details of how to do that are beyond the scope of this paper but you can easily find how to do it on the web.
Back in the primary machine, you need to tell the OSX clients where to find the cached files. You do this by entering the information for the newly created volume into the 'Alt' file path. Suppose the share name is 'xpcache' then into the 'Alt' field you would enter '\Volumes\xpcache' (without the apostrophes). Note the leading backslash, that's critical to this working, and that it's 'Volumes' not 'Volume'.
That's it. You should now be able to team render to the picture viewer and the clients will find the cache files in the correct place and fetch them when they need them.
OSX primary and Windows clients
This is a little easier than the Windows primary method. Once again, you'll need the name of the Mac primary by which other machines can access shared files. You can get this from the file sharing dialog box (see the screen shot in the sharing section above).
On the primary machine you need to tell the Windows clients where the cached files are. For example, if the Mac shared machine name is 'my-iMac' and the shared folder is 'xpcache', then in the 'Alt Folder' field you should enter '\\my-iMac\xpcache' (without the apostrophes). Note the double backslash to start the name.
That's it, you should now just be able to team render to picture viewer.
Using Team Render Server (TRS)
Team Render Server works a little differently from using TR clients only, and has significant advantages in terms of controlling render jobs on large farms. However, using X-Particles with TRS can sometimes be problematic, the main issue being that TRS doesn't quite work as it is supposed to.
The problem of assets
With TRS, you 'upload' assets to the server which then distributes them to the clients rendering that job. You do this by saving the project with all its assets (Cinema 4D File menu->Save Project with Assets...) which collects all the assets into one single folder. In the X-Particles Cache object, if you turn on 'Cache Files as Assets' the cache files will be saved to the folder 'Save Project with Assets' created. This all works fine. In addition, with TRS you shouldn't have to worry about using mixed networks, it should just...work.
However, it seems that TRS will recognise only certain file types as assets - e.g. Cinema 4D scene files, various image formats, etc. And it does NOT recognise X-Particles cache files. This means that TRS will not distribute the cache files to render clients, and ticking the 'Cache Files as Assets' switch won't do anything other than to keep the cache files in the same place as all other assets.
Using TRS and X-Particles
You can still use TRS with a cached X-Particles scene, but it isn't as easy as it should be. In effect, you need to set up the scene in the same way that you would if using TR2PV.
For the purpose of this paper we will assume that you have at least three machines (one to run the Team Render Server, and which won't take part in rendering) and two clients. If you only have one client you can still use TRS...but why bother?
On the server machine, run Team Render Server and on the client machines, run Team Render Client. X-Particles must be installed on all the clients. Once you do this, you should see something like this in the TR server:

Here you have a server (two green dots) and any available clients will appear in the left-hand pane.
Running the TRS web interface
Using TRS is done from a web interface which is launched from the Team Render Server application by clicking the 'globe' icon:

This opens the default browser, requires you to log in to the server, and you can then switch to the Jobs task, which shows something like this:

Details of how to use this interface are found in the Cinema 4D documentation. Essentially, you create a new render job, add files (scene file, bitmaps, etc.), upload these files to the server and click the 'Start' button to start the render process.
Caching the scene
As with the clients-only method, you must choose the cache type and a location for the cached files. You can turn on 'Cache Files as Assets' but then the files will be saved to the project folder and you will need to share that folder so it is visible to the client machines. You shouldn't need to do that, but it's required because TRS won't recognise the cache files as assets.
A discussion of the cache types can be found above.
Internal (memory) caching
This works in exactly the same way as for TR clients-only and details can be found above. Once the scene is cached and saved, you simply upload it to the server in the web interface and click 'Start'.
External (files) caching
If TRS worked as it should, you would save the project with assets, enable 'Cache Files as Assets' in the Cache object, cache the scene and upload the folder containing the cache files to the server. The server would then distribute these files to the render clients as needed. Unfortunately, it doesn't work like that.
The problem, as outlined in the introduction to this section, is that TRS simply refuses to recognise anything other than a limited set of file extensions as valid assets. Other file types are simply ignored. Please do complain to MAXON about that, it is of course beyond our control as TRS itself would need to be changed.
What this means is that if using TRS you will have to save the cache files to a shared folder on your network, as described above when using TR2PV. If you enable 'Cache Files as Assets' in the Cache object the cache files will be stored in a sub-folder of the project folder that Cinema created when you save the project with assets in the Cinema 4D File menu. That will work fine, but then you will need to share that project folder over the network.
We would suggest that instead you create a shared folder that will be used for any render job and save the cache files into that. Do not enable 'Cache Files as Assets' in that case, and there is no need to upload the cache files to the server (TRS won't do anything with them anyway). The workflow using TRS then becomes very similar to using TR2PV - create the share, save the cache files to it, and point the folder field in the Cache object to the shared folder where the cache files are located. And, of course, adjust the 'Alt Folder' field as well if using mixed networks.
Creating shared folders and making them available over the network is dealt with in detail in the TR2PV section above.
Troubleshooting
What usually goes wrong with TR2PV is either that nothing renders, so you get blank frames, or the frames don't seem to render in the correct sequence leading to stuttering and frames which are out of place. For TRS, it either works or it doesn't. There are several things to look at if you run into problems.
Bonjour
If you are using Windows, the 'Bonjour' service needs to be installed separately. We recommend adding machines manually instead and not bothering with Bonjour. Details can be found in the 'Setting up the clients' section.
Don't use WiFi networks
These networks don't cope very well with large amounts of network traffic. For reliable results, your render machines (and server if using TRS) should be connected by Ethernet.
Keep other network traffic to a minimum
For example, streaming a movie over the network when using TR could result in failure due to excess traffic. For maximum reliability, keep the other traffic down.
Internal caching
With internal caching, about the only thing which can go wrong is that the primary machine can't communicate with one or more clients. You can check this in the primary machine by using the Render menu->Team Render Machines... command, which displays the dialog box shown at the top of this page. Each client you want to use should have a check mark in the box to its left, and a green dot in the network icon. To check each client you can right-click it and choose 'Connection Test...' from the context menu. This will show if the connection is working correctly. Note that you may see problems with WiFi networks due to the large amount of data that has to be transmitted. It is recommended that your machines are connected with Ethernet, not WiFi.
If the connections are all satisfactory and it still doesn't work, be sure that you saved the cached file to save the cache data and that each cache tag has the 'Copy Tag Data' switch turned on.
External caching
In all cases of problems with external caching it is a good idea to turn on the 'Cache Log' in the extended options below the cache folder name in the Cache object. This will cause each client to output progress to the console in the TR Client, so you can see which frames are rendered by which client and any problems it has.
Assuming connections between clients and the primary are satisfactory (see above for how to check these) the usual reason for failure is that the client cannot access the cached files. This could be due to a network problem, which you can exclude by checking network connections as described, or most commonly because the shared folder is not found.
This shouldn't be an issue with PC-only or Mac-only setups but certainly can be with mixed networks. Check that the shares are set up correctly on the primary machine, and that the 'Alt Folder' is correctly specified in the Cache object.
To be absolutely sure the TR client can see the cache files, open the X-Particles preferences on the client and find the 'Default Folder' setting in the Cache Defaults:

You don't need to change this on the clients, as it is the folder the Cache object will save the cache files to, but what you can do is use it to check that the location of the cache files can be seen by the client. Simply use the button at the far right to navigate to the shared folder. If you can do that successfully, it proves that the client can access the cache files
If all else fails
If it still doesn't work you are not alone. Getting TR to work can be a black art, so feel free to post in our user forum or if necessary to contact support.
Acknowledgements
Many thanks to all our beta testers who tested this document for accuracy and completeness, and shared their experiences of using TR and TRS. Their help was invaluable in writing this document.