The Data Exporter Object
With this object you can export a snapshot of particle data at any time, in comma-separated value (CSV) format which you can then import into a variety of other applications. For a full discussion of the way this works and some examples of its use, please see the page 'Importing/Exporting Particle Data'.
If you are not familiar with the use of this object please read the above overview page and also see the section 'Using the Data Exporter' below, before using it for the first time.
Getting Help
Context-sensitive help is not available with this object. You can open this help page by clicking the 'Help' menu, then clicking 'Online Help'.
Interface
The Data Exporter is not an object added to the Object Manager like the Data Importer. It is a command you invoke from the main X-Particles menu and which displays the following dialog box:
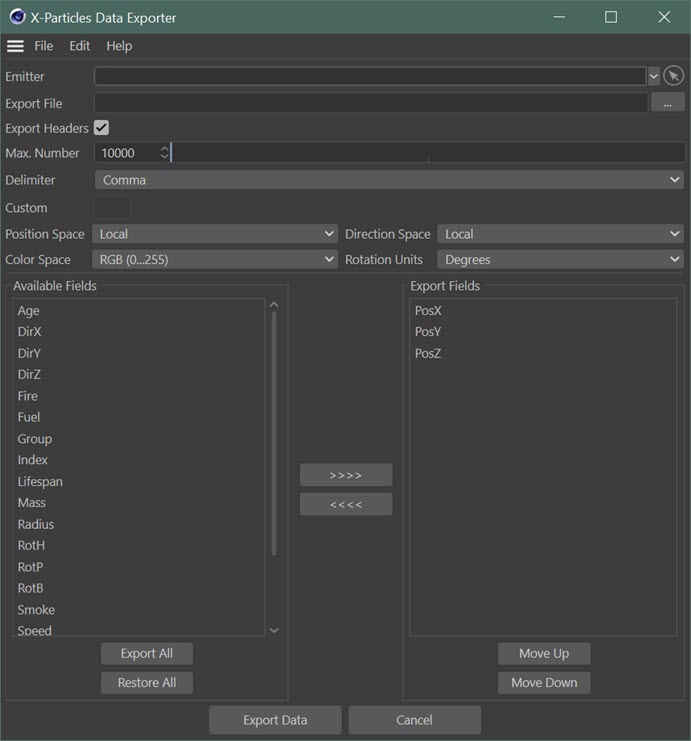
Parameters
Emitter
Drag an emitter into this field. This is the emitter whose particle data will be exported.
Data File
This is the file to which the data will be saved. It can be an existing file (which will be overwritten) or a new file. If the file has no extension, the .extension '.csv' will be added automatically, but if it already has an extension no change will be made.
Export Headers
If checked, the exporter will create the first line of the file as a header row containing the data field names separated by the delimiter character. The field names are the names shown in the 'Export Fields' list and are saved in that order. For more details about header rows and their importance, please see the page 'Importing/Exporting Particle Data'.
Max. Number
If you have a million particles on screen and export them all, this would produce quite a large (!) data file. You can restrict the number saved by entering any number in this field.
Delimiter
This drop-down lets you indicate which character is used as a delimiter in the data file. The most common is a comma, but tabs and semicolons are also popular. Use the drop-down to specify the delimiter to use. If you want to create a file which must use something else, you can select 'Other' then enter the character in the 'Custom Delimiter' field. Some applications are very specific about the delimiter they require, others are more flexible.
Custom Delimiter
This is the field delimiter character to use if 'Other' is selected in the 'Delimiter' setting.
Caution: you should only enter one character! If you enter a string of two or more characters the data exporter will use it, but the importing application may not be able to handle it.
Position Space
When position data for the particle is exported it can be treated as either 'World' or 'Local' data. This drop-down lets you select which one to use.
If you choose 'World' the data is treated as being in 3D world space, so no matter where the emitter is located the particle position in the 3D world will be used. If 'Local' is selected, the position is taken as relative to the emitter, so the exported position may be different from the world position, depending on the emitter position.
Note that if 'Local' is selected, the particle coordinates are local to the emitter. If they are being emitted from an object, you should ensure that the emitter and the object have the same world position (and rotation, if either are rotated). If the positions and/or rotations are different, the particle positions will not be local to the emitting object.
Direction Space
This is exactly the same as the 'Position Space' setting except that the exported particle direction is either set to 'World' or 'Local' space. See the note above regarding the emitter position/rotation if the particles are emitted from an object.
Color Space
Colour values in data files may take several different formats and the importing application will almost certainly have its own requirement for how colour data is handled. This drop-down lets you choose which colour space to use. The possible options are:
RGB (0...255)
This is probably the commonest choice. The colour is expressed in three data fields, one for red, green, and blue respectively. A value of 0 means there is none of that component in the final colour, a value of 255 means that component is at its maximum amount.
RGB (0...1)
Exactly the same as RGB (0...255) except that the range is given from 0.0 to 1.0. (This is the format used internally by X-Particles.)
RGB (0...100%)
Exactly the same as RGB (0...1) except that the range is given from 0.0% to 100.0%.
HSV
The colour is exported in Hue, Saturation and Value format.
HSL
The colour is exported in Hue, Saturation and Luminance format.
Available Fields and Export Fields
These are two lists containing the names of the fields which will be exported (the 'Export Fields' list) and those which are available to be exported (the 'Available Fields' list). Only the fields in the 'Export Fields' list will be exported.
Export All button
Click this button to move all fields from the 'Available Fields' list to the 'Export Fields' list.
Restore All button
Click this button to move all fields from the 'Export Fields' list back to the 'Available Fields' list.
>>>> and <<<< buttons
These are used to move fields between the two lists. See 'Choosing the fields to export' below.
Move Up and Move Down buttons
These are used to re-order the list of fields. See 'Re-ordering the fields to export' below.
Export Data button
Once you have set everything up, simply click this button to export the data.
Cancel button
Click this button to cancel the export and close the dialog.
Using the Data Exporter
To use the exporter, you first need some particle data. Set up the scene, run it for however many frames you wish, and then call up the exporter dialog box. Remember that this process is NOT a cache, it takes a snapshot of one frame of particle data.
You don't have to export all possible particle data. In fact it is likely that the importing application can only handle some of it and would be confused if unwanted data was exported. So the first thing you need to do is decide which data needs to be exported; for that you will need to see the documentation of the importing application.
Having decided that, the next problem is how the importing application expects the data to be presented. There are two possibilities:
The importing application expects the data to be in a specific order
This is by far the most likely scenario. For example, when importing data into Cinema 4D's Structure Manager, the manager expects to receive data as a point index followed by the three point coordinate values in X, Y, and Z order. If the data file had the coordinate data in Z,Y,X order, it would still be imported, but the X and Z values would be transposed. The manager doesn't care about the field names, though; they can be whatever you like.
If this is how the importing application wants the data, you will have to find out the expected order and arrange the list in the 'Export Fields' list accordingly. This is discussed below.
The importing application expects each data field to have a specific name
In this scenario, the application doesn't care about the order of the data fields but it needs to be able to match a specific field with the correct data by using a specified name for each field.
If that is what is needed then you can leave the order in the 'Export Fields' list alone but you will have to rename the data fields. Again, this is discussed below.
Of course, an application might expect the data to be in a specific order AND to have specific field names. That's just overkill, but you can do that if required.
Choosing the fields to export
The data export dialog has two lists. One is named 'Available Fields' and the other is 'Export Fields'. The fields in the 'Available Fields' list will NOT be exported, they are the data items which you can export if you want to. To export a data item, select it in the 'Available Fields' list and click the button marked '>>>>' to move it to the 'Export Fields' list.
Only the fields in the 'Export Fields' list will be exported.
Note that the three position fields are already in the 'Export Fields' list as it is highly likely you will want to export the particle coordinates. But you don't have to.
If you decide not to export a field after all, simply select it in the 'Export Fields' list and click the button marked '<<<<' to move it to the 'Available Fields' list. The field will be moved back to the bottom of that list.
Re-ordering the fields to export
As discussed above, the intended importing application for the data will probably expect the data items to be in the exported file in a specific order. The data fields will be exported in the order they occur in the 'Export Fields' list.
To re-order the list, select the field in the 'Export Fields' list and click the 'Move Up' or 'Move Down' buttons as often as needed to change the field position; repeat with any other fields which need to be changed.
Renaming the fields to export
Rarely, you may need to change the field name. If you need to do this, select the field in the 'Export Fields' list then, from the 'Edit' menu in the dialog box, choose 'Edit Field...'. A small dialog box will appear into which you can type the new name. Click OK to close this dialog and save the name.
Note that you can only change the names of fields in the 'Export Fields' list. But if you rename a field then move it back to the 'Available Fields' list, the new name is retained.