Particle Custom Data
What is Custom Data?
Each X-Particles particle carries with it quite a large amount of data specific to itself (colour, speed, age, etc.) and more is added by some modifiers or if you add it by turning on features such as particle rotations in the emitter.
However, there may be times when you want to add some specific data to each particle which is not already available. You can do that by adding Custom Data in the emitter.
Once added, you can test this data with a specific Custom Data question, or change it with the Custom Data Modifier or the Custom Data Action. You can also carry out data mapping using custom data items you have added to the particles.
- Adding new Custom Data
- Parameters
- Querying Custom Data items
- Changing Custom Data items
- Using the Get/Set Custom Data Xpresso nodes
- Examples
Adding new Custom Data
This is done in the emitter's 'Extended Data' tab, 'Custom Data' quicktab. In this quicktab you will initially see this:

To add an item of custom data, click the 'Add' button. You can remove data items individually once they have been added using the 'Remove Custom Data' button in each custom data section, or remove all custom data by clicking the 'Reset' button.
If you click 'Add' you will see this interface:
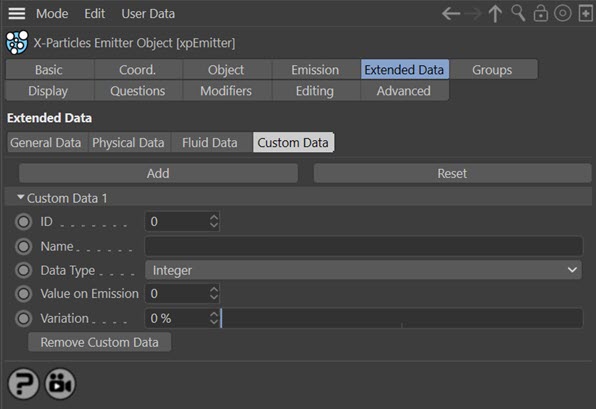
The various parameters are as follows.
ID, Name, Data Type, Value on Emission
The various parameters shown for each item of custom data are explained in the emitter custom data quicktab page.
Querying Custom Data items
A special question has been added to the Question object to let you test the value of your custom data. Please refer to the Question Object for details.
Changing Custom Data items
You cannot change the data type of a custom data item once it has been created (e.g. you cannot convert a Matrix to an integer). But you can change the value of the item.
The Custom Data Modifier
This is a modifier which specifically changes the value of custom data. It works in exactly the same way as other modifiers which alter particle data, such as the speed modifier or direction modifier. For more details, please see the Custom Data Modifier page.
The Change Custom Data Action
As with all modifiers in X-Particles, there is an action which can turn the Custom Data modifier on or off for a specific particle. As with actions such as the Change Speed action, this action can also change custom data items directly, without needing a modifier. Please see the Custom Data Action page for more information.
Using the Get/Set Custom Data Xpresso nodes
There are two new Xpresso nodes to let you get or set custom data values.
The Get Custom Data node
The incoming ports in this node work in the same way as the Get Particle Data node. It is explained fully in the Xpresso nodes page.
The Set Custom Data node
This node works in the same way as the other 'Set Data' nodes. It is explained fully in the Xpresso nodes page.
Examples
1. Frame Counter
This example demonstrates how to use custom data to implement a frame counter to use as a timer.
Let us suppose we want to increase the speed of a particle by 50 scene units every 15 frames. The speed modifier can increase speed each frame but we want a single increase every 15 frames. The only way to do this in earlier versions was to set up a series of questions testing the particle age for 15-frame increments and triggering a Change Speed action each time the question passed. To do this for just 300 frames would have required 19 questions! You could also have done this with Xpresso but not everyone likes Xpresso so we want to avoid that.
Adding Custom Data
The first thing to do is add an item of custom data to the emitter. We'll call it 'counter' and leave it as an integer. The value on emission should be 15, as we are going to reduce the value of this integer by 1, each frame, until it reaches zero.
Changing the value
To change the value of the custom data we add a Custom Data modifier. In the modifier all we need to do is specify the name of the data ('counter'), set 'Operation' to 'Increment/Decrement' and set 'Value' to -1; this will add -1 to the data value each frame, that is, it will reduce it by 1 each frame.
Testing the value
Next, we add a Question to the emitter. The question type should be 'Custom Data' and again we enter the name. All the other parameters can be left at the defaults, because we want to test for the data item equalling zero, which thanks to the custom data modifier, it will be after 15 frames.
Taking some action when the question passes
All we need to do then is add the Action to the question; this should be a Change Speed action in direct change mode. Leave the change as 'Relative' and set the value to 50. Now the action will add 50 to the particle speed each time it is triggered.
Play this and it will increase the speed - just once, after 15 frames. To make it happen every 15 frames, we need to do two things. First, in the emitter's Question tab, change the icon of the question from the default yellow tick to a blue clock. This will ensure that the question is checked every frame, regardless of whether the question passes or fails. If you don't do that, the question will only ever be tested once, which is not what we want.
Finally, add another action to the question and be sure it comes after the change speed action. This new action should be a Change Custom Data action; again, enter the data name 'counter' and set the value to 15. If this isn't done, the custom data modifier will continue to decrement the data, making it less than zero, so the question will never pass again.
Play the animation now and the particle speed will increase by 50 units every 15 frames.
How it works
The data item is initially set to 15. Each frame the custom data modifier decrements it by 1 and the value is tested by the question. When it reaches zero, the change speed action is triggered and the custom data item is reset to 15. The modifier will continue to decrement it each frame until the value reaches zero again and the cycle is repeated.
This is a very simple example of using custom data to set up a frame counter in X-Particles.
2. Collision testing with Xpresso
The Question node in X-Particles cannot test for the recent collision of a particle with an object because the internal flag that is set in the emitter is cleared after the emitter has carried any required processing. We can still do this though, using custom data.
The custom data
Add a new custom data item to the emitter. Set its name to 'collided' and the type to integer, with a value of zero.
Add a collider object
Add an object to the scene that the particles will collide with, and add an X-Particles collider tag to that.
Add a Question object to the emitter
Add a Question object and be sure to change its icon in the emitter to a blue clock icon, or it will only be tested once for each particle.
In the Question object, set the type to 'Particle Flags' and the question itself to 'Particle Collided (Object)'. Add an action to the question and choose a 'Change Custom Data' action from the 'Direct Actions' group.
In the action, change the data item name to 'collided', the operation to 'Set Value' and the 'Value' to 1.
Add an Xpresso tag to the emitter
In the Xpresso window, set up a node tree to look like this:
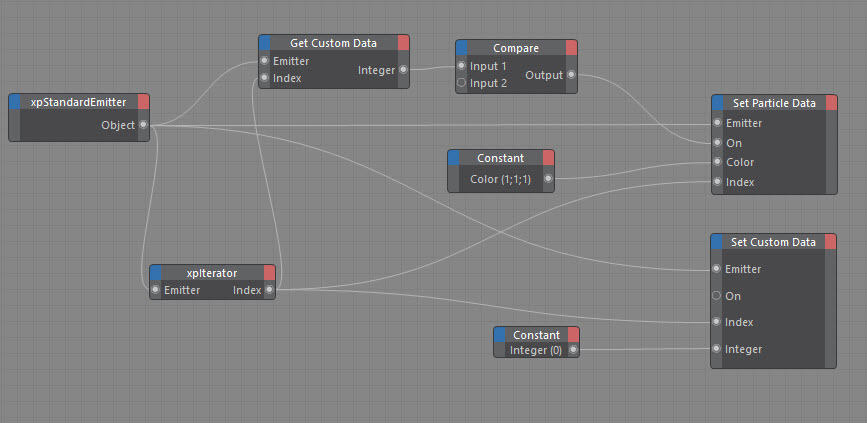
How it works
For each particle, the Question object tests if a collision has occurred. If it has, the custom data item named 'collided' is set to 1 using the Action. In the Xpresso nodes, the same custom data item is retrieved and its value tested in the Compare node to see if it equals 1. If it does, the Set Particle Data node is used to change the colour (to white, in this case).
The only other thing to do is to reset the custom data item to zero so whatever process is carried out on the particle does not repeat each frame. The constant node does this, as it doesn't matter whether the value was 0 or 1 - it just has to be zero at the end of the Xpresso tree.
3. Adding a boolean test question
One of the standard questions in the Question object is a Boolean Input question. However, this is limited in that it is not intended as a particle-specific question but one which tests some other parameter in Cinema 4D. The problem is that if you test a particle variable, such as speed, and the last particle tested passes that test, the question's action(s) will be applied to all particles, not just the one which passed the question.
Using custom data you can easily add a particles-specific boolean test. To do this:
- Add a custom data item and give it a name such as 'bool'.
- Make it an integer type and set its initial value to zero.
- In an Xpresso node, set up a node tree like this:

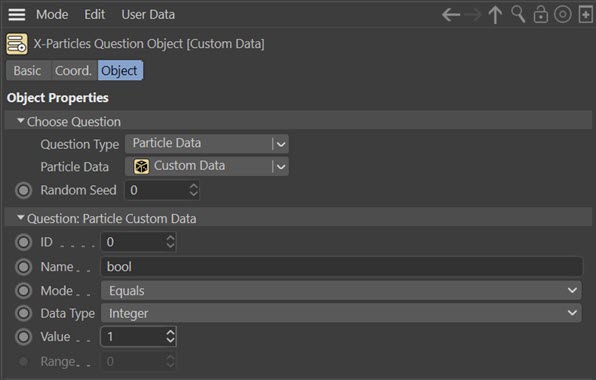
- Add a Custom Data question and set it like this:
How it works
For each particle, the speed is obtained by the Get Particle Data node, and compared to whatever value is set in the Compare node. The output, either 1 (true) or 0 (false) is piped into the Set Custom Data node, which then sets that value into the particle.
In the Custom Data question, the value of the custom data item in the particle is tested and compared to the 'Value' parameter (which is set to 1), and if that question passes, any actions are executed - but only for that particle.
Clearly there are simpler ways to test particle speed, but you can use custom data to set up any kind of particle-specific boolean value.